
Installation Guide

One Piece ADA/Barrier Free Showers
36” ADA Gelcoat & Solid Surface Transfer Showers
60” ADA Gelcoat & Solid Surface Roll-In Showers
Installation Instructions
8. Never clean the shower nished surface with metal tools of
any kind, including razors.
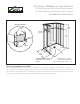
**Very Important for Showers with Thresholds 2 Inches or Less:
(See Figure 1)
Shower stalls with thresholds of 2 inches or less must to be
stored and installed with care. During storage this unit should
sit as it is received. It should be store with a 2” x 4” block
of some other type of material at each of the (4) points
numbered above in the top view. These units do not have
wooden bottoms to reinforce the oors as conventional
showers have. By placing the unit on some type of blocking,
the drain will not touch the oor. This will allow the draft of
the oor to be maintained without the weight of the shower
unit pushing the drain upward. The blocks should only be
placed at the outside corner edges of the unit and should
never be placed under the middle of the threshold. This
procedure should only be used during storage and not during
installation.
SHOWER THRESHOLD STYLES
ADA style showers have very specic code requirements.
Showers with an inside Dimension of 36” are referred to
as “Transfer Showers”. Wheelchairs may roll up to these
showers, and the occupant may “transfer” onto the seat of the
shower. Since these showers are not large enough to roll a
wheelchair into, the threshold height requirement is permitted
to be 1/2 inch 90 degree vertical. Typically, these showers are
STORAGE AND HANDLING
1. Most handling damage is the result of impact blows to the back side of the shower units.
2. Stress cracks can develop when shipping boards are removed before unit is positioned for final
installation in bathroom.
3. Placing objects inside of tub can cause scratches, abrasions or nicks to the finished surface.
4. Storing units outside right-side up can cause the sunlight to discolor the finish. Also, unit becomes
unstable and is easily knocked over by wind or bumping.
5. The backside of the shower unit is not water proof. Unit must be stored so that water will drain off of
and not accumulate in any one spot. Water can permeate the back laminates and soak the glassed
in wood supports causing bulges in the finished surface.
6. Never drag these units on any surface. Always transport the unit by hand using (2) people or a
two-wheel dolly.
7. Never let these units drop from any height, not even an inch.
8. Never clean the shower finished surface with metal tools of any kind, including razors.
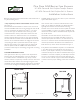
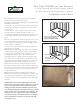
FRONT VIEW
TOP VIEW
2
1
4
3
* * VERY IMPORTANT FOR SHOWERS WITH THRESHOLDS 2 INCHES OR LESS:
Proper Block
Placement
Shower stalls with thresholds of 2 inches or less must to be stored and installed with care. During storage this unit
should sit as it is received. It should be store with a 2” x 4” block of some other type of material at each of the (4)
points numbered above in the top view. These units do not have wooden bottoms to reinforce the floors as conventional
showers have. By placing the unit on some type of blocking, the drain will not touch the floor. This will allow the draft
of the floor to be maintained without the weight of the shower unit pushing the drain upward. The blocks should only
be placed at the outside corner edges of the unit and should never be placed under the middle of the threshold.
This procedure should only be used during storage and not during installation.
1
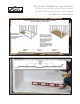
These shower units install differently from typical residential showers. Installation may need to conform to
requirements of the Americans With Disabillities Act (ADA) and other local codes. These requirements relate
to the height of the threshold in relation to the finished floor. Certain showers will install directly on the sub floor
and others will require a recess or pit. These showers require special preparation of the installation site, and
very specific installation procedures to assure the shower drains properly and meets code requirements.
NOTE: INSTALLATION OF THESE SHOWER UNITS MAY BE SUBJECT TO CODE APPROVAL
Refer to job prints and/or consult with architect to see if your installation must comply with ADA.
FIGURE 1
FOR Factory Help! If you have never performed an installation of a Praxis brand barrier free shower with
low profile threshold, we encourage you to request phone support or jobsite training by our local representative.
To do so please contact Jerry Hanna via email jhanna@praxiscompanies.com or call: 724-658-6686 ext 29.
ONE PIECE ADA/BARRIER FREE SHOWERS
36” ADA GELCOAT TRANSFER SHOWERS
60” ADA GELCOAT ROLL-IN SHOWERS
Figure 1
installed directly on the sub oor with no pit or recess. This
style is illustrated in Figure 2.
ADA showers with a minimum inside Dimension of 60”
wide x 30” in depth, are referred to as “Roll-In Showers”.
Typically, these showers have thresholds measuring
between 3/4” and 2.0” tall. As the name implies, the shower
must be installed so a person occupying a wheelchair may
roll into the shower without restriction. Code requires the
top of the shower
threshold to be even with the oor of the room at
the shower entry. To accomplish this, either construct a
recessed pit to place the shower in, or raise the oor of
the room to meet the shower threshold. The depth of the
recessed pit should be calculated so the nished oor is
level with the top of the shower threshold. See Figure 3.
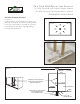
Every Barrier Free installation requires a 10 inch diameter
x 1/2” deep recess around the drain core. (See Figure 4
& Picture 1) This depth is necessary to assure the factory
manufactured slope to the drain is maintained. Even if your
installation is not ADA compliant, you will always need the
10 inch x 1/2 inch deep recess around the drain. Thin set
mortar must be used for support under all the installations.
In order to ensure proper draining of the unit, it is advised
to: