
Installation Guide


One Piece ADA/Barrier Free Showers
36” ADA Gelcoat & Solid Surface Transfer Showers
60” ADA Gelcoat & Solid Surface Roll-In Showers
Installation Instructions
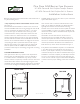
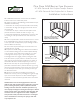
SHOWER FRAMING DIAGRAM
See Figure 12
Laurel Mountain is not responsible for the selection of
placement of ttings that must adhere to ADA guidelines
or any local codes. Installer is responsible for contacting
local authorities for information regarding building or
plumbing code requirements.
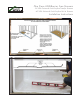
Slab
10” x 1/2”
Deep Recess.
Fill void using multi purpose
thin set applied with a
1/2” notched trowel.
Drain
10”
Temporary wood bracing for
shower floor and threshold.
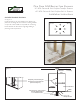
Ceiling
xxxxxxxxxxxxxxxxxxxxxxxxxxxxxxxxxxxxxxxxxxxxxxxx
Bead of Adhesive
(Refer to Step 15)
Wood
Pad
Figure 10
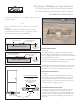
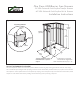
Slab
10” x 1/2”
Deep Recess.
Fill void using multi purpose
thin set applied with a
1/2” notched trowel.
Drain
10”
Temporary wood bracing for
shower floor and threshold.
Ceiling
xxxxxxxxxxxxxxxxxxxxxxxxxxxxxxxxxxxxxxxxxxxxxxxx
Bead of Adhesive
(Refer to Step 15)
Wood
Pad
Figure 11
Picture 5