
Installation Guide


One Piece ADA/Barrier Free Showers
36” ADA Gelcoat & Solid Surface Transfer Showers
60” ADA Gelcoat & Solid Surface Roll-In Showers
Installation Instructions
14. CAREFULLY, tilt shower unit back into the installed
location. Make sure it is level and plumb.
15. STOP and perform the following Checks Vital To Proper
Installation And Warranty:
• Check Floor for voids (if voids found, add more Thin Set)
• Check Floor for high spots (if high spots found, remove
some Thin Set)
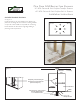
• Check Floor for slope or fall to the drain (Place small
plumbers level from all sides of drain. See Figure 10)
• Check Unit threshold has remained at to sub-oor with
no bowing or voids (if bowed remove obstruction and
reset).
16. Use a torpedo level to check the shower oor to assure
it has maintained factory slope to the drain, with no high
or low spots that would prevent proper drainage. Correct
these conditions if necessary.
17. Secure the unit permanently to the studs. Screws are
required. Do not use nails.
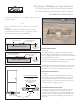
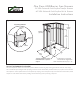
18. Prepare and install ceiling brace. Measure and install 2 x
4 brace between ceiling and a wood block placed directly
over the center of the drain, being careful not to scratch
or damage the unit (See Figure 11). Carefully hammer
and wedge brace into upright position pushing the drain
area down into its proper position to achieve the correct
slope ensuring proper drainage. Install brace on center of
threshold in the same manner, if required. (See Picture 5)
19. Test the oor slope for proper drainage around the
perimeter of the drain with a plumbers level or by pouring
water around the perimeter of the shower oor. If the oor
is rm with slope to the drain, your warranty is intact, you
can leave the shower.
20. Remove braces after the bedding compound and
adhesive has cured, (72 hours) checking oor again for high
spots to ensure the slope has not been violated. Tighten
connection to drain and waste pipe after braces have been
removed.
NOTE: All shower units are thoroughly tested to ensure the
ability to drain water. Several tests are performed on each unit
prior to it leaving the factory. Failure to follow the attached
handling instructions and above installation procedures may
cause improper drainage thus voiding the warranty. It is advised
that all curb-less shower units should be tted with water dam
accessories such as a weighted curtain and/or collapsible or
semi-permanent dam if the bath environment is not designed
with an outside drain to catch any over spray of water that
may escape the unit.
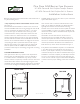
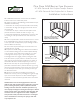
3/4” to 1” Bead of 3M 560
polyurethane adhesive.
Apply at threshold location.
Do Not stand up shower
with drain fitting
installed or shower
floor will warp.
(Tilt shower against wall)
Adhesive
Trowel “Thin-Set”
one shovel full
at a time.
Figure 8
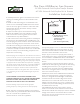
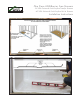
3/4” to 1” Bead of 3M 560
polyurethane adhesive.
A
pply at threshold location.
Do Not stand up shower
with drain fitting
installed or shower
floor will warp.
(Tilt shower against wall)
Adhesive
Trowel “Thin-Set”
one shovel full
at a time.
Figure 9
Picture 2