
Installation Guide


Multi-Piece Sectional Product
Installation Instructions
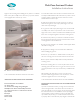
critical factory slope be maintained so the shower drains
well. To accomplish this, temporary bracing must be put in
place to assure the oor remains in the proper position as
the adhesive cures.
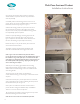
Before installing the bracing, place a padded piece of wood
on the top center of the threshold and directly on top of the
drain. Pad the wood with soft cloth or cardboard to prevent
damage to the nish.
Install temporary 2 x 4 stud bracing so they sit on top of
these wood pieces. Attach these studs to the room framing
above the shower, or pad to the ceiling. See Figure 26
26. Remove the temporary bracing after 72 hours. Place a
piece of cardboard in the shower to protect the nish.
Caulk all seams with white acrylic bathtub caulk.
SEAM CAULKING INSTRUCTIONS
Materials and tools required:
• acrylic latex caulk
• wiping cloths/rags
• clean water
• caulking gun
• cup
1. Cut off tip of caulk tube diagonally with opening
no larger than 1/8”. Figure 27
2. Run a continuous bead of caulk at the seam between
the two parts. Figure 28
3. Smooth caulk gently with a wet ngertip. Figure 29
4. Using a clean rag, wipe off excess water and caulk.
Figure 30
INSTALLATION INSTRUCTIONS FOR SHOWER SEATS
WITH SWING DOWN LEGS
(This style seat has four (4) adjustable height legs)
Your seat with swing down legs is fully assembled. Remove it from
the box and proceed as follows:
1. Choose the height of the seat you want. Barrier Free style
showers will typically have fold up seat installed at 17” to 19”
height.
2. After selecting the height you desire, adjust each of the four
legs to that height while maintaining the seat in a level position.
Lock each of the lock nuts.
3. Place the seat against the wall of the shower where you want
the seat to be located. Seat may be centered on the wall for a
Barrier Free installation.
4. With the seat placed against the mounting wall, position the
two hinges to the wall. Using a pencil, mark the three holes (3)
holes in the ange onto the wall for each hinge. Remove seat
from wall.
5. Using a power drill with a 0.120” diameter drill through the
wall the three (3) mounting holes for each ange.
6. Apply silicone caulking around and inside each drilled hole
before installing the seat.
7. Place the seat against the mounting wall with each hinge
9
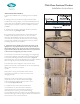
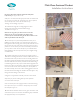
No recess necessary
installation.
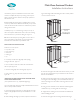
Shower framing alcove
with recess or pit built
into sub-floor.
10” area around drain
recessed1/2 inch
(Minimum)
10” area around drain
recessed1/2 inch
(Minimum)
FIGURE 5
FIGURE 6