
Installation Guide


Multi-Piece Sectional Product
Installation Instructions
15. Clean the sub-oor thoroughly, wiping away all loose
debris. Wipe up any moisture. Never use adhesive on a dirty
or damp surface.
16. To secure the shower pan to the oor area where the
shower pan will rest, 3/8” thick and 3” apart.
In this step, apply the silicone to the at oor area and ll
the boxed area around the drain pipe with the 100% silicone.
17. After the silicone is in place, rotate the pan back into
place for installation.
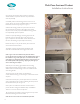
(Hint) In order to reach the pan without stepping on the silicone,
place a short piece of wood over the drain area. Use this to step
on to remove the 2 x 4 that is holding the pan against the back
framing. See Figure 15
Rotate the pan back to the horizontal position. As you lower
the pan to the sub oor, align the drain pipe with the drain
tting, and with the pencil mark at the front of the threshold.
When the pan is seated into the adhesive, place the
cardboard on the shower oor for protection.
Attach the pan to the studs by installing the at top/pan
head screws through the holes drilled into the ange.
Snug the screws up tight so the screw heads will be clear
of the side wall panels for assembly. Use care not to
overtighten to the point that causes ange breakage.
18. Before installing the walls, conrm the ledges
where the walls sit are level. Check with a long
level as shown in Figure 16. If there is an out of level
condition, remove screws and adjust as required.
19. Before the silicone cures, conrm the oor slope to the
drain has been maintained. To do this, use a 2 foot level at
various points around the drain to the adjacent wall to check
for draft. Make sure there is a downward slope to the drain
in all directions around the drain. Visually inspect the oor
to be sure there are no humps or dips that could cause
improper drainage.
See Figure 17A and 17B.
20. The next step will be to place the wall panels on the pan.
The back wall will be installed rst. If the water control valve
is in the back wall, carefully measure and mark the location
on the surface of the wall panel. If installing in a shower
Non shrink thin-set mortar can be purchased at Lowes or
The Home Depot. Please follow the mixing directions on the
bag.
In this step, apply the adhesive to the flat floor area and fill
the boxed area around the drain pipe with the Thin-Set
mortar.
After the adhesive is troweled over the sub floor, use a
spatula to wipe the adhesive over the entire area where the
pan will sit.
The exception will be the drain box area. This area will be
filled with thin-set non shrink mortar. Do not fill this area
above the floor line and do not spill any of this thin-set
material onto the contact adhesive.
(See Figure 13B.)
7
14.
A solid wood floor adhesive will be used to “glue” the
bottom side of the shower pan to the sub floor.
The following steps will detail the appropriate steps to
accomplish this.
NOTE: Models 4836 SH and 6030 SH are not glued as described
above. The models must have the bottom supported by shims
placed under the leveling legs at the underside of the pan.
This step is described on Page 5 Step 8.
15.
Clean the sub-floor thoroughly, wiping away all lose debris.
Wipe up any moisture. Never use adhesive on a dirty or
If installing these models, the following instructions refering to
adhesive do not apply.
16.
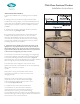
Now secure the pan in the upright position to the back framing.
Use a piece of scrap 2 x 4 lumber to temporarily secure
it. See
the example in Figure 12.
Figure 12
To secure the shower pan to the floor a solid wood
floor adhesive must be applied to the entire sub floor
area where the shower pan will rest.
Using a 1/2” notched trowel, apply adhesive evenly over the
pan contact area. Bring the adhesive up to the threshold
pencil mark and also make sure the adhesive will be in
contact with the back side of the pan. The long edge of the
trowel may be needed to get the adhesive to the far back of
the contact area where the pan is resting against the framing
studs in a vertical position.
(Pan not shown in Figures 13 A and B).
Figure 13A
Figure 13B
6
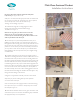
STORAGE AND HANDLING
1. Most handling damage is the result of impact blows to the back side of the shower units.
2. Stress cracks can develop when shipping boards are removed before unit is positioned for final
installation in bathroom.
3. Placing objects inside of tub can cause scratches, abrasions or nicks to the finished surface.
4. Storing units outside right-side up can cause the sunlight to discolor the finish. Also, unit becomes
unstable and is easily knocked over by wind or bumping.
5. The backside of the shower unit is not water proof. Unit must be stored so that water will drain off of
and not accumulate in any one spot. Water can permeate the back laminates and soak the glassed
in wood supports causing bulges in the finished surface.
6. Never drag these units on any surface. Always transport the unit by hand using (2) people or a
two-wheel dolly.
7. Never let these units drop from any height, not even an inch.
8. Never clean the shower finished surface with metal tools of any kind, including razors.
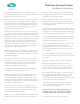
FRONT VIEW
TOP VIEW
2
1
4
3
* * VERY IMPORTANT FOR SHOWERS WITH THRESHOLDS 2 INCHES OR LESS:
Proper Block
Placement
Shower stalls with thresholds of 2 inches or less must to be stored and installed with care. During storage this unit
should sit as it is received. It should be store with a 2” x 4” block of some other type of material at each of the (4)
points numbered above in the top view. These units do not have wooden bottoms to reinforce the floors as conventional
showers have. By placing the unit on some type of blocking, the drain will not touch the floor. This will allow the draft
of the floor to be maintained without the weight of the shower unit pushing the drain upward. The blocks should only
be placed at the outside corner edges of the unit and should never be placed under the middle of the threshold.
This procedure should only be used during storage and not during installation.
1
These shower units install differently from typical residential showers. Installation may need to conform to
requirements of the Americans With Disabillities Act (ADA) and other local codes. These requirements relate
to the height of the threshold in relation to the finished floor. Certain showers will install directly on the sub floor
and others will require a recess or pit. These showers require special preparation of the installation site, and
very specific installation procedures to assure the shower drains properly and meets code requirements.
NOTE: INSTALLATION OF THESE SHOWER UNITS MAY BE SUBJECT TO CODE APPROVAL
Refer to job prints and/or consult with architect to see if your installation must comply with ADA.
FIGURE 1
FOR Factory Help! If you have never performed an installation of a Praxis brand barrier free shower with
low profile threshold, we encourage you to request phone support or jobsite training by our local representative.
To do so please contact Jerry Hanna via email jhanna@praxiscompanies.com or call: 724-658-6686 ext 29.
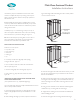
ONE PIECE ADA/BARRIER FREE SHOWERS
36” ADA GELCOAT TRANSFER SHOWERS
60” ADA GELCOAT ROLL-IN SHOWERS
A
pply 4-100% silicone
caulking pads 3/4” high
by 3” wide halfway
between outer wall and
drain.
Apply 100% silicone
caulking bead 1/2”
wide by 1/2” high
around drain
box out.
Apply a continuous
bead of 100% silicone
caulking 1/2” wide x 3/8”
high x full length behind
the black line marked at
the threshold where the
shower will rest once
the unit is installed.
A, B, C, and D locations.
C
B
A
D
FIGURE 4