
Installation & Assembly

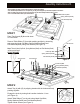

STEP 5
Assembly Instructions 3/3
C
Disengage the locks by turning their handles counter-clockwise ¼
turn (see Figure 3).
Pull out both sides of the table, then place Leaf (C) in the unit as shown,
aligning the dowels with the holes.
Push the table together firmly, then engage the locks by turning their handles clockwise ¼ turn
(see Figure 2).
Adding the Leaf
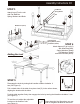
(Figure )4
STEP 4
Attach Aprons (D) to Leaf (C)
with Head Cap Bolts,
Spring Washers (Small)
Flat Washers (Small)
and Wood Screws (short).
C
D
D
Head Cap Bolt
Spring Washer (Small)
Flat Washer (Small)
Attach Legs (E) to the unit
with Flat Washers,
Spring Washers and Bolts.
STEP 3
E
E
E
E
Flat Washer
Spring Washer
Bolt
Wood Screw (short)
Please keep the Key Wrench as you may
need to re-tighten the Bolts in the future
To level the unit, adjust the adjustable
levelers on the bottom of unit.
4(see Figure )
(Figure 3)