
User guide

-31-
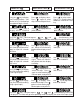
Press the
key to display
InPut (Input type selection).
Note: Selection of input type
& range must match jumper
selection in Section 16. 1.
Press until AC U
(ac Volts) is displayed or
Press
to select 0.2V,
2.0V, 20.0V, 200.0V or
660.0V or
AC A (ac Amperes) is dis-
played.
2.0a, 20.0a, 200.0a (milli-
amps) or 5.0A (Amps)
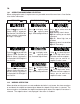
Press
to select value for
flashing digit.
Digit 1:
"0"= 20,000 cts. full scale
"2"=Same as "0" but LSD is
fixed zero.
"3"=2,000 cts. full scale
Digit 4:
Set to "0" for scale and offset
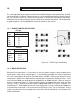
1 2 3 4 5
DIGIT SELECT KEY VALUE SELECT KEY
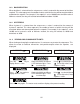
Press the
key to display
SEtuP. (Basic setup). See
Section 9, Page 10 for de-
tailed description of selec-
tions for digits 1 through 5.
Press the
key to display
SCALE (Scale factor).
Press to display value
and select left digit. Press
again to select another digit.
Press the
key to display
dEcPt (Decimal point).
Press to display decimal
point location.
Press
to select decimal
point location.
Use
to set digit values.
Set value and decimal to 1.0
or appropriate multiplier for
external shunts or CT's.
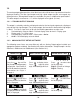
Press the
key to display
OFFSt (Zero offset).
Press to display value
and select left digit. Press
again to select another digit.
Use
to set digit values.
Set value to 00.000. Deci-
mal point is fixed by Dec.Pt.
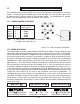
MENU KEY
Press to display status
and select left digit. Press
again to select another
digit. Selected digit will flash.
Press the
key. Continue to press
(or
and
simultaneously) until rESEt
is displayed. The meter will now go to the operating mode and display the value of the input
signal.