
Installation Guide


29
POWER UNIT INSTALLATION
1) Remove the power unit from the shipping box.
2) Remove the red plastic plug on the oil tank.
3) Remove the black breather cap on the lower section of the oil tank.
4) Install the black breather cap into the fill hole at the top of the tank.
5) Install the red plastic plug into the hole at the bottom of the tank.
6) After removing the plastic plug on the side of the power unit valve body
install the 90 degree hydraulic fitting using high pressure sealant compound.
DO NOT USE TEFLON TAPE.
7) Use the provided bolts and washers to secure the power unit to the power
unit mounting bracket.
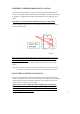
8) Use 5/16x18 bolts and washers (see fig. 8) to secure the power unit.
Figure 8
After the securing the power unit to the column, remove the black breather cap and
fill the reservoir with approx. 4.5 gallons (18 liters) of ISO-32 hydraulic oil (10
weight hydraulic oil) DO NOT USE TRANSMISSION FLUID or reclaimed hydraulic
oil. Use of transmission fluid or reclaimed hydraulic oil will void the manufacturer’s
warranty.
Note:
Use caution to avoid dust and other pollutants mixing with the hydraulic oil
while filling the power unit by using a clean funnel and clean paper strainer.
After the power unit has been mounted, install and connect the one remaining short
hydraulic hose to the 90 degree elbow and connect to the “T” fitting.
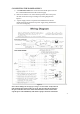
For lifts that have an SPX brand power unit, review the wiring diagram that is
attached to the inside cover of the push button junction box.
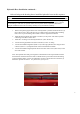
Push Start Button
Lowering Lever