
User's Manual
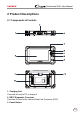
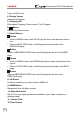
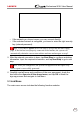
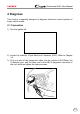
Table Of Contents
- 1 Overview
- 1.1 Vehicle Coverage
- 2 Product Descriptions
- 3 Initial Use
- 4 Diagnose
- 5 Reset
- 5.1 Oil Reset Service
- 5.2 Electronic Parking Brake Reset
- 5.3 Steering Angle Calibration
- 5.4 ABS Bleeding
- 5.5 Gear Learning
- 5.6 IMMO Service
- 5.7 Injector Coding
- 5.8 Battery Maintenance System Reset
- 5.9 Diesel Particulate Filter (DPF) Regeneration
- 5.10 Electronic Throttle Position Reset
- 5.11 Gearbox Matching
- 5.12 AFS (Adaptive Front-lighting System) Reset
- 5.13 Sunroof Initialization
- 5.14 Suspension Calibration
- 5.15 EGR Adaption
- 5.16 Seats Calibration
- 5.17 Tyre Reset
- 5.18 Coolant Bleed
- 5.19 AdBlue Reset (Diesel Engine Exhaust Gas Filter)
- 5.20 NOx Sensor Reset
- 5.21 AC System Initialization
- 5.22 High Voltage Battery Detection
- 5.23 Windows Calibration
- 5.24 Language Change
- 5.25 A/F Reset
- 5.26 Transport Mode
- 5.27 Stop/Start Reset
- 5.28 Intelligent Cruise Control System Reset
- 5.29 Engine Power Balance Monitoring
- 5.30 Gas Particulate Filter (GPF) Regeneration
- 5.31 Motor Angle Calibration
- 6 Data
- 7 Upgrade
- 8 Add-on Modules
- Warranty

18
LAUNCH Professional 919X User Manual
3 Initial Use
3.1 Charging & Turning On/O
3.1.1 Charging
There are two charging methods available:
Via Charging Cable & Power Adaptor: Plug one end of the included charging
cable into the DC-IN port of the tool, and the other end to the external DC
power.
Via Diagnostic Cable: Insert one end of the diagnostic cable into the DB-15
connector of the tool, and the other end to the vehicle’s DLC.
Once the charging LED illuminates solid green, it indicates that the battery is
fully charged.
Note: Attempting to charge the tool via OBD diagnostic port will consume
vehicle’s battery power. You are not recommended to charge the tool in this way
except for OBD diagnosis operations.
3.1.2 Turning On/O
Press for about 3 seconds to turn it on.
Press
for about 8 seconds to turn it o.
3.2 Getting Started
If it is the rst time you have used this tool, you need to make some system
settings.
1. Power on the tool. The screen displays a welcome page. Tap Welcome to
use to go to next step.
2. Choose the desired system language, and tap Next step.
3. Choose the desired time zone, and tap Next step to enter the WLAN setup
screen.
4. Slide the switch to ON, the system starts searching for all available wireless
LANs. Choose the desired WLAN access point / network,