
User's Manual

LAUNCH X-431Tool User’s Manual
8
8
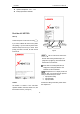
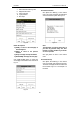
a b c d
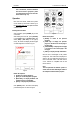
Fig 2-6
Method I:
1. Turn off the power of main unit.
2. Open the housing of main unit and get out main unit.
3. Open the paper lid on the back of the printer. See Fig 2-6a.
4. Take out the spindle and mount the paper scroll onto the spindle. Put the paper spindle into the
printer with correct direction. The paper may not be fed if the direction is wrong. See Fig 2-6b.
5. Lead the paper into slot. See Fig 2-56c. The paper will automatically lead out from the slot.
6. Adjust the paper and attach the paper lid. See Fig 2-6d.
7. Put main unit into housing.
Method II:
1. Open the housing of main unit and get out main unit.
2. Open the paper lid on the back of the printer. See Fig 2-6a.
3. Take out the spindle and mount the paper scroll onto the spindle. Put the paper spindle into the
printer with correct direction. The paper may not be fed if the direction is wrong. See Fig 2-6b.
4. Open the side plate, pull up the pressing rod and lead the paper into slot. See Fig 2-6c.Turn the
feed knob clockwise until the paper comes out of the outlet. See Fig 2-6d.
5. Adjust the paper and attach the paper lid.
6. Put main unit into housing.
Note: the printer paper is thermal paper which should avoid being heated. If being heated, the
paper will lose the efficiency or the printing result will lose.
Specifications
z Operating system: LINUX
z CPU: 32-bit MPU
z CF card: 512M
z Main unit I/O: standard serial
z Main unit power source: DC12V
z Main unit power: about 9W
z Printer: high-speed thermal mini printer
z Screen: 240*320 color LCD with touch-screen
z ConFiguration: Main unit, DIAGBOX, miniprinter.
z Com. Distance: the maximal distance between DIAGBOX and main unit is 25 meters by
bluetooth.
z DIAGBOX power source: DC 12V
z DIAGBOX power: about 3W