
User's Manual
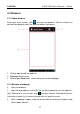
Table Of Contents
- Copyright Information
- Trademark Information
- Precautions on Using X-431 PRO
- Precautions on Operating Vehicle’s ECU
- 1 Introductions
- 1.1 Product Profile
- 1.2 Features
- 1.3 Knowledge of X-431 PRO
- 1.4 Technical Parameters
- 1.5 Package List
- 2 Preparations
- 3 How to diagnose
- 4 Others
- 4.1 Email
- 4.3 Browser
- 4.4 Using Bluetooth
- 4.5 Camera
- 4.6 Gallery
- 4.7 Music
- 4.8 Calendar
- 4.9 Alarms
- 4.10 File Manager
- 4.11 Display
- 4.12 Set screen lock
- 4.13 Applications
- 4.14 Language & input
- 4.15 Set date & time
- 4.16 View and release the memory of SD card and X-431 PRO
- 4.17 Restore X-431 PRO to factory settings
- 4.18 Downloads
- 4.19 Install / Uninstall APPS
- RCU-G user's manual_for certification_.pdf.part.pdf

LAU NCH
X-431 PRO User’s Manual — Others
4 Others
4.1 Email
The function allows you to send and receive email. You can add POP3 or IMAP
email account for some common web email service provider.
4.1.1 Add an email account
Note: Before sending or receiving email, you have to set up an email account. In
addition, this function required a stable network connection.
1. On the desktop, click to enter main menu screen, and then click .
2. Input email address and password, click “Next” or “Manual setup”.
Note: If “Manual setup” is selected, please consult your email service provider
for detailed parameter setting.
3. Click the desired account type (here take POP as example) to enter the
incoming settings screen, click “Next”.
4. Configure some sending settings, and click “Next” to enter frequency settings.
5. After setting, click “Next” and the system will prompt account setup has been
finished.
6. Click “Next” to enter email main menu.
4.1.2 Delete an email account
1. Enter main menu screen, and click to enter account screen.
2. Click the desired account, and then click
to choose “Settings”.
3. Click the account to be deleted to enter, and then scroll the screen
until ”Remove account” appears, click it to delete.
4.1.3 Send a email
1. Enter main menu screen, and click to enter account screen.
2. Click the desired email account.
3. Click
to enter new mail writing interface.
4. Input the receiver address in To field.
5. Input a title in Subject column.
18