V1M DiagunIV
LAUNCH English User Manual Copyright Information Copyright © 2017 by Launch Tech Co., Ltd. All rights reserved. No part of this publication may be reproduced, stored in a retrieval system, or transmitted in any form or by any means, electronic, mechanical, photocopying, recording or otherwise, without the prior written permission of LAUNCH. The information contained herein is designed only for the use of this unit.
LAUNCH English User Manual Important Safety Precautions Important: To avoid personal injury, property damage, or accidental damage to the product, read all of the information in this section before using the product. y Never collide, throw, or puncture V1M, and avoid falling, extruding and bending it. y Do not insert foreign objects into or place heavy objects on your device. Sensitive components inside might cause damage.
LAUNCH English User Manual y If the VCI connector remains unused for a long period of time, it is suggested to unplug the connector from vehicle’s DLC to conserve battery power. y Wear an ANSI-approved eye shield when testing or repairing vehicles. y The vehicle shall be tested in a well ventilated work area, as engines produce various poisonous compounds (hydrocarbon, carbon monoxide, nitrogen oxides, etc.
LAUNCH English User Manual TABLE OF CONTENTS 1 INTRODUCTIONS .......................................................................................... 1 1.1 PRODUCT PROFILE ................................................................................. 1 1.2 FEATURES .............................................................................................. 1 1.3 KNOWLEDGE OF V 1M.......................................................... 1 1.3.
LAUNCH English User Manual 3.2 DISCONNECT FROM A WI-FI NETWORK ..................................................... 10 4 INITIAL USE & VEHICLE CONNECTION .................................................... 11 4.1 DIAGNOSIS FLOWCHART .......................................................................... 11 4.2 INITIAL USE .............................................................................................. 11 4.2.1 User registration ................................
LAUNCH English User Manual 9.7 SETTINGS ................................................................................................ 37 9.7.1 Units of Measurement .................................................................... 37 9.7.2 About............................................................................................... 37 9.7.3 Log out ............................................................................................ 37 10 OTHERS ...
LAUNCH English User Manual 1 Introductions 1.1 Product Profile V1M is an slim evolutionary vehicle diagnostic tool. Featuring a quad-core 1.1GHz processor, and a 5.5 inch capacitive screen, V1M delivers diagnostic functionality which helps to diagnose vehicle issues more efficiently. In addition, V1M supports Wi-Fi connection, one-click update, diagnostic feedback and all kinds of service functions (including oil lamp reset etc). 1.2 Features 1. Diagnostics: A. Diagnose 2. 3.
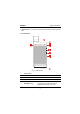
LAUNCH English User Manual y VCI Connector -- the Vehicle Communication Interface for accessing vehicle data 1.3.2 V1M handset Fig. 1-1 V1M handset 1 Front camera 2 Slot for VCI connector 3 Speakers 4 Ambient light sensor 5 VOLUME +/- Key For housing the VCI connector. To adjust the volume.
LAUNCH English User Manual snapshot pops up on the screen. The captured snapshot is saved in the “Screenshots” folder. 6 POWER/Screen lock key 7 LCD screen 8 USB/Charging port In Off mode, press it to turn V1M on; In On mode, turn V1M off with long press or lock screen with short press. To connect to the power adaptor for charging the V1M handset. 1.3.3 VCI connector (Only applies to 12V passenger cars) Fig.
LAUNCH English User Manual 2 Mini USB port For connecting the USB cable to the tablet to perform vehicle diagnosis. (Note: This port is disabled for V1M.) 3 Mode indicator y It illuminates red when the VCI connector is connected to the vehicle’s DLC. y Blue indicates the VCI connector is working in Bluetooth mode. 1.4 Technical Parameters V1M: Operating system Android 7.0 Processor Quad core 1.
LAUNCH English User Manual 1.5 Package List While opening V1M package for the first time, please carefully check the following components. Common accessories for each V1M are same, but for different destinations, the accessories of V1M may vary. Please consult from the local agency or check the package list supplied with V1M together.
LAUNCH English User Manual 2 Preparations 2.1 Charging V1M 1. Plug one end of the included power adaptor into the USB port of the V1M 2. Connect the other end to the AC outlet. appears on the screen, it indicates it is being charged. If the logo changes If into , it indicates that the battery is fully charged. Unplug the power adaptor from V1M. 2.
LAUNCH English User Manual Double-tap: To zoom in so that the text on a webpage appears in a column that fits your device’s screen. Long press: Tap and hold on the current interface or area until a contextual menu pops up on the screen, and then release it. Slide: To jump to different pages. Drag: Tap the application icon and drop it to other location. Spread apart/pinch together: To zoom in manually, place two fingers on the screen and then spread them apart.
LAUNCH English User Manual 2.6 Screen layout There are four on-screen buttons available on the bottom of the screen. BACK Tap to return to the previous screen. HOME Tap to navigate to the Android’s home screen. Recent Apps Tap to view the recently launched applications. Screenshot Tap to capture the current screen. 2.7 Notification panel The notification bar is used to display some activities, such as new message, to do list and running tasks.
LAUNCH English User Manual 2.8.5 Set standby time If no activities are made within the defined standby period, the screen will be locked automatically and the system enters sleep mode to save power. 1. On the home screen, tap Settings > Display > Sleep. 2. Choose the desired sleep time. 2.9 Set screen lock This function is designed to lock the screen and buttons to avoid accidental operations while V1M keeps unused. 1.
LAUNCH English User Manual 3 Wi-Fi Setting Note: If you don’t need to use Wi-Fi for a while, you can turn it off to conserve battery life. XV1M has built-in Wi-Fi that can be used to get online. Once you’re online, you can register your V1M, surf the Internet, get apps, send email, launch the remote diagnosis, and check for software updates etc. 3.1 Connect to a Wi-Fi network 1. On the home screen, tap Settings -> WLAN. 2.
LAUNCH English User Manual 4 Initial Use & Vehicle Connection 4.1 Diagnosis Flowchart For new users, please follow the operation chart shown in Fig. 4-1 to get familiar with and start using V1M Fig. 4-1 4.2 Initial Use During initial use, tap the V1M icon on the home screen to launch it and enter the main menu screen. By default, all software is pre-installed on the V1M and can be used to diagnose vehicles even if you do not experience the product registration.
LAUNCH English User Manual Fig. 4-2 1. If you are a new user, tap “New Registration”. See Fig. 4-3. Fig. 4-3 Note: To obtain better service, you need to provide real information. A. Create App account: In Fig.
LAUNCH English User Manual Fig. 4-4 B. Activate the VCI connector: In Fig. 4-4, input the Serial Number and Activation Code, which can be found in the password envelope. Product SN Product SN Activation code Fig. 4-5 Note: To exit and activate it later, tap “Skip”. In this case, you can activate your connector by tapping “Activate Connector” in “Personal Center”. For details, please refer to Chapter 9.3 Activate Connector. C.
LAUNCH English User Manual To download the diagnostic software, tap “Yes” to enter the software download page. Tap “No” to download it later. On the download page, tap “Update” to start downloading. It may take several minutes to finish it, please be patient to wait. To pause downloading, tap “Pause”. To resume it, tap “Continue”. Once download is complete, the system will install the software package automatically. 2.
LAUNCH English User Manual diagnostic tool. Special Function To perform some maintenance items, including electronic throttle position reset, ABS bleeding, oil lamp reset etc. Feedback Diagnosis This option allows you to feed back the diagnostic reports/software bugs to us for troubleshooting and analysis. Software Upgrade To update vehicle diagnostic software. If you keep signed in, a pop-up message will appear on the screen once a newer version is detected.
LAUNCH English User Manual Fig. 4-8 4.3.3 Vehicle connection The method used to connect the VCI connector to a vehicle’s DLC depends on the vehicle’s configuration as follows: y A vehicle equipped with an OBD II management system supplies both communication and 12V power through a standardized DLC.
LAUNCH English User Manual cable to vehicle’s battery, and the other end to the power jack of OBD I adaptor. 4.4 Bluetooth Setting Enter V1M Bluetooth setting screen (“Settings” -> “Bluetooth”), slide the Bluetooth switch to ON and V1M will start searching available Bluetooth device, tap the desired connector to pair. By default, the Bluetooth name is 98729*****00 (where ***** stands for 5 digits.).
LAUNCH English User Manual 5 Start Diagnostics Follow the steps mentioned below to start a new diagnostic session. Tap “Diagnostic”, and then tap a corresponding diagnostic software logo. Take Demo as an example to demonstrate how to diagnose a vehicle. 1). Tap the “DEMO”, a screen similar to the following appears: Fig. 5-1 2). Tap “Demo” to ignore Bluetooth connection and jump to the test item selection screen.
LAUNCH English User Manual Fig. 5-3 In Fig. 5-3, the tested system with fault code appears in red and the system with OK displays in black (normally). Tap the desired system to enter the test function selection page. For detailed operations on test function, please refer to Chapter 5.3. On-screen Buttons: Clear DTC: Tap to clear the existing diagnostic trouble codes. See Chapter 5.1.2. Fault Report: Tap to view the health report in details. See Chapter 5.1.1. 5.1.
LAUNCH English User Manual Fig. 5-4 In Fig. 5-4: The systems that have been found OK are shown in black under the Normal tab. The tested systems with faults are listed under the Fault tab and the number of DTC is displayed in red next to the system. Tap > to view the detailed DTC information of the current system.
LAUNCH English User Manual Fig. 5-5 On-screen Buttons: Search: Highlight a certain DTC item, and then tap it to launch the browser to search for more detailed information about the selected DTC online. Report: To save the current data in text format. All reports are saved under the tab “Report” in “My Report” from “Personal Center” menu. For details on report operations, please refer to Chapter 9.1 “My Report”. 5.1.
LAUNCH English User Manual 5.2 System Scan This option allows you to quickly scan which systems are installed on the vehicle. In Fig. 5-2, tap “System Scan”, the system start scanning the systems. Once the scanning is complete, the screen will display the result. See Fig. 5-6. Fig. 5-6 In Fig. 5-3, tap the desired system to advance to the test function selection page. For detailed operations on test function, please refer to Chapter 5.3. 5.
LAUNCH English User Manual Fig. 5-7 Swipe the screen from the bottom to view the vehicle system on the next page. Tap the desired system (take “ECM” for example) to jump to the test function page. Fig. 5-8 Note: Different vehicle has different diagnostic menus.
LAUNCH English User Manual 5.3.1 Version Information This function is used to read the version information of system mode, vehicle VIN, software and ECU. 5.3.2 Read Fault Code This function displays the detailed information of DTC records retrieved from the vehicle’s control system. In Fig. 5-8, tap “Read DTC”, the screen will display the diagnostic result. Fig.
LAUNCH English User Manual trouble code. Note: The trouble code will not disappear until the trouble was completely cleared. 5.3.4 Read Data Stream This option retrieves and displays live data and parameters from the vehicle’s ECU. In Fig. 5-8, tap “Read Data Stream”, the system will display data stream items. Fig. 5-10 On-screen Buttons: Select Page: Tap it to select all items of the current page. To select certain data stream item, just check the box before the item name.
LAUNCH English User Manual page. Fig. 5-11 Notes: 1. If the value of the data stream item is out of the range of the standard (reference) value, the whole line will display in red. If it complies with the reference value, it displays in black (normal mode). 2. The indicator 1/X shown on the bottom of the screen stands for the current page/total page number. Swipe the screen from the right/left to advance/return to the next/previous page.
LAUNCH English User Manual “Personal Center” menu. For details on playback operations, please refer to Chapter 9.1 “My Report”. before the recording progress bar. To stop reading the data stream, tap Saved data: Tap to access to “My Reports”. Report: Tap to save the current waveform as a diagnostic record. There are 3 types of display modes available for data viewing, allowing you to view various types of parameters in the most suitable way.
LAUNCH English User Manual comparison. In this case, different items are marked in different colors. See Fig. 5-13. Fig. 5-13 On-screen Buttons: Record: Tap to start recording diagnostic data for future playback and analysis. The saved file follows the naming rule: It begins with vehicle type, and then the record starting time and ends with .x431 (To differentiate between files, please configure the accurate system time).
LAUNCH English User Manual 6 Reset The Reset section is specially designed to provide you quick access to the vehicle systems for various scheduled service and maintenance performances. All resetting operations are driven by executive commands. Just by following the on-screen prompts to select appropriate execution options, input correct values or data, and perform necessary actions, the system will guide you through the complete performance.
LAUNCH English User Manual 1. If the brake pad wears the brake pad sense line, the brake pad sense line sends a signal sense line to the on-board computer to replace the brake pad. After replacing the brake pad, you must reset the brake pad. Otherwise, the car alarms. 2. Reset must be performed in the following cases: a) The brake pad and brake pad wear sensor are replaced. b) The brake pad indicator lamp is on.
LAUNCH English User Manual accurately, which can avoid an error message displaying on the instrument panel. ABS Bleeding This function allows you to perform various bi-directional tests to check the operating conditions of Anti-lock Braking System (ABS). 1. When the ABS contains air, the ABS bleeding function must be performed to bleed the brake system to restore ABS brake sensitivity. 2.
LAUNCH English User Manual 7 Diagnosis Feedback This item allows you to feedback your diagnostic problems to us for analysis and troubleshooting. Tap “Diagnostic Feedback”, a pop-up message will appear: Fig. 7-1 Tap “CONFIRM” to choose the vehicle diagnostic record page. A). Tap the desired vehicle to enter the diagnostic log selection page. Select the check box and tap “Submit”. A screen similar to the following will appear: Fig.
LAUNCH English User Manual Check the box before the failure type, fill in the detailed failure description in the blank text box and telephone or email address. After inputting, tap “Submit Result” to send it to us. B). Tap “History”, the diagnostic logs marked with different color indicate the process status of the diagnostic feedback. Black/Red/Blue means the diagnostic feedback is fixed/pending/in process respectively.
LAUNCH English User Manual 8 Software Update Once a newer diagnostic software version is detected, a prompt message will pop up on the screen. To keep synchronized with the latest version, tap “Update now” to enter the update center. Fig. 8-1 Tap “Update” to start downloading. Once downloading is finished, the software packages will be installed automatically. To delete the older version saved on the local storage, select the check box and then tap “Delete”.
LAUNCH English User Manual 9 Personal Center This function allows users to manage the VCI connector and diagnostic reports, and personal information. 9.1 My report This option is used to view the diagnostic report generated in process of vehicle diagnosis. Additionally, delete, share operations are also supported. Tap “My Report”, there are total 3 options available. If user records the running parameters while reading data stream, it will be saved as .
LAUNCH English User Manual Fig. 9-2 Input the Serial Number and Activation Code, and then tap “Activate” to activate it. Note: The Serial Number and Activation Code can be found from the password envelope. 9.4 Firmware Fix Use this item to upgrade and fix diagnostic firmware. During fixing, please do not cut power or switch to other interfaces. 9.5 Profile Use this item to view and configure personal information. 9.
LAUNCH English User Manual 9.7 Settings This function allows users to manage your personal information, configure system settings and feedback your vehicle issues or diagnostic reports to us for analysis. 9.7.1 Units of Measurement It is designed to set the measurement unit. Metric System and English System are available. 9.7.2 About The software version information and disclaimer are included. 9.7.3 Log out This option allows you to logout the system.
LAUNCH English User Manual 10 Others 10.1 Email The function allows you to send and receive emails. 10.1.1 Configure an email account Note: Before sending or receiving email, you have to set up an email account. In addition, this function requires a stable network connection. 1. On the home screen, tap Email. 2. Choose the desired email account type. 3. Input email address and password, tap “Next”.
LAUNCH 4 Close the current page. 5 Create a new tab. 6 Input a web address. 7 Add the current page as bookmark. 8 Open search bar. 9 Open bookmark list. 10 View more options. English User Manual 10.2.2 Download files Files, pictures, and applications can be downloaded from the website in browser. For example: Tap and hold a picture, then choose “Save image” from pop-up menu to download it. To download a link, tap and hold it, and then choose “Save link”.
LAUNCH English User Manual 3. Set the tool as “Connected as a media device”, and copy the APK file from the PC to the tool. 10.4 Clear Cache Doing so clears all browsing records and accounts and enables V1M to run smoothly and quickly. 1. Tap Settings -> Apps. 2. Tap and select “Sort by size” to arrange all applications in size order. 3. Tap certain application, then tap “Clear Cache” to release the space these cache files are occupied.
LAUNCH English User Manual 11 FAQ 1. How to save power? ¾ ¾ ¾ ¾ ¾ Please turn off the screen while V1M keeps idle. Set a shorter standby time. Decrease the brightness of the screen. If WLAN connection is not required, please turn it off. Disable GPS function if GPS service is not in use. 2. What should I do in case I forgot the screen lock? You can set screen lock as pattern or password.
LAUNCH English User Manual Warranty THIS WARRANTY IS EXPRESSLY LIMITED TO PERSONS WHO PURCHASE LAUNCH PRODUCTS FOR PURPOSES OF RESALE OR USE IN THE ORDINARY COURSE OF THE BUYER’S BUSINESS. LAUNCH electronic product is warranted against defects in materials and workmanship for one year from date of delivery to the user.
LAUNCH English User Manual Banxuegang, Bantian, Longgang, Shenzhen, Guangdong P.R.China, 518129 Launch website: http://www. cnlaunch.com http://www.x431.com http://www.dbscar.com Statement: LAUNCH reserves the rights to make any change to product designs and specifications without notice. The actual object may differ a little from the descriptions in the manual in physical appearance, color and configuration.
NOTE: This equipment has been tested and found to comply with the limits for a Class B digital device, pursuant to part 15 of the FCC Rules. These limits are designed to provide reasonable protection against harmful interference in a residential installation. This equipment generates uses and can radiate radio frequency energy and, if not installed and used in accordance with the instructions, may cause harmful interference to radio communications.