
User's Manual
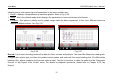

Table Of Contents
- _
- 1 Introduction
- 1.1 Product Profile
- 1.2 Features
- 1.3 Technical Specifications
- 2 Knowledge of CRP229
- 2.1 CRP229 Display Tablet
- 2.2 CRP229 Accessory Checklist
- 3 Preparations
- 3.1 Charging CRP229
- 3.2 On Using Your Battery
- 3.3 Power On/Off CRP229
- 3.3.1 Power on
- 3.3.2 Power off
- 3.4 Tips On Finger Operations
- 3.5 Lock & unlock the screen
- 3.5.1 Lock the screen
- 3.5.2 Unlock the screen
- 3.6 Screen Layout
- 3.7 Status Bar
- 3.8 Notification bar
- 3.9 Customize your desktop
- 3.9.1 Move items on the desktop
- 3.9.2 Delete items from the desktop
- 3.9.3 Change your wallpaper
- 3.9.4 Adjust brightness
- 3.9.5 Set standby time
- 3.9.6 Set screen lock
- 3.9.7 Adjust the volume
- 3.10 Input Method
- 3.10.1 Activate / hide on-screen keyboard
- 3.10.2 Edit text
- 3.10.3 Android input method
- 4 Wi-Fi Setting
- 4.1.1 Connect to a Wi-Fi network
- 4.1.2 Disconnect from a Wi-Fi network
- 5 How to diagnose
- 5.1 Connections
- 5.1.1 Preparation
- 5.1.2 DLC Location
- 5.1.3 Vehicle Connection
- 5.2 Diagnosis Flowchart
- 5.3 Product Registration
- 5.3.1 Product registration
- 5.3.2 Diagnostic software layout
- 5.3.3 Function menu
- 5.4 Update Diagnostic Software
- 5.5 Start Diagnosing
- 5.5.1 Read DTC
- 5.5.2 Clear Fault Memory
- 5.5.3 Read Data Stream
- 5.6 Reset
- 5.7 golo
- 5.7.1 Register a golo official account
- 5.7.2 Assign a diagnostic device to a official account
- 5.7.3 Pre-bind a golo user
- 5.7.4 Launch real-time remote diagnosis
- 5.8 Update
- 5.9 Profile
- 5.9.1 Firmware Fix
- 5.9.2 My Report
- 5.9.3 Profile
- 5.9.4 Change Password
- 5.9.4 Retrieve Password
- 5.9.5 Manage Recharging Card
- 5.9.8 Help
- 5.9.9 Log Out
- 5.10 Settings
- 5.10.1 System of Units
- 5.10.2 Orientation
- 5.10.3 Expiration Reminder
- 5.10.4 Print Information
- 5.10.5 Diagnostic Feedback
- 5.10.6 Network Detection
- 5.10.7 About
- 6 Others
- 6.1 Email
- 6.1.1 Configure an email account
- 6.1.2 Send an email
- 6.1.3 View an email
- 6.1.4 Delete an email
- 6.1.5 Revise an account setting
- 6.1.6 Delete an email account
- 6.2 Browser
- 6.2.1 Open browser
- 6.2.2 Download files
- 6.2.3 Manage bookmarks
- 6.2.4 Set homepage
- 6.2.5 Clear history
- 6.3 Calendar
- 6.4 Alarms
- 6.4.1 Add an alarm
- 6.4.2 Delete an alarm
- 6.4.3 Turn on/off alarm
- 6.5 File Manager
- 6.6 Applications
- 6.6.1 Install applications
- 6.6.2 View installed applications
- 6.6.3 Uninstall applications
- 6.7 Set Date & Time
- 6.8 Clear Cache
- 7 FAQ

LAUNCH CRP229 English User’s Manual
5.7.3 Pre-bind a golo user
Except that a golo carcare user asks for to be a registered customer, the garage who sold golo connectors can also
adopt the golo Cloud to bind golo carcare users as regular customers.
Follow the steps described as below to proceed:
1. Log in http://ipublic.x431.com/;
2. Click “golo Clients” in the navigation bar;
3. Click “Add golo users” and input the S/N and Password of golo carcare connector in the pop-up dialog box and then
click “Save” to add it.
Note:
If a car owner purchases a golo carcare connector that is pre-bound to the garage, just input the S/N of the connector to
activate it.
4. Click “Assign service technician” to appoint a special technician to serve for this golo user. After finished, click “Save”
to confirm your settings.
Note:
The pre-binding agreement is in effect for one year. During this period, golo carcare user can not unbind to this garage
on the mobile phone terminal.
5.7.4 Launch real-time remote diagnosis
After binding golo users, tap “golo”, all customers will be listed on the screen in the following kinds.
Options Notes
Scheduled Customer It defines as the golo carcare users who made a reservation for remote assistance to the
garage. Before sending the remote request, this golo user must be the followed customer.
35