
User's Manual

November 2010
SiBEAM, Inc.
SB-UG-0004-B 8
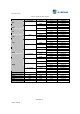
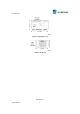
Table 2. Supported Uncompressed Audio Formats
Audio Sample Rate, F's
2/6/8-channels 2-channel
Multiples
of Fs
32 kHz 44.1 kHz 48 kHz 88.2 kHz 96 kHz 176.4 kHz 192 kHz
128 4.096 5.645 6.144 11.290 12.288 22.579 24.576
256 8.192 11.290 12.288 22.579 24.576 45.158 49.152
384 12.288 16.934 18.432 33.864 36.864
512 16.384 22.579 24.576 45.158 49.152
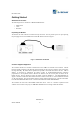
Setup
The setup for the SK9210TX-HS is fairly straight forward.
Step 1: Make sure all power is off on the Notebook PC and remove the battery. Open up the Notebook
PC so that DMC socket is accessible. This may require the removing of other boards/screws and plastic
coverings.
Step 2: Insert the DMC board into the DMC socket. The socket is keyed so the board can only fit in on
direction.
Step 3: Install the RF board into position. This typically will also involve opening up the LCD panel to
provide access to the RF board location. Depending on the PC configuration, it may be necessary to
unplug the cable between the DMC and RF board to do the installation. It’s typically easiest to unplug the
cable from the RF board and route the cable around other boards and thru the hinge assembly. If
unplugged, plug back in the cable between the DMC and RF board once the RF board is in position.
Step 4: Close up the PC installing all boards, cables and plastic enclosures.
Step 5: Power on the Notebook PC. Make sure that the PC comes up with normal operation as expected.
Step 6: Install the WAC as described in the following section.
Step 7: Place the Notebook PC within range of a WiHD sink device (<10m) and power on the sink device.
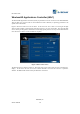
Step 8: Start the WAC and go to the Network tab. Select Refresh List to see the list of available
WVAN’s. The WVAN for the sink device powered up should be listed.
Step 8: Select the appropriate WVAN and press the Connect button. The A/V should start playing on the
sink device after approximately 8-15 seconds.