
Installation & Assembly
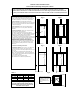

Fig. A Fig. B
C" C"
A
A
3.5 "
B
B
To Finished Floor To Finished Floor
Fig. C Fig. D
C C
A A
B B
To Finished Floor To Finished Floor
Table 1 Fig. E
Rough-In A B C
14" x 24" 24" 48" 14"
Oval 24" x
36" Mirror
Models
24" 48" 14"
Medicine Cabinet Installation Guide
Recessed Reversable Single Swing Door Cabinets
A medicine cabinet is a convenient way to add storage space to your bath. Your new bath cabinet is designed for
long life, easy maintenance and flexibility to fit your needs. The installation instructions below are for typical
situations found in most homes. As with most construction there is a wide range of possible structural issues that
may make your installation different from what is shown below. When in doubt consult a construction professional.
1. If replacing an existing recess mounted cabinet.
Remove existing cabinet from the wall. Measure the wall
opening. If the opening is different than that required for your
new cabinet start with Fig. C and resize the opening to fit.
2. New construction. The ideal location for medicine
cabinets is about 60" from the finished floor to the center of the
mirror. The measurements shown in the table below will place
the cabinet at that height.
3. New Construction. Frame the rough wall opening as
shown in Figures A or B. Go to step 5 and continue with
installation.
4. Existing construction. Please refer to Figures C and D.
Prepare the rough opening as follows.
(a) Measure to determine the location for the cabinet.
(b) Locate existing studs. The easiest installation is between
existing studs. If studs interfere with the installation, relocate
or install new framing as shown in Figures C and D.
(c) Layout the rough wall opening as shown in Figures C and
D referring to table 1 below. Cut this opening, being careful not
to damage surrounding wall finish. If plumbing and/or
electrical obstructions exist they must be relocated before
installing the cabinet. If plumbing or electrical must be
relocated be sure that this is done in accordance with local or
national building codes. It is recommended that you use a
licensed electrical or plumbing contractor to relocate these
obstructions.
5. Finish the surrounding wall surfaces.
6. Mounting the cabinet. Refer to Fig. E. The cabinet may
be mounted with the door hinge on the right or left side.
(a) Place the cabinet in the wall opening with the door on the
desired side.
(b) Install the four mounting screws included with your
cabinet. Do not tighten all the way. Using a level tighten the
screws on opposite sides slowly keeping the cabinet level. Do
not over tighten the screws.
(c) Do not use nails to install the cabinet.
(d) Install shelves as desired if separate items.
Before cutting the rough opening be sure
that the installed medicine cabinet will clear
all obstructions such as counter tops and side
walls when the door opens.
Medicine Cabinet must be
level. Use the four
mounting screws included
to install cabinet. Use
shims if needed to level
cabinet.