
Installation & Assembly

TOOLS REQUIRED
3/8 in. drill bit
Phillips
screwdriver PencilLevelPower drill
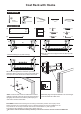
Coat Rack with Hooks
(A)
(A)
(C)
(C) (C)
(a)
(a)
x1 x2
x5 (d) x2
(b)
(b) (b)
x2 (e) x2
x1
(c) (f)
(c) (c)
x4
x1(B)
(B)
(e)
(d)
1. Secure board (A) to (C) with screws(c)
2.Put the hooks into the (B), then Secure (B) to (C) with
screws(b)
3.Hold the shelf against the wall where you want it
positioned. Place a level on it to ensure it is exactly level.
Use a pencil to mark wall anchor locations on the wall.
5.Carefully align the keyhole brackets over each hanger
screw and slide the holder down.
4.Drill a hole into each of the two wall anchor locations
marked on the wall. Insert an anchor into each hole and
tap lightly with a hammer to seat the pointed prongs of
each anchor into the wall surface.
DISCLAIMER: Install shelf and shelving units according to instructions provided. The company and its
related companies are not responsible for injury or damage resulting from incorrect installation or use.
Our products are for use only as shelves units and are not intended for any other purposes.
For assistance with installation or missing parts, please contact us.
The emission of the chemicals listed in Prop 65 in this product has been tested to meet the standard of CARB ATCM.