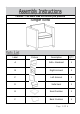
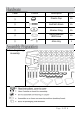
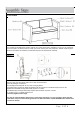
Caution : You must read this before you proceed Single Sofa Label Picture Description QTY A Sofa - Backrest 1 B Right Armrest 1 C Left Armrest 1 D Sofa Seat 1 E Seat Cushion 1 F Back Cushion 1 Page 1 OF 6
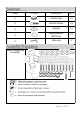
Label Picture Description QTY ① Plastic Cap 13 ② Bolt M6*40mm 13 ③ Washer 13 ④ Spring Washer Ø16*2mm 13 ⑤ Allen Key 1 Before Beginning Assembly: Page 2 OF 6
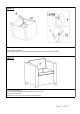
Overview This Single Sofa has multiple parts and may require up to some 30 minutes to assemble. To give you an overview of the Single Sofa parts, the above picture is to help you put the various parts into perspective. Please read through the instructions herebelow to familiarise yourself with the parts and steps before assembly. Step 1 Open the carton and place all the parts onto a clean and soft surface. Unpack all packages of hardware. Place the Right Armrest (B) with its inside facing skywards.
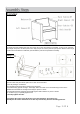
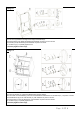
Step 2 Place the Seat (D) between the Right Armrest(B) and Backrest(A). Attach the Seat(D) to the Right Armrest(B) with hardware as picture 3 and 4 shows. Use an Allen Key(⑤) to partially tighten these. Do not fully tighten the bolts. Step 3 Place the Left Armrest (C ) against the Backrest(A) and Seat(D). Make the metal rod on the Backrest(A) insert into the MOUNTING POSITIONs of the Left Armrest(C ) as picture 5 shows. Attach the Left Armrest(C ) to Backrest(A) with hardware as picture 6 shows.
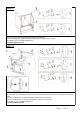
Step 4 Tighten all bolts completely. Put the Plastic Cap(①) to cover the bolt heads, adjust the Leveler to ensure good stability. Step 5 Turn the Sofa right side up. Place the Seat Cushion(E) and Back Cushion(F) onto the Sofa. Your Sofa is ready for use. Caution:This Chair can only be used on a flat, level surface.
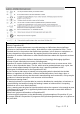
Questions & Answers about Proposition 65 • What is Proposition 65? Proposition 65 requires businesses to provide warnings to Californians about significant exposures to chemicals that cause cancer, birth defects or other reproductive harm. These chemicals can be in the products that Californians purchase, in their homes or workplaces, or that are released into the environment.
Caution : You must read this before you proceed Loveseat Label Picture Description QTY G Loveseat - Backrest 1 B Right Armrest 1 C Left Armrest 1 H Seat 1 E Seat Cushion 2 F Back Cushion 2 Page 1 OF 6
Label Picture Description QTY ① Plastic Cap 15 ② Bolt M6*40mm 15 ③ Washer Ring 15 ④ Spring Washer Ø16*2mm 15 ⑤ Allen Key 1 Before Beginning Assembly: Page 2 OF 6
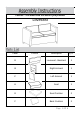
Overview This Loveseat has multiple parts and may require up to some 30 minutes to assemble. To give you an overview of the Loveseat parts, the above picture is to help you put the various parts into perspective. Please read through the instructions here below to familiarise yourself with the parts and steps before assembly. Step 1 Open the carton and place all the parts onto a clean and soft surface. Unpack all packages of hardware. Place the Right Armrest(B) with its inner side, facing skywards .
Step 2 Place the Seat (H) between the Right Armrest(B) and Backrest(G). Attach the Seat(H) to the Right Armrest(B) with hardware as picture 3 and 4 shows. Attach Seat(H) to the Backrest(G) with hardware as picture 5 shows. Use an Allen Key(⑤) to partially tighten these. Do not Fully Tighten at this stage. Step 3 Place the Left Armrest (C ) against the Backrest(G) and the Seat(H). Make the metal rod on Backrest(G) insert into the MOUNTING POSITIONs of Left Armrest( C ) as picture 6 shows.
Step 4 Tighten all Bolts completely, put the Plastic Cap(①)to cover the Bolt heads. Adjust the Leveler to ensure good stability. Step 5 Turn the Loveseat right side up. Place the Seat Cushion(E) and Back Cushion(F) onto the Loveseat. Your Loveseat is ready for use. Caution:This Loveseat can only be used on a flat, level surface.
Questions & Answers about Proposition 65 • What is Proposition 65? Proposition 65 requires businesses to provide warnings to Californians about significant exposures to chemicals that cause cancer, birth defects or other reproductive harm. These chemicals can be in the products that Californians purchase, in their homes or workplaces, or that are released into the environment.
Caution : You must read this before you proceed Table Label Picture Description QTY R Top Panel 1 S Front/Back Panel 2 T Side Panel 2 Page 1 OF 6
Label Picture Description QTY ① Bolt Cap 13 ② Bolt (M6*40mm) 13 ③ Washer 13 ④ Spring Washer (Ø16*2mm) 13 ⑤ Allen Key 1 Before Beginning Assembly: Page 2 OF 6
Overview Top Panel(R) Side Panel(T) Front Panel(S) This Table has multiple parts and may require up to 30 minutes to assemble. To give you an overview of the Table parts, the above picture is to help you put the various parts into perspective. Please read through the instructions below to familiarise yourself with the parts and steps before assembly. Step 1 Open the carton and place all parts on a clean, non-marring surface.
Step 2 Place the Top Panel(R) facedown on a clean and soft surface. With the help of your adult partner, turn the Table Frame over and place it onto the Top Panel(R) as shown above. Attach the Top Panel(R) to the Front and Back Panels(S) and Side Panels(T) using Bolts(②), Spring Washers(④) and Washers(③) with Allen Key(⑤) as shown above. Tighten all Bolts at all joints completely at this stage. Step 3 Use the Bolt Cap(①) to cover all Bolts.
Step 4 Place the Table on a level surface to check the wobbles. If the Table wobbles, adjust the Levelers on the bottom of the Legs to make it level. Step 5 Your Table is ready for use. This Table can only be used on a flat, level surface.
Questions & Answers about Proposition 65 • What is Proposition 65? Proposition 65 requires businesses to provide warnings to Californians about significant exposures to chemicals that cause cancer, birth defects or other reproductive harm. These chemicals can be in the products that Californians purchase, in their homes or workplaces, or that are released into the environment.