
Installation Guide

All electrical connections and the installation of this fixture must be in agreement with local codes,
ordinances or the NEC (National Electric Code) or CEC (Canadian Electrical Code).
Do not connect this fixture to an electrical system that does not provide a means for equipment grounding.
FIXTURE INSTALLATION GUIDE
Caution: Turn off power to electrical box before installing
GLASS INSTALLATION:
Angle the Glass Diffuser and position the bottom
into the Glassholder (H) as shown, then rotate the
upper portion into the glassholder. If the glass does
not seat properly, then the socket wires may be
conflicting with the glass neck. Gently move the
wires out of the way, then reinsert the glass.
Once the Glassholder is properly seated,
secure with the Retaining Screw (I).
DO NOT OVERTIGHTEN THE RETAINING SCREW.
NOTE: Glass Diffuser shown is for example
purposes, the actual Glass Diffuser may be
different in appearance.
I
H
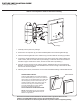
1. Carefully remove parts from package.
2. Remove the two Cap Nuts (A) to release the Backplate from the Mounting Bracket (B).
3. Attach the Mounting Bracket to the Outlet Box (C) with two Machine Screws (D) provided.
4. Connect the electrical leads from the fixture to the house supply wires, black to black and
white to white, and secure with wirenuts provided (E). Connect the House Ground Wire to
the Bare Copper Lead from the fixture, and secure with wirenut provided (F).
5. Align the circular openings on the Canopy with the Threaded Posts (G) on the Mounting
Bracket. Push the Canopy over the Threaded Posts until the Canopy is flush with the wall,
then secure with the Cap Nuts.
6. With the power still off, insert bulb of not more than the labeled wattage. Install Glass Diffuser.
A
B
C
D
E
F
G
Glass Diffuser
Canopy
(One Light Vanity 120V)