
Installation Instructions
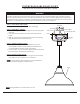

Gasket
Blue to Blue
Junction Box
LED Driver
Neutral to White
Power Supply to Black
Screw x 3pcs
5mm x 1”
Shade
Back Plate
Knot
Brown to Brown
STEP 1: UNPACKING THE LIGHT:
1. Carefully remove the light xture from the packaging.
STEP 2: PREPARING WIRING:
2. Feed the wiring from the shade through the front opening of the
back plate.
3. Tie a support knot inside the base plate at the desired shade
height.
4. Remove excess wiring and strip both ends of the wire, keeping
approximately 4 inches out from the base.
STEP 3: WIRING INSTRUCTIONS:
5. Use wire nuts to connect the brown LED driver wire to the
brown LED wire from the shade, and the blue LED driver wire
to the blue LED wire from the shade (output wires).
6. Use wire nuts to connect the power supply to the black wire and
the neutral wire to the white wire (input wires).
STEP 4: INSTALL BACK PLATE:
7. Attach Back Plate and Gasket to the ceiling and secure the Back
Plate with three (3) screws (5mm x 1”) and anchors.
To avoid damage, make sure lamp is securely installed to a
solid surface using the included anchors.
Installation of lights and electrical work may present a possible shock or re hazard if improperly installed or used. All
electrical work should be performed in accordance with all federal, state and local safety regulations and require proper
grounding. All work should be performed by a certied electrician. Before starting installation, turn OFF electricity at the
main fuse or circuit breaker that controls the power to the xture/room you are working on.
WARNING
CEILING INSTALLATION INSTRUCTIONS
Note Ceiling installation is rated for indoor use only.
Note
INTERCHANGEABLE BARN LIGHT