
Assembly Instructions

1. Carefully unpack and lay out the parts as shown in illustration.
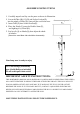
2. Screw theTube (B), (C),(D) and Socket Section(E)
into the nipple of Base (A) ,then pull the cord from base.
3. Insert Tube (F) into Socket Section(E).
4. Place the Shade (G) onto the Double Stem (F),
and tighting it by Finial (H).
5. Put Acrylic (I) on Shade(G),then adjust the shade
in balance.
(Attention:
sand blast side should be downwards)
Your lamp now is ready to enjoy
IMPORTANT SAFETY INSTRUCTIONS:
THIS PORTABLE LAMP HAS A POLARIZED PLUG (ONE BLADE IS WIDER THAN THE OTHER)
AS A SAFETY FEATURE TO REDUCE THE RISK OF ELECTRIC SHOCK. THIS PLUG WILL FIT
IN A POLARIZED OUTLET ONLY ONE WAY. IF IT DOES NOT FIT FULLY IN THE OUTLET,
REVERSE THE PLUG. IF IT STILL DOES NOT FIT, CONTACT A QUALIFIED ELECTRICIAN.
NEVER USE WITH AN EXTENSION CORD UNLESS THE PLUG CAN BE FULLY AND EASILY
INSERTED. DO NOT ATTEMPT TO ALTER THE PLUG.
SAVE THESE INSTRUCTIONS FOR FUTURE REFERENCE.
Use 2*60 Wattage (Maximum)
type A bulb (Bulb not included)
On-off socket pull-chain switch
A
E
F
G
H
I
B
C
D
ASSEMBLY INSTRUCTIONS