
Product Manual

1. THE MEASURING OPERATION
1. Before any measurements are at-
tempted, make sure that the measuring
surface is suitable. It should not be very
glossy, (photographs) too rough, muti-
lated, torn or patched up with adhesive
tape. If the measuring surface is not quite
suitable, cover it with a transparent sheet
of tracing paper to minimize the problem.
Make sure that the measuring table is
reasonably flat and that both pole weight
and planimeter body operate at the same
elevation.
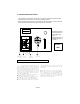
2. Assemble your instrument as shown
on page 2 and if your instrument is a
model 30, select the tracer arm length
most suitable for your application.
(please check page 5 for details)
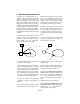
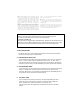
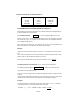
3. Place the tracer point TP of your plani-
meter in the approximate center of the
area to be measured. Position the pole
weight in such a manner, that the pole
arm P and the tracer arm T form a 90
0
an-
gle (approx.) as shown in fig.1 below.
4. Make a quick cursory tracing around
the area to be measured to make sure
that the measuring wheel does not run
over paper edges and that the area can
be covered in one single continuous ope-
ration.
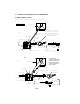
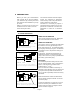
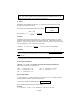
5. Select a starting point S somewhere
on the area periphery and move the
tracer point TP over it. (fig.2)
Pole Weight
P
TP
T
T
TP
P
S
Starting and End Point
Pole Weight
90 degree angle (approx)
Fig. 1
Fig. 2
6. Set the measuring mechanism to zero
or take an initial reading.
7. While keeping the tracer point TP pre-
cisely over the peripheral line, move the
tracer around the area in a clockwise di-
rection until the circuit is closed and the
starting point S is reached again. Impor-
tant : While measuring, keep the instru-
ment level on the measuring surface to
avoid a lift off of the measuring wheel.
8. Read the result off the measuring
mechanism. ( please check page 3 for
details)
9. If the counter was cleared prior to the
measuring process, the result "N" can
readily be used to obtain the actual area
measurement.
10. If you took an initial readout prior to
the measurement, it must be subtracted
from the final readout to obtain "N".
11. For 1:1 measurements expressed
in inch
2
or cm
2
, multiply the result "N" by
the "u" value given for your model 10 or
20 or, if your instrument is a model 30,
by the "u" value for the arm extension
used.
( please check page 7 for details)
12. For scale measurements to be ex-
pressed in ft
2
, acres, mile
2,
, m
2
, ha, km
2
,
multiply "N" by C
A
. (
= Scale Area Con-
stant) Please check page 7.
Page 1