
Download

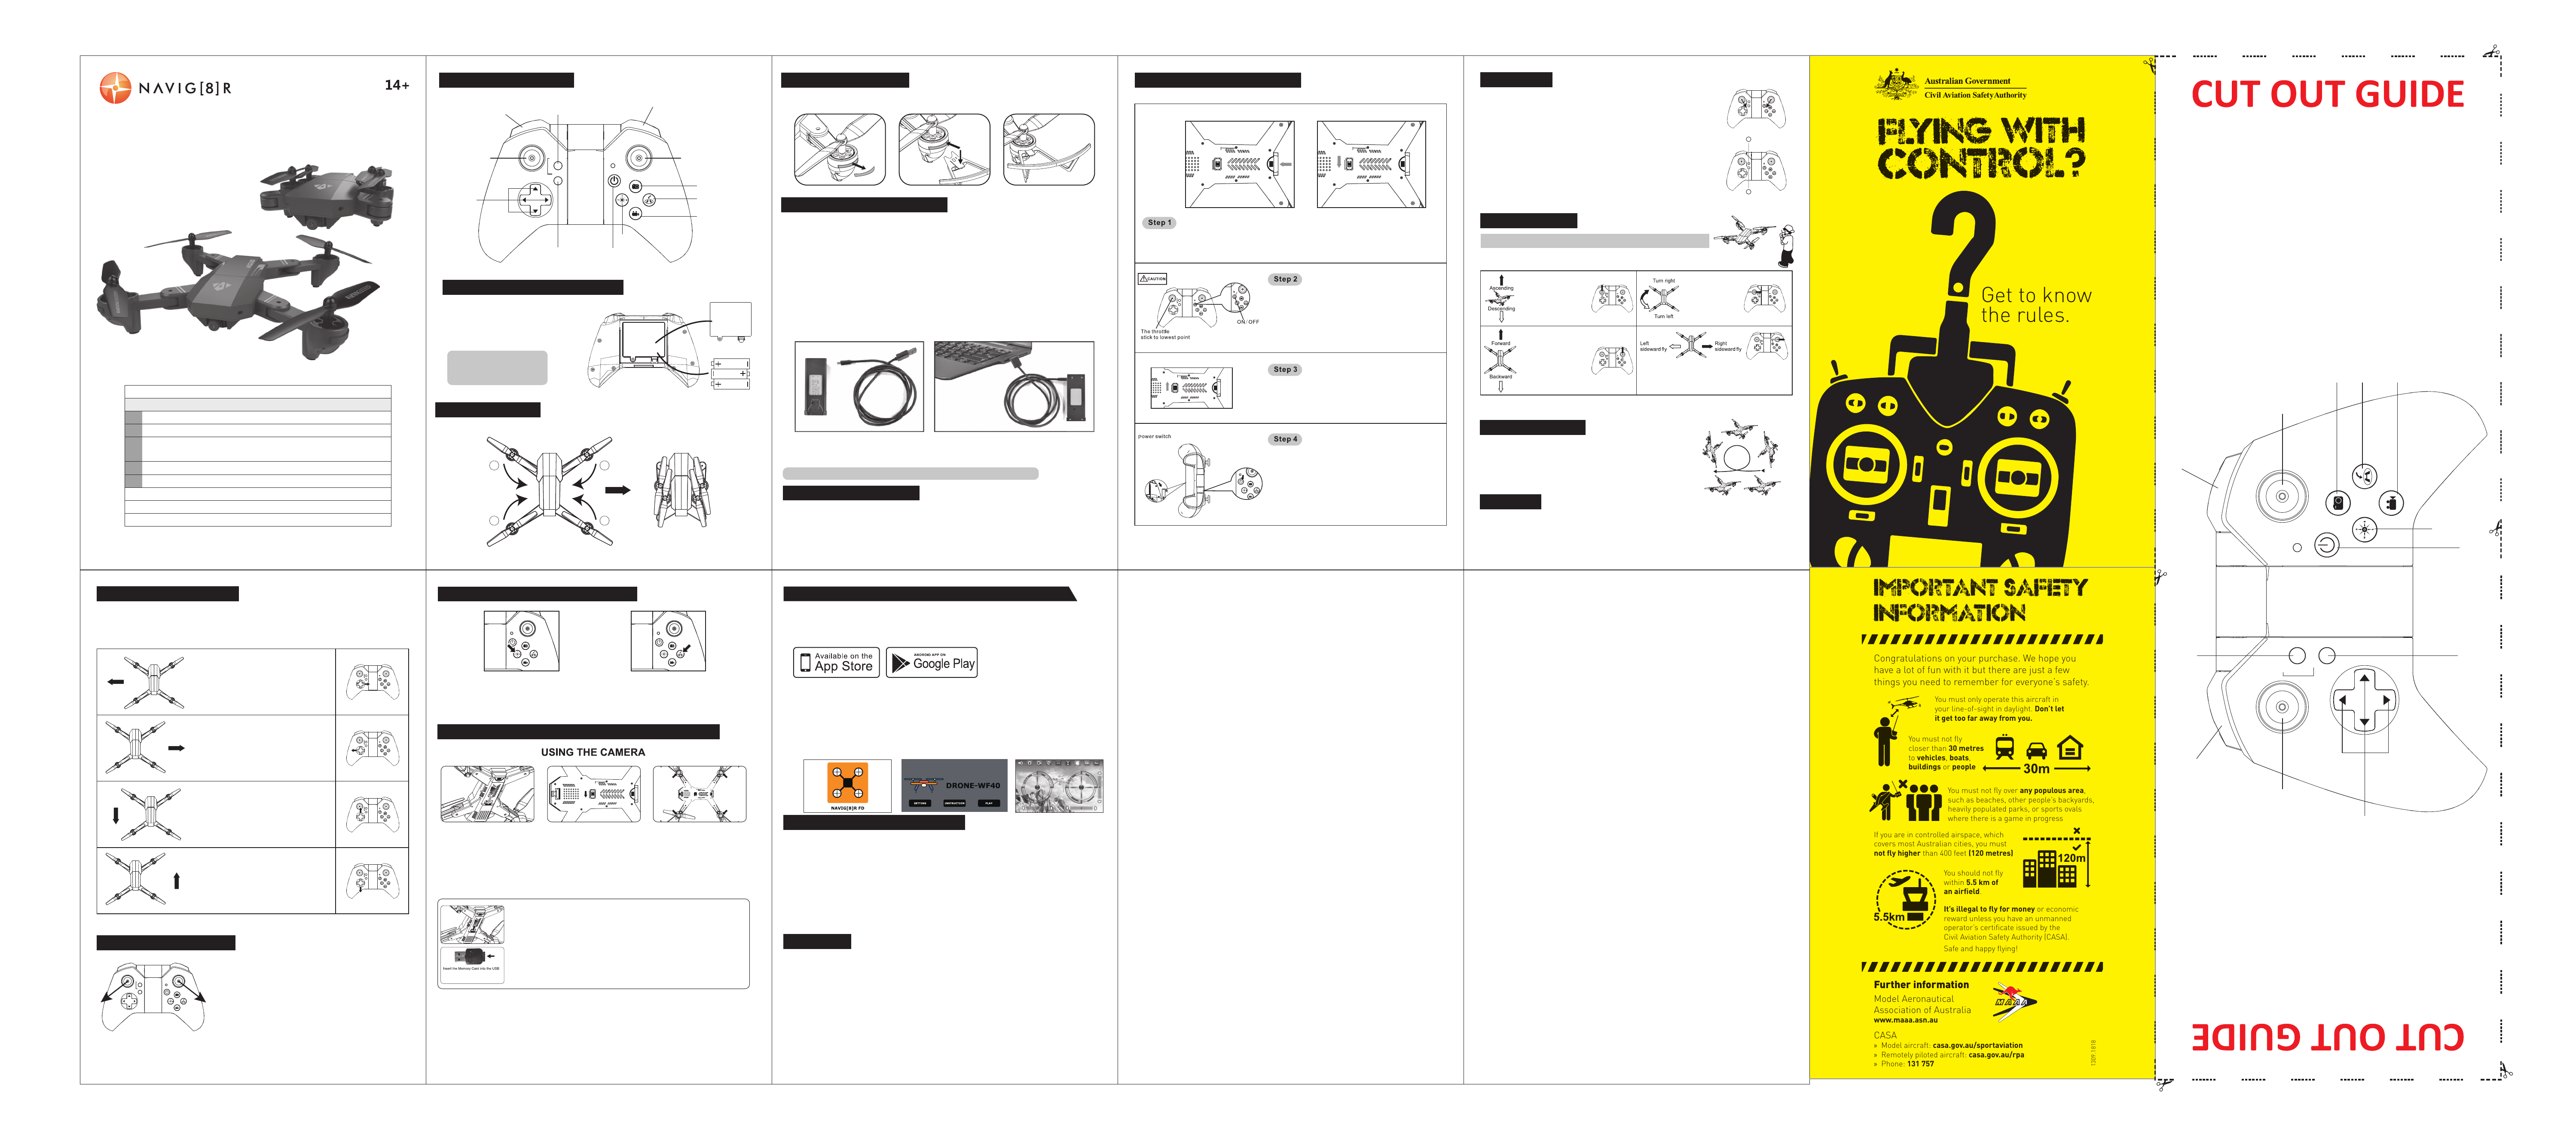
Get to know
the rules.
IMPORTANT SAFETY
INFORMATION
Congratulations on your purchase. We hope you
have a lot of fun with it but there are just a few
things you need to remember for everyone’s safety.
You must only operate this aircraft in
your line-of-sight in daylight.
Don’t let
it get too far away from you.
You must not fly
closer than
30 metres
to
vehicles
,
boats
,
buildings
or
people
You must not fly over
any populous area
,
such as beaches, other people’s backyards,
heavily populated parks, or sports ovals
where there is a game in progress
If you are in controlled airspace, which
covers most Australian cities, you must
not fly higher
than 400 feet
(120 metres)
You should not fly
within
5.5 km of
an airfield
.
It’s illegal to fly for money
or economic
reward unless you have an unmanned
operator’s certificate issued by the
Civil Aviation Safety Authority (CASA).
Safe and happy flying!
Further information
Model Aeronautical
Association of Australia
www.maaa.asn.au
CASA
»
Model aircraft:
casa.gov.au/sportaviation
»
Remotely piloted aircraft:
casa.gov.au/rpa
»
Phone:
131 757
1309.1818
OFF
ON
1.CONTROLLER COMPONENTS:
2.SETTING UP THE CONTROLLER / DRONE:
3.INSTALL THE PROTECTOR :
INSTALLING THE CONTROLLER BATTERIES
Pull the accessory as Pic1. and Press the locking plate on the protector, as the same time push-in the protector
as Pic.2, the protector is installed finish.
1. Unscrew the battery cover, and insert 3 *AA batteries,
making sure you insert them following the correct
polarity as shown.
2. Re-attach the battery cover
NOTICE:
1. Always have an adult to install the batteries
2. Always use Alkaline Batteries
3. Never mix old and new batteries
1 2
7.SETTING UP THE SIGNAL CONNECTION:
5.CHARGING YOUR DRONE BATTERY:
6.SAFE FLIGHT ENVIRONMENT:
1. Make sure the surrounding area is free of all people, pets or other obstacles before you start to fly.
2. The Drone is designed for Outside flying, or Indoors if you have enough space.
Do not use in strong wind.
3. Leave 1.5 meters between you and the Drone at all times.
Inset the battery to the battery housing. (see frist picture). Turn on the power switch of the Drone - the LED's
on the Drone will start to flash. Place the Drone down on a flat surface, making sure the drone is facing
away from you.
Always Turn off the Power Switch of the Drone after flight.
Always turn the controller off after flight, and remove all batteries
if leaving un-used for a long period of time.
3
Press down the controller Power Switch to turn on the power, The
controller will make one short BEEP sound and the red LED will flash.
To pair the signals of the Vision Drone and the Controller, you must
RAISE the UP/DOWN Lever on the controller all the way to the TOP.
One short BEEP will sound, then, LOWER it all the way to the
BOTTOM. Another short beep will sound.
Press the take off button – then, the next time you RAISE the UP/
DOWN Lever, the Drone will lift into the air.
OFF
ON
OFF
ON
stop
Land
Take-off
stop
Land
Take-off
stop
Land
Take-off
stop
Land
Take-off
stop
Land
Take-off
stop
Land
Take-off
stop
Land
Take-off
stop
Land
Take-off
stop
Land
Take-off
stop
Land
Take-off
stop
Land
Take-off
13.AUTO TRIM FUNCTION:
When you lift your Drone into the air, and don't use any of the other direction levers, your Drone
should simply hover in one spot without moving in any other direction. If however it doesn't, you can follow the
bellow instructions to TRIM your Drone back to a perfect hover. TRIMMING is always needed before
your first flight.
12.FLIGHT ADJUSTMENT SECTION:
If your Drone banks to the Left,
keep pressing the Bank Left/Bank Right
Trim Button to the Right till the
Drone stops banking.
If your Drone banks to the Right,
keep pressing the Bank Left/Bank Right
Trim Button to the Left till the
Drone stops banking.
If your Drone flies Backwards,
keep pressing the Forward/Backwards
Trim Button Up till the
Drone stops flying Backwards.
If your Drone flies Forwards,
keep pressing the Forward/Backwards
Trim Button Down till the
Drone stops flying Forwards.
17.REPLACING BLADES AND FIXING ISSUES:
1.BLADE REPLACEMENT: Your Drone blades are very strong, but sometimes they can get damaged
with a bad crash. You have spare blades in the box, and to replace them it is as easy as just placing a new one
back on over the motor bar. You must always replace an A Blade with an A Blade, and a B Blade
with a B Blade.
2.Drone NOT LIFTING OR NOT FLYING IN YOUR CHOSEN DIRECTION:
1)The most common reason for a Drone not lifting or flying in your chosen direction properly is that you have
hair and debris wrapped around one or more of the blades. This is simple to remove, just take off the blade.
Remove the debris, and place the blade back on.
2) The batteries in either the Drone or Controller may need charging
(or replacing if it’s the batteries in the controller).
3) You may have knocked your Trim Button settings out of sync. Follow the instructions earlier in this booklet to
reset them back to the factory settings, and then re-trim as desired.
18.WARNINGS:
. The Drone is designed for 14+
. Adult supervision is always advisable with any form of flying toy
. Always ensure your flight area is free of all obstacles before taking off, and ensure the Drone is always
flown in excess of 1.5 meters from yourself and others
. Remove all batteries from the Drone and Controller when not in use
. Never overcharge
. Never leave to charge unattended
. Never touch the Drones motors during or after flying as they bcan get hot
. Never touch the blades when they are in motion
. If the Drone becomes damaged, stop using it immediately
. Do not dispose of any parts of the Drone or Controller in the normal rubbish; all parts should be taken
to your local recycling centre
. The battery in the Drone should never be exposed to any form of high temperature or disposed of in a fire
7 8 95 6
Push both controll levers to the positions shown in the picture,
and hold them for a few seconds. The lights on the drone will start
to flash. Now the quadcopter is recovered to its original
factory setting and ready to fly again.
OFF
ON
Step 2: Turn on the the Power
Switch of the Drone as
you would for any normal flight.
Step 3: The four light will show on
the camera whenever the drone is
in use. The Two tail light will flash
once when you take a photo, and
it will Keep flash when taking a video.
Attention: When filming a video, always make sure to press the video button the
second time to finish the video BEFORE you land and disconnect the Drone
battery, as otherwise your video will not save.
Turn the On/Off switch on the Drone to Off, and remove the Memory Card
from the camera. Insert the Memory Card into the included USB Card Reader
(making sure you insert it the correct way round - see picture), and attach the USB
Card Reader (not inlc.) to your computer. You will now be able to open the Photo/
Video files saved on the memory card on your computer in exactly the same way
you open other pictures and videos saved on memory cards or sticks. The AVI
format of the video will need a media player which supports AVI format.
15. EXTRA INSTRUCTION MANUAL FOR CAMERA DRONE FUNCTION:
14.HEADLESS AND ONE KEY RETURN FUNCTION:
2.One key return function:
Press the Trim Slider button Right,
you will get into one key return mode.
To quit the mode by Press the same
slider button.
1.Headless function:
Press the Trim Slider button left,
you will get into compass mode
flying.To quit from compass mode
by Press the same slider button.
16.EXTRA INSTRUCTION MANUAL FOR WIFI CAMERA DRONE FUNCTION:
SOFTWARE DOWNLOAD AND INSTALLATION
2.USING INSTRUCTION
1). Connect the model to the power, the indicator on camera light up .
2). Enter the “setting” menu of your mobile device and turn on WIFI.
3). Find a network WIFI called “NAVIG[8]R FD” , “WI-FI 720P” , “XSW UFO”, or “WiFi UFO”
click connection until “connected”.
4). Open the “NAVIG[8]R FD”, “XSW UFO”, “WiFi UFO” OR “WI-FI 720P” software,
click the “play” icon into the control interface. And you will see the real time video.
stop
Land
Take-off
Forward/Backward and
Leftside/Rightside Lever
Power Switch
Emergency Button
Up/Down and
Turn Left/Turn
Right Lever
Speed Button Take-off/Landing
Flip Button
One key Return Button
Take Photo (N/A)
Take Video (N/A)
Trim Button
Headless
function
Battery Cover
3 X AA(LR06)
1.5V Batteries
stop
Land
Take-off
stop
Land
Take-off
3.FOLDING THE ARMS :
FOLD THE ARMS AS THE ORDER OF NUMBER AS THE PICTURE SHOW
Place the Drone on a flat surface, making sure the Yellow LED Lights
is facing away from you.
PLEASE USE THE CONTROLLER TO PRACTICE SIMULATED FLIGHTS BEFORE
YOU ACTUALLY TAKE THE Drone IN THE AIR FOR THE FIRST TIME
TIP: It is much easier when you start to learn to fly the Drone, to ignore Turn Right / Turn Left.
By using Up/Down, Forward/Backward, Bank Left/Bank Right, the Drone will still be able to fly anywhere.
1.Make sure the Drone is flying at least 3 meters above the floor,
or 3 meters bellow a ceiling.
2.Press the Flip button on the controller, The controller will make a “Beep”
sound, then flick the right hand lever in any direction, and the Drone will
flip in that direction.
3.You may need to push Up on the Up/Down Lever after the flip,
if your battery is low on power in order to keep the Drone
high in the air after the Flip.
When you push Up on the
Up/Down Lever the Drone
will start to go Up (please do
this slowly at first till you learn
the sensitivity). When you
push Down on the Up/Down
Lever the Drone will
start to go Down.
When you push Forward on the
Forward/Backward Lever the
Drone will start to fly
Forward (please do this slowly
at first till you learn the
sensitivity). When you push
Backwards on the Forward/
Backward Lever the
Drone will start to
fly Backwards.
When you push Left on the Bank Left/Bank
Right Lever the Drone will start to Bank
Left (please do this slowly at first till you learn the sensitivity) .
When you push Right on the Bank Left/Bank Right Lever the
Drone will start to Bank Right.
When you push Left on the
Turn Left/Turn Right Lever
the Drone will start
to spin Left. When you
push Right on the Turn
Left/Turn Right Lever the
Drone will start to
spin Right.
10.HOW TO DO A 360 FLIP:
SPEED CONTROL: When you first turn on your Drone, it is set to 25% speed, you will hear ONE
beep. When you press the SPEED BUTTON, you will hear TWO beeps and the speed will be increased to
50%. Pressing the SPEED BUTTON again you will hear THREE beeps and the speed will increase to 100%.
Pressing again will bring you back to 25% speed and you will hear ONE beep. Always learn to fly at 25%
speed, and then you can increase it as you get better at flying.
11.FEATURES:
9.FLIGHT CONTROL:
4
OFF
ON
8.AUTO-HOVER:
stop
Land
Take-off
stop
Land
Take-off
1
2
START YOUR FIRST FLIGHT:
Push both controll levers to the positions shown in the picture, and hold them for
a few seconds. The lights on the drone will start to flash.The motor start working.
AUTO-HOVER:
Press the " take-off /Land " button (1) once, the drone automatically goes up to air
and stays at a height of around 1.5 meters.After that push the left stick to keep
the drone at any height you wants.
Press the " take-off /Land " button again, the drone will slowly goes down to the
floor and finally the motors stop spinning.
Emergency Button:
In case the drone is to crash against the wall or hit the tree, you can Press
the " Stop " button (2) , at the same time, the motors will stop spinning at once
and the drone falls to the floor immediately.
Make sure there is no people below the drone.
Tip: Below operation only available for altitude hold version.
stop
Land
Take-off
Forward/Backward and
Leftside/Rightside Lever
Power Switch
Emergency Button
Up/Down and
Turn Left/Turn
Right Lever
Speed Button Take-off/Landing
Flip Button
One key Return Button
Take Photo (N/A)
Take Video (N/A)
Trim Button
Headless
function
SEARCH FOR “NAVIG[8]R FD” , “WI-FI 720P” , “XSW UFO”, or “WiFi UFO”
Warranty Against Defects
Laser Corporation Pty Ltd (“Laser”) warrants your new product to be free from
defects in materials and workmanship for 12 months, from the date of
purchase, provided that the product is used in accordance with
accompanying recommendations or instructions where provided. The benefit
of this warranty is in addition to your rights under the Australian Consumer
Law and to other rights and remedies of the consumer under a law in relation
to the goods or services to which the warranty relates.
Through a network of retailers and resellers, Laser will provide you with your
choice of a repair, exchange (where possible) or refund (within Dead on
Arrival period) for this product if it becomes defective within the warranty
period.
This warranty will no longer apply where the defect is a result of alteration,
accident, misuse, abuse, normal wear and tear, neglect or improper storage.
Please retain your receipt as proof of purchase
How to make a product warranty claim:
Step 1: Find your receipt which proves the date of purchase. Where the
date of purchase cannot be verified, your place of purchase or Laser will
make an assessment based on the date of manufacture, the condition of the
Laser Product and the type of defect.
Step 2a): Contact your place of purchase. They will assess the nature of the
fault and repair, replace or fund the product as per their store refund or
warranty policy.
Step 2b): If your place of purchase cannot be contacted, then you can
contact Laser. Customer Service with details of your defective Laser Product:
Phone: (02) 9870 3355; or Email: support@laserco.com.au or online
www.laserco.com.au/warranty (click on “Consumers (End Users)”). Our
business address is at 1/6-8 Byfield Street, North Ryde, NSW 2113
Step 3: Laser will issue you with a Return Authorisation (RA) number within
48 hours. When requested, send us the defective Product and a copy of your
receipt. Laser will cover the cost of the return delivery.
Step 4: Wait for us to contact you. Once we have received your defective
Laser Product for inspection, we will inform you of our assessment of your
claim within 7 days. When we contact you, we will firstly let you know whether
you have a valid claim under this Warranty, and if so, we will inform you
whether your defective Laser Product will be replaced or repaired, together
with the number of days you can expect to wait to receive your replaced or
repaired Laser Product.
Step 5: For further details on warranty cover and returns, please check Terms
and Conditions for Warranty Returns section on
http://www.laserco.com.au/warranty
Our goods come with guarantees that cannot be excluded under the
Australian Consumer Law. You are entitled to a replacement or refund for a
major failure and compensation for any other reasonably foreseeable loss or
damage. You are also entitled to have the goods repaired or replaced if the
goods fail to be of acceptable quality and the failure does not amount to a
major failure.
Read these instructions carefully before using the appliance and
save them for future reference.
DRONE-W4
Action Drone Indicator Remote Indicator
1 Turn on D rone Slow flash -
2 Turn on Remote Fast flash Slow flash
3
Connection (Th rottle UP (Beep), then Down (Beep)
Remote Solid light Solid light
4 Press TAKE-OFF to take o ff
5 Press LAND or th rottle down to land
Note:
Drone Blink Drone not pai red
Drone blinking and can not connect Flat battery
To help get you started, please refer to the quick connection guide below
BATTERY WARNING:
Lithium Polymer batteries can expand, burst or catch fire if used incorrectly, causing both property damage and
or personal injury. It is essential that you follow all the included instructions and safety warnings in full. The
manufacturer, distributors and retailers will assume no liability for the failure to comply with these safety
instructions and warnings.
INSTRUCTIONS WHEN CHARGING:
1) The battery must be removed from the product before charging.
2) If the battery has just been used, please let it cool down to room temperature before charging.
3) Charging must only be undertaken by an Adult, and only using the charger included with this product.
4) Always charge the battery on a non flammable heat resistent surface with non flammable surroundings.
5) Connect the battery to the USB charging cable
6) Connect the USB Charging cable to your USB Charging devices. The RED LED on the battery will light up
while charging, and will Turn Off once the battery is fully charged. It takes around 90-120 minutes to fully
charge the battery. Never continue to charge the battery after the RED LED have Turned Off.
7) Lithium Polymer batteries do not last forever. If your battery becomes damaged in a crash or no longer charges
properly, immediately replace it with a new battery. To prolong the life of your battery, it is always best to retain
a bit of charge in your battery prior to charging it.
stop
Land
Take-off
1 2
3 4
AGES:
USER MANUAL
HIGH PERFORMANCE 4-CHANNEL CAMERA QUADCOPTER
DRONE-WF40
Pull
Push-in
Press
Finish
Pic.1 Pic.2 Pic.3
Remark: Only USB charging cable that inside packaging can be used for charging.
Step1: Insert the memory card
(not incl.) into the camera. You
must make sure you insert the
memory card the correct way up
(see picture). If you insert the
memory card up side down it will
get stuck and your camera will
not work.
Memory Card Reader (not inlc.) making
sure you insert it the correct way as
shown