
Installation Instructions
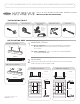

NATURE VUE INSTALLATION INSTRUCTIONS PAGE 3
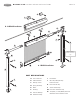
FOR SURFACE MOUNT ONLY
CUTTING THE CASSETTE
Notice that the A-Screen Cassette has two removable stickers labeled “Begin
Measuring From This End” (Side A), and another labeled “Cut This End” (Side B).
Starting from Side “A”, mark your required dimension, then subtract 3/8”(9.5mm)
from Step 2 width measurements.
________ (W) – 3/8" = ________
The 3/8” (9.5mm) deduction is an allowance for the G-Cassette End Cap with
E-Brake that you will install in STEP 5.
Firmly hold the A-Screen Cassette & Pull Bar and cut to size (including the screen).
Hold upright and tap away the metal shavings.
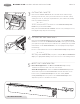
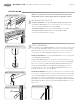
CUTTING THE SIDE GUIDE RAILS
Notice that the B-Side Guide Rails already have a black colored C-End Cap/Latch
installed at one end of the rail. DO NOT CUT THIS END; cut the opposite end. Mark
your required net height dimension, then subtract 2-1/8” (54mm) from Step 2 width
measurements. Cut the B-Side Guide Rails to size. Hold upright and tap away the
metal shavings.
Be sure to cut the end that does not have the G-Cassette End Cap already installed.
________ (H) – 2-1/8” = ________
After cutting the B-Side Guide Rails, use pliers to crimp the M-Insect Pile/Weather
Strip in place [see picture at left] so that it does not move in the holding channels.
3
4
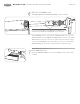
INSECT PILE / WEATHER STRIP
Recess Mount Applications : The M-Insect Pile/Weather Strip is already
installed in the channel located on the rear of the Cassette.
Surface Mount Applications : Remove the M-Insect Pile/Weatherstrip from the
channel at the top back of the A-Screen Cassette. Then slide the runners on the
bottom of two (2) L-Surface Mount Clips into the same channel, BEFORE
installing G-End Caps. Note: the position of the L-Surface Mount Clips can be
adjusted at any time once installed in the channel.
5
A
L
M
Crimp