
User guide


4: Configuration
xPrintServer User Guide 57
Proxy Server Configuration
The Admin user may utilize these directions to manage the outbound internet requests made
through a proxy server. User authentication may be enabled as a prerequisite to processing any
requests. Once configured and enabled, all data request for Lantronix Web Services will be
redirected to the configured Proxy Server.
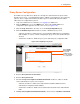
1. Login to the xPrintServer user interface (see Logging In) as Admin user.
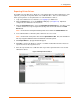
2. Click the Admin tab to access the Admin menu. A list of all available Admin user
configuration options appears to the left of the screen (see Figure 4-10).
3. Click the Proxy Server link to the left to access the Proxy Configuration page.
4. Click the Enable Proxy Server checkbox to enable or disable the proxy server.
- Check the checkbox to enable the proxy server and make additional proxy configuration
fields available. In order to continue configuring the proxy server, this checkbox must be
checked.
- Uncheck the checkbox to disable the proxy server and hide proxy configuration fields.
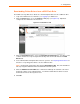
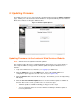
Figure 4-25 Configuring Proxy Server
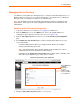
5. Enter the Proxy Server IP or Host name.
6. Enter the Proxy Server Port.
7. Check the Proxy Server requires UserID and Password checkbox to enable or disable
remote authentication for proxy server requests.
- Check the checkbox to enable remote authentication and make additional remote
authentication configuration fields available.
- Uncheck the checkbox to disable remote authentication and hide remote authentication
fields.
8. If Proxy Server requires UserID and Password is checked, enter a UserID and Password.
When Enable
Proxy Server
is checked,
additional fields
become available
for configuration.