
User guide

4: Configuration
xPrintServer User Guide 44
Setting Printer Options
The Admin user may use this selection to view and modify settings in an xPrintServer-provisioned
printer.
1. Login to the xPrintServer user interface (see Logging In) as Admin user.
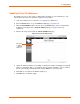
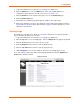
2. Click the Printer tab to access the Printers > List page (see Figure 4-6).
3. Utilize Search as necessary to find a particular printer.
4. Click the button beside the printer you wish to set printer options.
5. Click Set Printer Options in the popup command menu that appears (or Cancel within the
same menu if you want to back out of it). Available printer settings will appear.
Different printers will have different printer settings available for modification.
Some printers will have multiple heading tabs by which all the setting options are
organized.
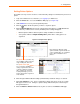
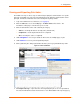
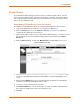
Figure 4-14 Sample Printer Options
6. Click through available tabbed headings (all in dark blue) and make changes as desired.
7. Click Save Changes to save. A note verifying that settings have been saved successfully
will appear on the screen. Changes to printer settings will remain in place until changed
through xPrintServer.
8. Click the Return to Printer List button at any time to return to the Printers > List page.
The printer above provides only
five modifiable settings under the
single heading tab, “General”.
The printer to the right
has several more modifiable
settings organized beneath each
of the three dark blue heading
tabs. Clicking any of the blue
heading tabs brings you to the
printer setting options organized
under that tab.
Every printer has different setting
options available, organized under one
or more heading tab(s) as exemplified
by the options available in these
printers.