
User guide


4: Configuration
xPrintServer User Guide 36
Configuring Printers through Discovery
The Admin user may run Discovery anytime after xPrintServer is started up. Utilize these
instructions to discover and provision network printers connected after the xPrintServer last
started up or printers on other networks if their IP addresses have been added (see Updating
Printer IP Addresses).
1. Login to the xPrintServer user interface (see Logging In) as Admin user.
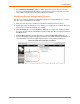
2. Click the Printer tab to access the Printers > List page (see Figure 4-6).
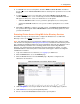
3. Click the Discovery link to the left of the page to reach the Printer Discovery page. A
message stating “Printer Auto Discovery has not yet been run” will appear if printers are
available for discovery. If new printers are not available for discovery, you will see a Printer
Auto Discovery Report (see Figure 4-8).
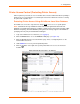
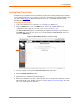
4. Click the Re-run Discovery button within the Printer Auto Discovery Report to manually
check for any new printers. After a few minutes, a new Printer Auto Discovery Report will
appear showing the current date and time of the current discovery and configuration of
printers and associated downloaded drivers.
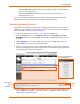
5. Expand the SNMP field to see configuration information about the discovered printer(s). An
example of what you may see in the SNMP field:
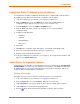
Figure 4-9 Expanding Detected Printers Information
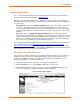
6. Expand the Detected Printers field and further expand additional available subcategories
(indicated with a
icon to the left) to see a list of discovered printers and the status of the
provisioning results.
Note: If you expand the Printer Auto Discovery Report, you may need to use the left-right and
up-down scroll bar to see the entire contents of your report.