
User guide


4: Configuration
xPrintServer User Guide 33
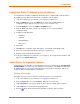
- Check the Protected checkbox beside a specific printer to require user authentication
prior to use for all remote users.
- Uncheck the Protected checkbox beside a specific printer to not require user
authentication prior to use.
Note: In some cases, iOS devices will cache the user name and password of the first user
authentication login so that a remote user only needs to login that first time.
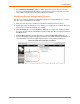
Viewing Configured Printers
The Admin user may utilize these instructions to view provisioned network-connected printers
installed since the xPrintServer last started up or printers on other networks if their IP addresses
have been added (see Adding a Printer IP Address).
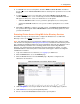
1. Login to the xPrintServer user interface (see Logging In) as Admin user.
2. Click the Printers tab to access the Printers > List page. The Description, Location,
Make/Model and the most recent Status of all currently configured printers will be listed on
this page.
3. Utilize Navigation as necessary in situations where there are multiple pages of printers.
4. Utilize Search as necessary to find a particular printer.
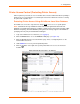
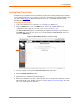
5. Click on any printer in the list to retrieve additional information on that printer. In Figure 4-6
below, the fourth printer in the list was clicked and the associated printer details displayed in
a grey field at the bottom of the list of printers.
Figure 4-6 Printer Details and Pop-Up Command Menu
6. Click the button to the right of a specific printer to access a pop-up command menu of
options available for that printer. Each of these options is explained in greater detail under
Admin Printer Configuration Options.
Pop-Up Command Menu
for selected printer
Details of Selected Printer
Description
Name
IP Address
Location
Status