
User guide

xPrintServer User Guide 28
4: Configuration
This chapter describes how to configure your xPrintServer using the xPrintServer user interface.
Admin user: the default and permanent master user login for the xPrintServer. The Admin user
has complete access of the xPrintServer user interface functionality including user, printer and job
management and configuration capabilities as compared to non-Admin users who can only
change their own password, have access to their own print jobs and view basic xPrintServer
information.
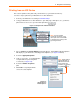
Table 4-1 Comparing Admin and Non-Admin User Privileges
Non-Admin User Privileges Admin User Privileges
Access to functionality in the Home
and Jobs tab in the xPrintServer
user interface.
Change user password.
View and modify own print jobs
(not the print jobs of other
users).
View basic information about the
xPrintServer system status.
Access to Home, Admin, Jobs, Printers, Users and Logs
tab pages which includes all the functionality available
through the xPrintServer user interface.
Change all user passwords.
View and manage information about all print jobs,
printers and user logins.
Ability to update firmware, reset device to default
settings, add/delete printers and users, manage printer
access, modify time zone, restart the device, view and
send diagnostic information, update the name of the
xPrintServer unit, and monitor logs.
User Administration
The Admin user is able to create new users, delete users, specify user access to particular
printers and update local and remote user passwords. The Admin user may also utilize the
Search feature as necessary to find a particular user. Non-Admin users may only modify the
password of their created account.
Changing Passwords
The Admin user and non-Admin users may use the To change your password directions below to
change their user password. The Admin user may use the To change a non-Admin user
password as the Admin directions below to change the password for any non-Admin user.
Password changes are effective immediately.
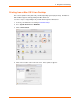
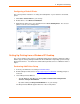
To change your password:
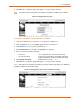
1. Login to the xPrintServer user interface (see Logging In).
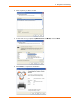
2. Click the Password link on the left side of the Home page. The Change Password page
will appear displaying the User for which the password change is being made.
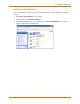
3. Complete the following fields:
Current Password
New Password
Re-enter new Password
4. Click Change Password.
Note: Passwords are case-sensitive and may
include up to 32 characters. All printable characters
may be used with the exception of single and double
quotation marks such as: ‘
or “.