
User guide


2: Installation
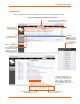
xPrintServer User Guide 13
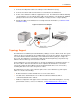
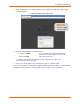
3. Connect the USB printer cable to the USB port of the xPrintServer (if any).
4. Connect the network cable from the wireless router/switch to the xPrintServer.
5. Power on the xPrintServer with the supplied power cord. The xPrintServer will automatically
set-up all printers on your network and/or USB-connected printers. The glowing “X” will blink
quickly for about 30 seconds, and then it will pulse slowly to show it’s ready for printing.
6. Monitor the LEDs on the xPrintServer for activity and status information (see Ethernet LEDs
and Status LEDs).
Figure 2-3 Quick Connect Diagram
Topology Support
The xPrintServer is hardwired (via standard CAT-5) cabling to a router, switch or hub. The system
requires an Access Point (A/P) be also hardwired and connected to the network. The iOS devices
associates with the A/P
and communicates to the xPrintServer when a print job is ready to be
processed. The xPrintServer communicates with network attached printer(s); the printers may
either be wired or wirelessly connected to the network.
For the xPrintServer to auto-detect printers on bootup, the xPrintServer and printers must be on
the same subnet. After auto-detection has been completed, the xPrintServer can then be
relocated to a different subnet (WI-FI connected subnet that iOS devices are connected to)
assuming that subnet can route to the previous subnet.
The xPrintServer uses Zeroconf to advertise print services to the iOS device(s) and requires
either one or both of the following:
Both the iOS device and the xPrintServer are on the same subnet.
The iOS device and xPrintServer are on different subnets but multicast traffic is
communicated between the subnets.
Multicast configuration and support can be found in the Lantronix knowledgebase. You may
perform word searches, such as for “multicast”, at
http://www.lantronix.com/resources/.