
User's Manual

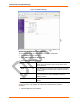


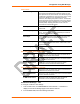


Table Of Contents
- Labeling of the End Product
- Integration Note
- Using This Guide
- Introduction
- Configuration Using DeviceInstaller
- Server Configuration
- WLAN Configuration
- Host List Configuration
- OEM Pin Configuration
- Channel 1 and Channel 2 Configuration
- Email Configuration
- Accessing WiPort using Web-Manager
- Host List Configuration
- Channel 1 and Channel 2 Configuration
- Email Configuration
- WLAN Configuration
- OEM Pin Configuration
- Updating Settings
- Configuration via Serial Mode or Telnet Port
- Configurable Pins
- Monitor Mode
- Updating Firmware
- Troubleshooting

Configuration using Web-Manager
22 WiPort™ User Guide
Figure 4-2. Network Settings
Automatic IP Address Configuration
To automatically assign an IP address and its network configuration:
1. Click Network from the main menu.
2. Select Obtain IP address automatically.
3. Enter the following (as necessary):
BOOTP
Select Enable to permit the Bootstrap Protocol (BOOTP). The
BOOTP server automatically assigns the IP address from a
pool of addresses.
DHCP
Select Enable to permit Dynamic Host Configuration Protocol
(DHCP). DHCP automatically assigns a leased IP address to
the WiPort unit.
Auto-IP The WiPort generates an IP in the 169.254.x.x address range
with a Class B subnet. Select the Disable checkbox to
disable this feature.
DHCP Host Name Enter the name of the host on the network providing the IP
address.
Note: Disabling BOOTP, DHCP, and Auto-IP (i.e. all three checkboxes) is
not advised as the only available IP assignment method will then be ARP or
serial port.
4. Click the OK button when finished.