
User's Manual
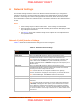
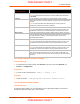
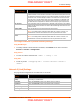
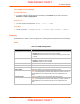
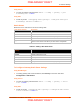
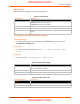
Table Of Contents
- PremierWave XC HSPA+ User Guide
- 1: Using This Guide
- 2: Introduction
- 3: Installation of PremierWave XC HSPA+
- 4: Using DeviceInstaller
- 5: Configuration Using Web Manager
- 6: Network Settings
- Network 1 (eth0) Interface Settings
- Network 1 (Link) Settings
- Network 1 (Failover)
- Network 2 (Cellular) Settings
- Network 2 (Link) Settings
- Gateway
- 7: Cellular
- 8: Action Settings
- 9: Line and Tunnel Settings
- Line Settings
- Tunnel Settings
- Serial Settings
- To Configure Tunnel Serial Settings
- Packing Mode
- To Configure Tunnel Packing Mode Settings
- Accept Mode
- To Configure Tunnel Accept Mode Settings
- Connect Mode
- To Configure Tunnel Connect Mode Settings
- Disconnect Mode
- To Configure Tunnel Disconnect Mode Settings
- Modem Emulation
- To Configure Tunnel Modem Emulation Settings
- Relay Output
- 10: Terminal and Host Settings
- 11: Services Settings
- 12: Security Settings
- 13: Maintenance and Diagnostics Settings
- Filesystem Settings
- Protocol Stack Settings
- SMTP Settings
- Diagnostics
- Threads
- Clock
- System Settings
- Discovery and Query Port
- 14: Advanced Settings
- 15: Security in Detail
- 16: Updating Firmware
- 17: Branding the PremierWave XC HSPA+
- Appendix A: Technical Specifications
- Appendix B: Compliance
- Appendix C: Technical Support
- Appendix D: Binary to Hexadecimal Conversions
- Appendix E: USB-CDC-ACM Device Driver File for Windows Hosts

PremierWave XC HSPA+ User Guide 32
6: Network Settings
The Network Settings show the status of the Ethernet interface/link and let you configure the
settings on the device. Interface settings are related to the configuration of the IP and related
protocols. Link settings are related to the physical link connection, which carries the IP traffic.
The PremierWave contains one network interface. The Ethernet interface is also called interface 1
or eth0.
Notes:
Some settings require a reboot to take effect. These settings are noted below.
Wait a minimum of 10-20 seconds after rebooting the unit before attempting to make
any subsequent connections.
The blue text in the XML command strings of this chapter are to be replaced with a
user-specified name.
Network 1 (eth0) Interface Settings
Table 6-1 shows the network interface settings that can be configured.
Table 6-1 Network Interface Settings
Network Interface
Settings
Description
State Select to enable or disable the interface.
BOOTP Client Select to turn On or Off. At boot up, after the physical link is up, the
PremierWave will attempt to obtain IP settings from a BOOTP server.
Note: Overrides the configured IP address/mask, gateway, hostname, and
domain. When DHCP is Enabled, the system automatically uses DHCP,
regardless of whether BOOTP is Enabled. Changing this value requires you to
reboot the device.
DHCP Client Select to turn On or Off. At boot up, after the physical link is up, the
PremierWave will attempt to obtain IP settings from a DHCP server and will
periodically renew these settings with the server.
Note: Overrides BOOTP, the configured IP address/mask, gateway,
hostname, and domain. Changing this value requires you to reboot the device.
Note: Within WebManager, click Renew to renew the DHCP lease.
Priority It ranges from 0-10. Note: Lower priority number means higher preference.
IP Address Enter the static IP address to use for the interface. You may enter it alone or in
CIDR format.
Note: This setting will be used if Static IP is active (both DHCP and BOOTP
are Disabled). Changing this value requires you to reboot the device. When
DHCP or BOOTP is enabled, the PremierWave tries to obtain an IP address
from a DHCP or BOOTP server. If it cannot, the PremierWave generates and
uses an Auto IP address in the range of 169.254.xxx.xxx, with a network mask
of 255.255.0.0.
PRELIMINARY DRAFT
PRELIMINARY DRAFT