
User's Manual
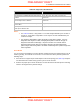

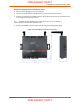

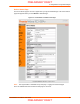
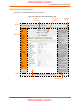
Table Of Contents
- PremierWave XC HSPA+ User Guide
- 1: Using This Guide
- 2: Introduction
- 3: Installation of PremierWave XC HSPA+
- 4: Using DeviceInstaller
- 5: Configuration Using Web Manager
- 6: Network Settings
- Network 1 (eth0) Interface Settings
- Network 1 (Link) Settings
- Network 1 (Failover)
- Network 2 (Cellular) Settings
- Network 2 (Link) Settings
- Gateway
- 7: Cellular
- 8: Action Settings
- 9: Line and Tunnel Settings
- Line Settings
- Tunnel Settings
- Serial Settings
- To Configure Tunnel Serial Settings
- Packing Mode
- To Configure Tunnel Packing Mode Settings
- Accept Mode
- To Configure Tunnel Accept Mode Settings
- Connect Mode
- To Configure Tunnel Connect Mode Settings
- Disconnect Mode
- To Configure Tunnel Disconnect Mode Settings
- Modem Emulation
- To Configure Tunnel Modem Emulation Settings
- Relay Output
- 10: Terminal and Host Settings
- 11: Services Settings
- 12: Security Settings
- 13: Maintenance and Diagnostics Settings
- Filesystem Settings
- Protocol Stack Settings
- SMTP Settings
- Diagnostics
- Threads
- Clock
- System Settings
- Discovery and Query Port
- 14: Advanced Settings
- 15: Security in Detail
- 16: Updating Firmware
- 17: Branding the PremierWave XC HSPA+
- Appendix A: Technical Specifications
- Appendix B: Compliance
- Appendix C: Technical Support
- Appendix D: Binary to Hexadecimal Conversions
- Appendix E: USB-CDC-ACM Device Driver File for Windows Hosts

3: Installation of PremierWave XC HSPA+
PremierWave XC HSPA+ User Guide 22
Table 3-8 Diagnostic LED Indications
Notes:
For Table 3-8 above, a “long” blink is 0.7 seconds of light followed by 0.3 seconds of
no light. A “short” blink is a light that is on for only 0.2 seconds and followed by 0.2
seconds of no light.
The diagnostic blink patterns reflect the highest priority fault condition. Also, the
Diagnostic LED will give an initial, identifying blink pattern to indicate the type of
diagnostic information it will display. All power and other non-network related
diagnostic patterns begin with one long blink. All wired LAN related diagnostics
patterns begin with two long blinks. All cellular-related diagnostics patterns begin with
three long blinks.
Reset Button
You can reset the PremierWave to factory defaults, including clearing the network settings. The IP
address, gateway, and netmask are set to 00s. To reset the unit to factory defaults, perform the
following steps.
1. Place the end of a paper clip or similar object into the reset opening (see Table 3-9) and press
and hold down micro switch during a power cycle for 10-15 seconds.
2. Remove the paper clip to release the button. The unit will continue the boot process restoring
it back to the original factory default settings.
Fault Conditions Blink Pattern
No Ethernet link when eth0 is enabled Long, long, short, short, 2 seconds off, continuous
No cellular link (no BSSID detected) when wlan0 is
enabled
Long, long, long, short, short, 2 seconds off,
continuous
No IP obtained from cellular when wlan0 is enabled
and the bridge mode is disabled.
Long, long, long, short, short, short, 2 seconds off,
continuous
Over temperature or when the internal temperature
reaches 85°F.
Long, short, short, short, 2 seconds off, continuous
Loss of power or when both the terminal and barrel
power input is below 9 volts.
Long, short, short, 2 seconds off, continuous
PRELIMINARY DRAFT
PRELIMINARY DRAFT