
Users Manual Part 2


FOX3-2G/3G/4G HARDWARE MANUAL VERSION 2.2.5
This confidential document is a property of Lantronix and may not be copied or circulated without previous permission.
Page 39 of 48
7.5.2. IOBOX-MINI/CAN/WLAN accessory devices for FOX3-2G/3G/4G
7.5.2.1. Connecting IOBOX-MINI/CAN/WLAN to FOX3-2G/3G/4G
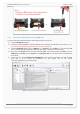
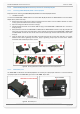
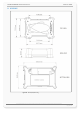
Requirements for mounting the IOBOX-MINI/CAN/WLAN to the FOX3-2G/3G/4G devices:
• T6-TORX screwdriver
To mount the IOBOX-MINI or IOBOX-CAN to one of the FOX3-2G/3G/4G devices or IOBOX-WLAN to one of the FOX3-
3G/4G devices, follow next steps:
1. Remove the power supply and any other connections from the device. Use a T6-TORX screwdriver as shown
in step (1) and unscrew 4 screws as shown in step (2).
2. Open the casing of the device as shown in step (3).
3. Indicate the USB connector on the device PCB and plug in the IOBOX-MINI or IOBOX-CAN to it as shown in
steps (4) and (5).
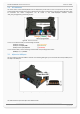
4. Hold pressed the front of the IOBOX-MINI or IOBOX-CAN or IOBOX-WLAN as shown in step (6) and place the
lower case on to the upper case of the device. Insert carefully the two tabs of the IOBOX-MINI or IOBOX-CAN
or IOBOX-WLAN into the two slots of the lower case of the device (6) and then slide the lower case until it
stops (7).
5. Close the device with all 4 screws (8). Make sure that both cases fit to each other and there is no space
between them. When tightening the screws, apply a tightening torque equal to these values: TORX 6
screwdriver with a fixed torque of 0.5 - 0.6 Nm
Figure 22: Mounting IOBOX-MINI or IOBOX-CAN/WLAN to the FOX3-2G/3G/4G devices.
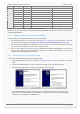
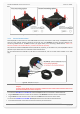
7.5.2.2. IOBOX-MINI pinout
The IOBOX-MINI is offered for the FOX3-2G/3G/4G as an accessory for input/output extensions. To connect external
input/output ports to the IOBOX-MINI, you have to order CA38 - 16pin cable.
FOX3-2G/3G/4G with IOBOX-MINI plugged in
IOBOX-MINI assignment
Figure 23: IOBOX-MINI pinout.