
Use Instructions


PN 10232 Eagle V1.2 Instructions for Use Rev 1.0 Page 72 of 101
6.2.2.2.5. Fluorescence Imaging
Accessed through Imaging Mode, White Light Imaging can only be performed after creating a new
patient session (Section 6.2.2.1.1), continuing a previous session (Section 6.2.2.1.2), or beginning a
Demo Session (Section 6.2.2.1.3).
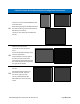
Table 37 Table XX Fluorescence Imaging Instruction
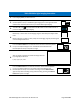
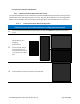
1.
Enter Imaging Mode per Section 6.2.2.2.
2.
Fluorescence Imaging must be performed in the darkness. When correct
ambient lighting conditions are met, the FL icon located in the top right corner
of the Imaging Mode’s user interface is circled in blue.
Refer to Section 6.2.2.2.5.1 if prompted with “Warning: “ambient light is too
bright for Fluorescence Imaging”.
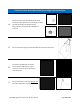
3.
While in Imaging Mode with the FL icon circled in blue, press the FL button on
the right side of the HFC tactile interface (Section 6.2.1) or the Fluorescence
Light Imaging Icon on the right side of the Software User Interface (Section
6.2.2) to initiate Fluorescence Imaging.
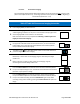
4.
The white FL icon turns blue when the FL button on the tactile interface is
pressed to begin Fluorescence Imaging.
5.
Move back, or move closer to the imaging target as directed by the Range
Finder icons
Before capturing an image or video, verify correct imaging range by
monitoring the onscreen Range Finder icons.
6.
Press the Camera button on the left side of the HFC Tactile Interface (Section
6.2.1) or the Capture Image Icon on the left side of the Software User Interface
(Section 6.2.2) to capture an image.
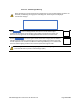
7.
Press the Video button on the left side of the HFC tactile interface (Section
6.2.1) or the Video Capture Icon on the left side of the User Interface (Section
6.2.2) to start video recording. Press the Video button again to stop video
recording. During video recording, pressing the Camera button will capture an
image.