Table of Contents Riding Mowers Accu-Z Razor® Z44 & Z52 (S/N 526171 & Above) Zero Turning Radius Mowers 24893 357-187M Operator’s Manual ! Read the Operator’s manual entirely. When you see this symbol, the subsequent instructions and warnings are serious - follow without exception. Your life and the lives of others depend on it! © Copyright 2009 Printed 1/12/09 Cover photo may show optional equipment not supplied with standard unit.
Land Pride Table of Contents Table of Contents Important Safety Information . . . . . . . . . . . 1 Safety at All Times . . . . . . . . . . . . . . . . . . . . . . . . . 1 Safety Labels . . . . . . . . . . . . . . . . . . . . . . . . . . . . . 4 Introduction . . . . . . . . . . . . . . . . . . . . . . . . . 7 Application . . . . . . . . . . . . . . . . . . . . . . . . . . . . . . . 7 Using This Manual . . . . . . . . . . . . . . . . . . . . . . . . . 7 Owner Assistance . . . . . . . . . . . . . . . . . .
Land Pride ▲ Table of Contents Important Safety Information Important Safety Information These are common practices that may or may not be applicable to the products described in this manual. Safety at All Times Look For The Safety Alert Symbol Thoroughly read and understand the instructions given in this manual before operation. Refer to the “Safety Label” section, read all instructions noted on them.
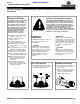
Table of Contents Land Pride Important Safety Information These are common practices that may or may not be applicable to the products described in this manual. Practice Safe Maintenance ▲ Understand procedure before doing work. Use proper tools and equipment, refer to Operator’s Manual for additional information. ▲ Work in a clean dry area. ▲ Put mower in park, turn off engine, and remove key before performing maintenance. ▲ Allow mower to cool completely before performing maintenance.
Table of Contents Land Pride Important Safety Information These are common practices that may or may not be applicable to the products described in this manual. Prepare for Emergencies ▲ Be prepared if a fire starts. ▲ Keep a first aid kit and fire extinguisher handy. ▲ Keep emergency numbers for doctor, ambulance, hospital and fire department near phone. Wear Protective Equipment ▲ Protective clothing and equipment should be worn. ▲ Wear clothing and equipment appropriate for the job.
Table of Contents Land Pride Important Safety Information Safety Labels Your mower comes equipped with all safety labels in place. They were designed to help you safely operate your implement. Read and follow their directions. 1. Keep all safety labels clean and legible. 2. Replace all damaged or missing labels. To order new labels go to your nearest Land Pride dealer. 3. Some new equipment installed during repair requires safety labels to be affixed to the replaced component as specified by Land Pride.
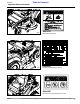
Table of Contents Land Pride Important Safety Information 24894 838-307C Warning: Moving Parts 838-308C 24913 Warning: Rotating Blade Hazard 838-833C 24894 1/12/09 Warning: Fuel (Imbedded in Fuel Tank) Z44 & Z52 (S/N 526171 & Above) Zero Turning Radius Mowers Riding Mowers Accu-Z Razor® 357-187M 5
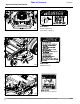
Table of Contents Land Pride Important Safety Information 838-444C 24895 24894 Danger: Muffler Hot (Both Sides of Engine) 838-310C Warning: General 838-815C Warning: Rollover Hazard 24913 6 Z44 & Z52 (S/N 526171 & Above) Zero Turning Radius Mowers Riding Mowers Accu-Z Razor® 357-187M 1/12/09
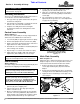
Table of Contents Land Pride Introduction Introduction Land Pride welcomes you to the growing family of new product owners. This mower has been designed with care and built by skilled workers using quality materials. Proper assembly, maintenance and safe operating practices will help you get years of satisfactory use from the machine. Application The Accu-Z® Razor Mowers from Land Pride are compact in size and ideal for homeowner grass maintenance.
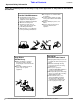
Table of Contents Land Pride Section 1: Assembly & Set-up Section 1: Assembly & Set-up NOTE: For correct torque values, refer to “Torque Values Chart” on page 48. Uncrating Instructions The crate is assembled with nails and the mower frame is secured to the crate floor with metal bands. 1. First, pry off the top panel and then the side panels and then the end panels. 2. Cut and remove metal bands securing front and rear wheels to the crate floor. Discard bands. 3.
Table of Contents Land Pride Section 1: Assembly & Set-up IMPORTANT: Do not pull a trailer or implement exceeding 300 pounds towing capacity and 50 pounds tongue weight. Loss of control may result. Do not make turns that will cause a trailer or implement being towed with the hitch to come in contact with the mower or damage may result. Electrical Cable Connection Refer to Figure 1-3: ! WARNING Incorrect battery cable connections can damage mower’s electrical system and cause battery cables to spark.
Table of Contents Land Pride Section 2: Operating Procedures Section 2: Operating Procedures Mower Features Refer to Figure 2-1: Your Razor riding mower is designed with innovative and state-of -the art features. Knowing the location and how these features work will make handling your mower more comfortable. Below is a list of the major features we will be reviewing in this section.
Table of Contents Land Pride Section 2: Operating Procedures Operating Check List Ignition Switch Hazard control and accident prevention are dependent upon awareness, concern, prudence and proper training involved in operation, transport, maintenance and storage of the riding mower. Therefore, it is absolutely essential that no one operates the mower without first having read, fully understood and become totally familiar with the Operator’s Manual.
Table of Contents Land Pride Section 2: Operating Procedures Blade Engagement Switch Refer to Figure 2-2: The blade engagement switch engages the deck blades. Pull switch up to engage blades and push switch down to disengage the blades. ! Move the control levers to neutral to stop and fully apart to set park brakes. IMPORTANT: Never engage blades with engine running at high rpm or when the deck is under load. Clutch, belts or deck could be damaged.
Table of Contents Land Pride Section 2: Operating Procedures Deck Lift Pedal Refer to Figure 2-6: The deck lift pedal is used to raise and lower the deck and to set deck cutting height. 1. Pushing on the deck lift pedal with your foot will raise the deck. 2. Using the deck height indicator, place deck height locking pin into the desired cutting height hole. 3. Lower deck gently against locking pin. When going over obstructions, push the deck lift pedal to raise the deck.
Table of Contents Land Pride Section 2: Operating Procedures NOTE: The engine starter should not be operated for periods longer then 30 seconds at a time. An interval of at least two minutes should be allowed between such cranking periods to protect the starter from overheating and burn-out. 4. Insert key in ignition switch and rotate clockwise to engage starting motor. Release key when engine starts. 5. Perform test to make sure safety start interlock system is operating properly.
Land Pride Table of Contents Section 2: Operating Procedures Front of Mower Faces This Direction 23923 Figure 2-7 Moving Mower with Stalled Engine Refer to Figure 2-8: Each hydro-drive is equipped with a bypass valve for the purpose of moving the mower when the engine is inoperable. Moving the mower with a good battery IMPORTANT: Do not tow machine. Move it by hand or use a winch and load it on a trailer.
Table of Contents Land Pride Section 2: Operating Procedures Safe Operating Instructions The safe operation of any machinery is a big concern to all consumers. Your Zero Turn Riding Mower has been designed with many built-in safety features. However, no one should operate this mower before carefully reading this Operator’s Manual. Also read all instructions noted on the safety decals. ▲ Be familiar with all functions of this mower. ▲ Avoid battery acid spills.
Land Pride Table of Contents Section 2: Operating Procedures ! DANGER Prior to operating the mower the operator should be thoroughly familiar with the proper use and operation of the equipment, should read the manual completely and thoroughly, and should have attempted slow moving maneuvers to become familiar with the operation of the equipment before attempting normal speed operation. An inexperienced operator should not mow on slopes or on uneven terrain.
Table of Contents Land Pride Section 2: Operating Procedures Mower Deck Operation ! DANGER Never attempt to make any adjustments to the mower deck while the engine is running or when the blades are engaged. Mower blades cannot be seen and are located very close to deck housing. Fingers and toes can be cut off instantly. With the engine running at a medium speed, engage blades (Refer to Figure 2-10). Advance engine throttle to full rpm once the blades have become fully engaged.
Table of Contents Land Pride Section 3: Adjustments Section 3: Adjustments ! WARNING Unless specifically required, DO NOT have engine running when servicing or making adjustments to the mower. Place both control levers in the park position and remove ignition switch key. Read and observe safety warnings in front of manual. Repairs or maintenance requiring engine power should be performed by trained personnel only.
Table of Contents Land Pride Section 3: Adjustments Control Lever Neutral Adjustment Before considering any adjustment, check tire air pressure and make certain hydraulic oil is at operating temperature. Unequal tire pressure will cause mower to drift to one side. Refer to “Tire Inflation Chart” on page 23 and page 48. Adjustments for neutral position are made to the pump linkage rods located between the control lever and pump arms.
Table of Contents Land Pride Section 3: Adjustments Forward Stop Adjustment Steering Dampener The control lever stops are designed to do two things: First, and most important, they must keep the pumps from bottoming out internally. Second, the stops may be adjusted to help drive straight when the control levers are pushed forward against the stops.
Table of Contents Land Pride Section 3: Adjustments Seat Adjustment Refer to Figure 1-1 on page 8: IMPORTANT: The arm rests on the Deluxe Seat must be pivoted up before hinging the seat platform forward. Leaving the arm rests down while hinging the seat platform forward can cut the arm rest covers and void their warranty. The seat platform is slotted so the seat can be adjusted to the operator.
Table of Contents Land Pride Section 3: Adjustments Deck Drive Belt Adjustment Engine RPM Setting The spindle belt remains in constant tension by means of a spring tensioned idler. The spring tension should be adjusted so that the belt does not slip under normal operating load conditions and may require readjusting as the belt stretches and wears. The belt should be replaced if it is excessively worn or damaged. The Razor is designed so that the engine will run at 3600 rpm static pump load only.
Table of Contents Land Pride Section 3: Adjustments Refer to Figure 3-9: 5. Set cutting height at 3 1/4” on the height indicator by placing the height adjusting stop in the 3” hole, and turning the height adjustment stop so that the flat side is against the stop handle. 6. Clamp the height adjusting stop against the stop handle. This will assure that the height will not move during the setting process. Otherwise, spring pressure from the deck lift springs will tend to pull the stop away from the handle.
Table of Contents Land Pride Section 3: Adjustments Refer to Figure 3-13: 9. Start the leveling process on the left front side of the mower. 10. Set the amount of threads on the deck lift rod to protrude approximately 1” pass the lift block. 11. Jam both nuts against the lift block. 12. Push or pull on the deck lift foot pedal until the chain on the left front just becomes tight, making sure that the deck stays tight against the 3” block.
Table of Contents Land Pride Section 3: Adjustments Refer to Figure 3-13 on page 25: 27. Compress the deck lift assist springs so that there is 1” of space between the front nut and on the spring and the rear nut on the deck lift block. Typical both sides. 28. When completed, all chains will be tight, and deck cutting height will be set to the deck height indicator. Deck Cutting Height Adjustment Deck height is adjustable from 1 1/2” to 4 1/2” in 1/4” increments.
Table of Contents Land Pride Section 4: Options & Accessories Section 4: Options & Accessories Snow Plow Refer to Figure 4-1: Get more use from your Zero Turn Mower by attaching a front mount snow blade. Available in 60" and 72" widths, this blade easily attaches to Accu-Z and Razor Riding Mowers.
Table of Contents Land Pride Section 4: Options & Accessories Grass Catcher Refer to Figure 4-5: Collect your fresh cut grass with a rear mount or side mount Grass Catcher. Grass collection systems are available through: Humboldt Speciality Mfg. Co. Ph. 800-488-2009.
Table of Contents Land Pride Section 5: Maintenance & Lubrication Section 5: Maintenance & Lubrication Maintenance Locations 22 6 5 7 10 9 3 17 21 16 2 8 19 1 4 7 6 22 18 9 24895 1. 2. 3. 4. 5. 6. 7. 8. 9. 10. 11. 12. 13. 14. 15. 16. 17. 18. 19. 20. 21. 22.
Table of Contents Land Pride Section 5: Maintenance & Lubrication Maintenance Schedule Service at Intervals Indicated Every 25 Hours Clean mower, Deck & Engine Cooling System Verify Safety Start Interlock System Every 50 Hours Every 100 Hours Every 200 Hours Refer to Page Daily (After engine has cooled.
Land Pride Table of Contents Section 5: Maintenance & Lubrication Maintenance ! WARNING Read and observe all safety warnings in this manual and in the engine service manual. ! WARNING Except when checking or changing components, always keep protective shields on for safety as well as for cleanliness. ! WARNING Keep your machine clean and remove any deposits of trash and clippings, which can cause engine fires and hydraulic overheating as well as excessive belt wear.
Table of Contents Land Pride Section 5: Maintenance & Lubrication Tires Use only tires recommended by Land Pride. Solid fill tires are not to be used on the Razor mower. It is important for your safety and the safety of others that the tires have correct air pressure. Check air pressure in all four tires before each use. Visually inspect tires for loss of air throughout each day of operation. See Tire Inflation Chart below for correct tire pressure.
Table of Contents Land Pride Section 5: Maintenance & Lubrication Refer to Figure 5-4: Remove the cover over the fuse to access the fuse. Uncovered 20 Amp Fuse Left Expansion Tank Right Expansion Tank 23809 Seat Platform Back 2-Bolts 20amp Fuse W/Cover Removed Figure 5-4 Before attempting any diagnosis of electrical system, use a test light or voltmeter to check battery voltage. If battery voltage is satisfactory, check cleanliness and tightness of terminals and ground connections.
Table of Contents Land Pride Section 5: Maintenance & Lubrication 5. Clean transaxle exterior and expansion tank of any debris. A degreaser may be needed. NOTE: Drain old oil filters of all free flowing oil prior to disposal. Place used oil and oil filter in appropriate containers and deliver to an approved collection facility. 6. Move actuator arm (#2) out of the way and unscrew the used oil filter (#5). Be sure to properly dispose the filter. 7. Remove expansion tank cover (#11) to facilitate drainage.
Land Pride Table of Contents Section 5: Maintenance & Lubrication Transaxle Purging Procedures It is critical that air is purged from the hydrostatic drive system to keep it efficient. This is because compression and expansion rate of air is higher than that of oil. This purge procedure should be implemented any time the hydrostatic system has been opened to facilitate maintenance or after the oil has been changed. Symptoms of a hydrostatic system that has not been purged may be: 1. Noisy operation. 2.
Table of Contents Land Pride Section 5: Maintenance & Lubrication Clean dirt from around fuel tank cap, remove cap and begin filling. Do not fill fuel tanks to the top if mowing on hilly terrain or in hot weather. Gas can rise up to the fuel cap vent hole and seep out. When finished, screw cap back on securely and wipe up any spilled gasoline. Use regular unleaded gasoline with an octane rating of 87 or higher.
Table of Contents Land Pride Section 5: Maintenance & Lubrication Crankcase Dipstick Never pry a belt onto a pulley as this will cut or damage the fibers of the belt covering. Keep oil and grease away from belts, and never use belt dressings. Any of these will destroy the belt composition in a very short time.
Table of Contents Land Pride Section 5: Maintenance & Lubrication 9. Re-tension idler pulley (#4) by turning the overcenter-release bolt (#9) clockwise. Tension belt per “Deck Drive Belt Adjustment” section on page 23. 10. Re-install hitch pin (#10). 11. Re-install deck belt covers. 12. Re-attach the negative battery cable and floor panel. 7 6 Hydro-Drive Belt Replacement Instructions 1 Refer to Figure 5-12 & Figure 5-13: 1. Park unit on a flat surface. Stop engine and remove ignition key.
Table of Contents Land Pride Section 5: Maintenance & Lubrication Mower Blade Maintenance Blade Inspection Check the mower blades daily, they are the key to power efficiency and well groomed turf. Keep them sharp, a dull blade will tear rather than cut the grass, leaving a brown ragged top on the grass within a few hours. A dull blade also requires more power from the engine. Replace any blade which is bent, cracked or broken. ! WARNING DO NOT try to straighten a blade that is bent.
Table of Contents Land Pride Section 5: Maintenance & Lubrication ! WARNING Failure to correctly torque the bolt may result in the loss of the blade which can cause serious injury. Warped Blade (Replace) Preparation of Engine for Storage Cutting Plane Prepare engine for long term storage as follows: 1. 2. 3. 4. Straight Blade 19076 9. Protect battery from freezing temperatures. Disconnect the negative ground wire from the battery to reduce the chances of a slow electrical drain.
Table of Contents Land Pride Section 5: Maintenance & Lubrication Lubrication Points Lubrication Legend Multi-purpose spray lube Multi-purpose grease lube Multi-purpose oil lube 50 Intervals in hours at which lubrication is required 25 Hours Center Blade Spindle Through opening between front shields. 1 Zerk Type of Lubrication: Multi-purpose Grease 23707 Quantity = As required 25 Hours Left Blade Spindle Under lower edge of pulley cover.
Table of Contents Land Pride Section 5: Maintenance & Lubrication 100 Hours Caster Wheel Bearing Zerk Located on hub of caster wheel 2 Zerks (One on each caster wheel) Type of Lubrication: Multi-purpose Grease Quantity = As required See NOTE: Caster spindles have sealed bearings and require no servicing.
Table of Contents Land Pride Section 5: Specifications & Capacities Section 5: Specifications & Capacities Z44 & Z52 Accu-Z Razor® (S/N 526171+) Engine Specifications Engine Type Briggs & Stratton Mower Model No. Z44 Horsepower Engine Model Type Honda Z52 22 Z44 22 26 44K777-0116-E1 44K777-0116-E1 44P777-0116-E1 No of Cylinders Z52 18 18 20 GXV610K1-QAF GXV610K1-QAF GXV620K1-QAF 2 2 2 2 2 2 44.2 cu. in. (725 cc) 44.2 cu. in. (725 cc) 44.2 cu. in. (725 cc) 37.5 cu. in.
Table of Contents Land Pride Section 5: Specifications & Capacities General Specifications Mower Model No‘ Starter Charging System Z44 Z52 12-volt (.8 KW), solenoid shift positive engagement. w/Honda Engine 12-volt (.8 KW), industrial Starter w/Briggs & Stratton Engine 12-volt, 20 amp w/Honda Engine 12-volt, 16 amp w/Briggs & Stratton Engine Governor Fuel Mechanical Unleaded gasoline with octane rating of 87 or higher Fuel Capacities 12 US GAL Ground Speed Forward: 0-7.5 MPH Reverse: 0-5.
Table of Contents Land Pride Section 6: Features and Benefits Section 6: Features and Benefits Z44 & Z52 Accu-Z Razor® (S/N 526171+) Features Benefits 44” or 52” Cutting width Sized and priced right for residential owners. Ground speed Forward 0-7.5 mph and Reverse 0-5.5 mph for high mowing productivity Mid-mount deck design Mid-mount design puts the deck closer to the operator’s line of sight for a more efficient and precise operation.
Table of Contents Land Pride Section 7: Troubleshooting Section 7: Troubleshooting Symptoms Starting motor does not crank Suggested Remedies Control arms are not in park position or park switch is out of adjustment Place control arms in neutral and full out.
Table of Contents Land Pride Section 7: Troubleshooting Symptoms Probable Causes Suggested Remedies Low oil pressure (Indicated by oil light on while engine is running.
Table of Contents Land Pride Section 8: Appendix Section 8: Appendix Torque Values Chart Bolt Head Identification Bolt Size (Inches) in-tpi 1 1/4" - 20 1/4" - 28 5/16" - 18 5/16" - 24 3/8" - 16 3/8" - 24 7/16" - 14 7/16" - 20 1/2" - 13 1/2" - 20 9/16" - 12 9/16" - 18 5/8" - 11 5/8" - 18 3/4" - 10 3/4" - 16 7/8" - 9 7/8" - 14 1" - 8 1" - 12 1-1/8" - 7 1 1/8" - 12 1 1/4" - 7 1 1/4" - 12 1 3/8" - 6 1 3/8" - 12 1 1/2" - 6 Grade 2 N · m ft-lb 7.4 8.
Table of Contents Land Pride Section 8: Appendix Warranty Land Pride warrants to the original purchaser that this Land Pride product will be free from defects in material and workmanship beginning on the date of purchase by the end user according to the following schedule: *Residential use: 4 years Parts and Labor. *Residential purpose means use of product on same lot as your home.
Corporate Office: P.O. Box 5060 Salina, Kansas 67402-5060 USA www.landpride.