
Operation Manual


156
LANCOM Advanced VoIP Client
Installing and Uninstalling LANCOM Advanced VoIP Client
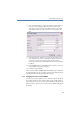
햴 To create a new account, click the "Add" button.
The dialog field "Edit SIP Account" is opened. Please note that the names given
here can vary according to the provider.
Select a pre-configured provider from the list of providers, or choose the option
"Custom" if you want to enter the details yourself.
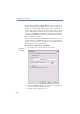
Choose the option „Automatic“, if your system has a configured VoIP router.
LANCOM Advanced VoIP Client logs on directly to this after you have entered
your user data (see (d)), and you do not need to specify the server name.
햵 In the field "User ID", please enter your user ID. You are given this ID by your
provider, and it is the first component of your SIP-URI (e.g. "Jones" in
Jones@Lancom.com).
햶 Enter a label for the account in "Description". This entry is optional.
햷 In the lower half, you must enter your authentication data for logging on to the
SIP provider. Your provider gives you the user name and the password for the
logon.
햸 You can use the "Enable account" button to specify that this account can be
used. If this option is activated, LANCOM Advanced VoIP Client logs on to the
relevant provider with this account each time it starts.