
Operation Manual


140
LANCOM Advanced VoIP Client
LANCOM Advanced VoIP Client Configuration
햶 Click on “Assign” to assign the Hotkey you have chosen.
LANCOM Advanced VoIP Client will now check whether the Hotkey you have
chosen has already been assigned elsewhere. If it has, you will receive a
message.
You must then repeat step 4.
햷 If you activate "Accept calls with 'Return'", you can pick up the call by pressing
the 'Return' button. If you are telephoning with a headset, this will be
activated. If you are telephoning with a handset, handsfree telephoning will be
activated - if it is available. Otherwise only the speakers will be activated.
햸 If you activate "Switch on Num key when LANCOM Advanced VoIP Client
window is active", you can immediately enter the number using the numeric
keypad in the case of an activated LANCOM Advanced VoIP Client window. If
this checkbox is not activated, you can still enter a number after pressing the
Num key, even if the LANCOM Advanced VoIP Client window is not active. The
LANCOM Advanced VoIP Client window will open with the entered number in
the display.
햹 Click on “OK”.
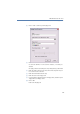
This is how you delete a Hotkey
햲
If you would like to delete a Hotkey, select the associated function from the
drop-down list.
햳 The assigned Hotkey will be shown under “Hotkey”.
햴 Click on “Remove” to delete the entered Hotkey.
햵 Click on “OK”.
When you delete a LANCOM Advanced VoIP Client Hotkey, the original
Windows Hotkey function is restored.
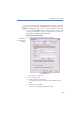
8.4.9 SIP Account / Audio
Here you can define all local settings.
This includes e.g. the definition of the SIP account, or settings for the speech
quality.
This is how you define the settings for your LANCOM Advanced VoIP
Client computer
햲
Go to the menu bar and click on "Settings | SIP Accounts / Audio".
The “Properties of…” page opens.
Select the “SIP Accounts” tab
Delete Hotkey
Configure
LANCOM
Advanced VoIP
Client locally