
Operation Manual


116
LANCOM Advanced VoIP Client
LANCOM Advanced VoIP Client in Detail
햳 Click on the “Export...” button.
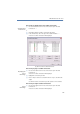
The Export Recorded Conversations wizard will appear.
햴 Click on “Next >”. A list of the recorded conversations will appear. This contains
all recorded conversations. As default, all recordings are highlighted for export.
햵 In the first column, deactivate as necessary any recordings that you don't want
to export.
햶 Click on ”Next >”.
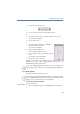
햷 Select the directory into which the recording should be exported.
You can also say here whether an existing file should be overwritten, or
whether this recording should not be exported.
햸 The recordings will be saved as WAV files. In the process, the name of an
exported file will be created as follows:
<Direction of the call>#
A differentiation is made between outgoing calls (OUT) and incoming calls
(IN).
<Number of the user>#
This is the called extension (IN), or the extension from which the call was
started (OUT).
<Name of the conversation partner>#
The name can only be given if the number has been assigned to a name.
<Number of the conversation partner>#
Will be displayed if one exists.
<Date of the call>#
Date in the format <yyyymmdd>
<Time of the call>
Time in the format <hhmmss>
Example:
The name
Out#123#Schulz, Eva#0012345678#20050217#155844.wav
means that an outgoing call from the number "123" to Eva Schulz with the
number "0112345678" was recorded on February 17, 2005 at 15:58:44.