
Operation Manual


104
LANCOM Advanced VoIP Client
LANCOM Advanced VoIP Client in Detail
This is how you import entries into your Phonebook
햲
You have several options:
Click on the “Phonebook” button or
go to the menu bar and click on “Lists | Phonebook...” or
Click with the right mouse button on the LANCOM Advanced VoIP Client
user interface and then on “Lists | Phonebook...”.
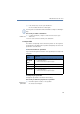
The following window appears: “Phonebook”.
햳 Click on "Import...".
The Import Wizard will appear. It supports you as you import the entries into
the Phonebook.
햴 Click on ”Next >”.
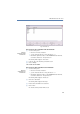
The following window appears: "Select the Source File".
햵 Enter the file from which the entries should be imported.
Once the file is selected, the entries will be checked and displayed in the
window. In addition, you will be shown how many entries (lines) this file
contains and whether any damaged entries exist.
Damaged entries will be indicated with "**** Invalid lines! ****“.
You can edit the file here before importing.
햶 To do so, click on “Edit…”. A word processing program will open. You can then
change or delete your entries or add new ones. Save and close the file.
햷 If you have made changes in the import file, click on "Reload...".
The file will be checked again.
햸 Click on ”Next >”.
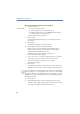
The following window appears: "Select the Phonebook entries to be imported".
Deactivate the checkbox in front of the entries that you do not want to import.
Tip: If you would like to deactivate/activate several entries at once, highlight
them by clicking on one entry and then click on the other entries while
pressing the CTRL key. All highlighted entries appear with a colored
background. You can then switch the activation of the highlighted entries by
pressing the space bar.
햹
Click on ”Next >”.
햺 The following window appears: "Delete existing Phonebook before import".
Activate the checkbox "Delete existing Phonebook before import" if you would
like to replace the existing Phonebook with the imported one.
Import entries