
Operation Manual


•
103
LANCOM Advanced VoIP Client
LANCOM Advanced VoIP Client in Detail
This is how you export your entries from the Phonebook
햲
You have several options:
Click on the “Phonebook” button or
go to the menu bar and click on “Lists | Phonebook...” or
Click with the right mouse button on the LANCOM Advanced VoIP Client
user interface and then on “Lists | Phonebook...”.
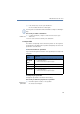
The following window appears: “Phonebook”.
햳 Click on "Export...".
The Export Wizard will appear. It supports you as you export the entries from
the Phonebook.
햴 Click on ”Next >”.
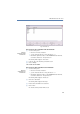
The following window appears: "Select the Phonebook entries to be exported".
햵 Deactivate the checkbox in front of the entries that you do not want to export.
Tip: If you would like to deactivate/activate several entries at once, highlight
them by clicking on one entry and then click on the other entries while
pressing the CTRL key. All highlighted entries appear with a colored
background. You can then switch the activation of the highlighted entries by
pressing the space bar.
햶
Click on ”Next >”.
The following window appears: "Select the destination file".
햷 Select the directory and a file name under which the exported file should be
saved.
햸 You can also define whether the entries should be added to an existing file or
whether an existing file should be overwritten.
햹 If the column names (Name, Phone Number) should appear in the first line of
the file, activate the corresponding checkbox.
햺 Click on ”Next >”.
Before the export takes place, you will be shown an overview of the export
parameters.
If you would like to make additional changes, click on "Back" and change the
parameters.
햻 Begin the export by clicking on “Next >”.
햽 The following window appears: "End the Export Wizard for the Phonebook".
햾 Click “Finish”.
The export wizard will be closed
햿 Click on ”Close” to close the window.
Export entries