LANCOM 7111 VPN LANCOM 8011 VPN
© 2004 LANCOM Systems GmbH, Wuerselen (Germany). All rights reserved. While the information in this manual has been compiled with great care, it may not be deemed an assurance of product characteristics. LANCOM Systems shall be liable only to the degree specified in the terms of sale and delivery. The reproduction and distribution of the documentation and software included with this product is subject to written permission by LANCOM Systems.
LANCOM 7111 VPN – LANCOM 8011 VPN Preface Preface Thank you for placing your trust in this LANCOM Systems product. Due to the Fast Ethernet uplink, LANCOM devices are ideal partners for all connection variants. Integrated LANCOM High Security Firewall With 100 up to 1000 VPN channels the LANCOM router series offers enough capacity for high-bandwidth couplings (LANCOM 8011 VPN with hardware accelerator).
LANCOM 7111 VPN – LANCOM 8011 VPN Preface We ask you additionally to inform you about technical developments and actual hints to your product on our Web page www.lancom.de, and to download new software versions if necessary. User manual and reference manual The documentation of your device consists of two parts: the user manual and the reference manual. EN You are now reading the user manual. It contains all information you need to start your LANCOM router.
LANCOM 7111 VPN – LANCOM 8011 VPN Preface In the other parts of the documentation, all described models have been classified under the general term LANCOM router. This documentation was compiled … In case you encounter any errors, or just want to issue critics or enhancements, please do not hesitate to send an email directly to: info@lancom.de Our online services ( www.lancom.
LANCOM 7111 VPN – LANCOM 8011 VPN Contents Contents 1 Introduction EN 1.1 Which use does VPN offer? 9 1.2 Firewall 12 1.3 What does a router do? 1.3.1 Bridgehead to the WAN 1.3.2 Areas of deployment for routers 13 14 14 1.4 What can your LANCOM router do? 15 2 Installation 18 2.1 Package contents 18 2.2 System preconditions 18 2.3 Introducing LANCOM router 2.3.1 Status displays 2.3.2 The back of the unit 19 19 24 2.4 Hardware installation 24 2.5 Software installation 2.5.
LANCOM 7111 VPN – LANCOM 8011 VPN Contents 42 5.1 What information is necessary? 5.1.1 General information 5.1.2 Settings for the TCP/IP router 5.1.3 Settings for the IPX router 5.1.4 Settings for NetBIOS routing 43 43 45 46 47 5.2 Instructions for LANconfig 48 5.3 Instructions for WEBconfig 48 6 Providing dial- up access 50 6.1 Which information is required? 6.1.1 General information 6.1.2 Settings for TCP/IP 6.1.3 Settings for IPX 6.1.4 Settings for NetBIOS routing 50 51 52 52 53 6.
LANCOM 7111 VPN – LANCOM 8011 VPN Contents 9 Troubleshooting 9.1 No WAN connection is established 67 9.2 DSL data transfer is slow 67 9.3 Unwanted connections under Windows XP 68 9.4 Cable testing 68 EN 10 Appendix 70 10.1 Performance data and specifications 70 10.2 Contact assignment 10.2.1 DSL interface 10.2.2 ISDN-S0 interface 10.2.3 Ethernet interfaces 10/100Base-T 10.2.4 Configuration interface (Outband) 72 72 72 73 73 10.
LANCOM 7111 VPN – LANCOM 8011 VPN Chapter 1: Introduction 1 Introduction Due to the Fast Ethernet uplink, the devices are the ideal partner for almost all WAN connection variants. The integrated multi protocol router and the integrated firewall enable a secure internet access for the local network. The ISDN interface is mainly used to establish Dynamic VPN connections to remote sites with dynamic IP addresses. 1.
LANCOM 7111 VPN – LANCOM 8011 VPN Chapter 1: Introduction Conventional network infrastructure First, let's have a look at a typical network structure that can be found in this form or similar forms in many companies: EN LAN Head Office ISDN ISDN LAN Workstation in remote access, e.g. homework Internet Subsidiary The corporate network is based on the internal network (LAN) in the headquarters.
LANCOM 7111 VPN – LANCOM 8011 VPN Chapter 1: Introduction to the original investment costs, ongoing costs are also incurred for the administration and maintenance of this equipment. Networking via the Internet EN The following structure results when using the Internet instead of direct connections : LAN Head Office Internet LAN Subsidiary Workstation in remote access All participants have fixed or dial-up connections to the Internet. Expensive dedicated lines are no longer needed.
LANCOM 7111 VPN – LANCOM 8011 VPN Chapter 1: Introduction technologies such as DSL (Digital Subscriber Line) or G.703 (2-Mbit leased lines). But also a conventional ISDN line can be used. The technologies of the individual participants do not have to be compatible to one another, as would be the case for conventional direct connections. A single Internet access can be used to establish multiple simultaneous logical connections to a variety of remote stations.
LANCOM 7111 VPN – LANCOM 8011 VPN Denial-of-Service Protection Attacks from the Internet can be break-in attempts as well as attacks with the aim of blocking the accessibility and functionality of individual services. Therefore a LANCOM Wireless DSL is equipped with appropriate protective mechanisms, which recognize well-known hacker attacks and which guarantee the functionality.
LANCOM 7111 VPN – LANCOM 8011 VPN Chapter 1: Introduction Connecting a LAN to the Internet does not technically differ from coupling two LANs. The only difference is that it is not just a handful of computers behind the Internet provider's router. Instead, it is the net of the networks the public Internet. 1.3.
LANCOM 7111 VPN – LANCOM 8011 VPN Chapter 1: Introduction access to the Internet is required on either side of the network interconnection. EN VPN tunnel via the Internet VPN gateways Conventional via ISDN Without VPN, a LAN to LAN interconnection can alternatively be realized via ISDN. In this case, an intelligent line management and sophisticated filter mechanisms keeps connection costs low.
LANCOM 7111 VPN – LANCOM 8011 VPN Chapter 1: Introduction RAS server (via VPN) RAS server (via ISDN) EN IP router IPX router (via ISDN), e.g.
LANCOM 7111 VPN – LANCOM 8011 VPN Chapter 1: Introduction LANCOM 7111 VPN LANCOM 8011 VPN Quality of Service Dynamic bandwidth management / IP-Traffic Shaping EN Bandwidth limiting with absolute or per connection transfer limits, separated from send or receive site TOS or DiffServ priority queuing Automatic packet size adaption incl. PMTU adjustment or fragmentation.
LANCOM 7111 VPN – LANCOM 8011 VPN Chapter 2: Installation 2 Installation This chapter will assist you to quickly install hardware and software. First, check the package contents and system requirements. The device can be installed and configured quickly and easily if all prerequisites are fulfilled. EN 2.1 Package contents Please check the package contents for completeness before starting the installation.
LANCOM 7111 VPN – LANCOM 8011 VPN Chapter 2: Installation The LANtools and the LANCAPI functions also require a Windows operating system. A web browser is required for access to WEBconfig. 2.3 Introducing LANCOM router This section introduces your device. We will give you an overview of all status displays, connections and switches. While the information in this section is useful for the installation of the device, it is not absolutely essential.
LANCOM 7111 VPN – LANCOM 8011 VPN Chapter 2: Installation Flashing means, that the LED lights up very briefly in the respective colour and stay then clearly longer (approximately 10x longer) switched off. Inverse flashing means the opposite. The LED lights permanently in the respective colour and is only briefly interrupted. Flickering means, that the LED is switched on and off in irregular intervals. EN Power This LED indicates that the device is operational.
LANCOM 7111 VPN – LANCOM 8011 VPN Chapter 2: Installation Reset connect charge protection. Increase the limit that has been reached. Completely deactivate the lock that has been triggered (set limit to '0'). LANCOM Systems Signal for reached time or connect-charge limit EN There's no need to worry if the Power LED blinks red and you can no longer connect to the WAN. This simply indicates that a preset time or connect-charge limit has been reached.
LANCOM 7111 VPN – LANCOM 8011 VPN Chapter 2: Installation ETH 1 to ETH 4 Connection status and data traffic of the four LAN ports with integrated switch:.
LANCOM 7111 VPN – LANCOM 8011 VPN Chapter 2: Installation reactivated as required, and the ISDN status LED will once again light up green.
LANCOM 7111 VPN – LANCOM 8011 VPN Chapter 2: Installation 2.3.
LANCOM 7111 VPN – LANCOM 8011 VPN Chapter 2: Installation The LAN connector identifies automatically the transfer rate (10/100 Mbps) of the connected network device (autosensing). A parallel connection of devices with different speeds and types is possible. You should never have more than one unconfigured LANCOM router in a network segment at any given time. All unconfigured LANCOM router devices use the same IP address (with the final digits '254'), which would result in an address conflict.
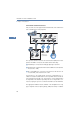
LANCOM 7111 VPN – LANCOM 8011 VPN Chapter 2: Installation Example for LANCOM 8011 VPN EN Configuration PC with serial port ISDN-(NTBA) LAN DMZ Network terminator, e.g. SDSL modem 2.5 Software installation This section covers the installation of the included system software LANtools for Windows. You may skip this section if you use your LANCOM router exclusively with computers running operating systems other than Windows. 2.5.1 Starting LANCOM setup Place the LANCOM CD in your CD drive.
LANCOM 7111 VPN – LANCOM 8011 VPN Chapter 2: Installation EN In Setup select Install LANCOM Software. The following selection menus will appear on the screen: 2.5.2 Which software should you install? LANconfig is the configuration program for all LANCOM routers and Wireless LAN access points. WEBconfig can be used alternatively or in addition via a web browser. LANmonitor lets you monitor on a Windows PC all LANCOM routers and Wireless LAN access points. LANCAPI is a special form of the CAPI-2.
LANCOM 7111 VPN – LANCOM 8011 VPN Chapter 3: Basic configuration 3 Basic configuration The basic configuration can be performed on a step-by-step basis using a convenient setup wizard to guide you through the setup process and prompt you for the required information. EN First, this chapter will inform you which information is required for the basic configuration. Use this section to assemble the information you will need before launching the wizard. Next, enter the data in the setup wizard.
LANCOM 7111 VPN – LANCOM 8011 VPN Chapter 3: Basic configuration New LAN—fully automatic configuration possible If all connected network devices are still unconfigured, the setup wizard will suggest fully automatic TCP/IP configuration. This may be the case in the following situations: Fully automatic TCP/IP configuration will not be available when integrating the LANCOM router in an existing TCP/IP LAN.
LANCOM 7111 VPN – LANCOM 8011 VPN Chapter 3: Basic configuration Enable DHCP server? Disable the DHCP server function in the LANCOM router if you would like to have a different DHCP server assign the IP addresses in your LAN. 3.1.2 Configuration protection EN The password for configuration access to the LANCOM router protects the configuration against unauthorized access.
LANCOM 7111 VPN – LANCOM 8011 VPN Chapter 3: Basic configuration 3.1.5 Connect charge protection Connect charge protection blocks connections that go beyond a previously set amount, protecting you from unexpectedly high connection costs. EN In a LANCOM router, there are three independent budgets: For DSL access, you can set a maximum connection time in minutes. In addition to this time budget, there is also a budget for limiting ISDN connection charges.
LANCOM 7111 VPN – LANCOM 8011 VPN Chapter 3: Basic configuration hosts (netmask > '255.255.255.0'), please ensure that the IP address 'x.x.x.254' is located in your own subnet. If you have chosen automatic TCP/IP configuration, please continue with Step . EN If you would like to configure the TCP/IP settings manually, assign an available address from a suitable address range to the LANCOM router. Confirm your choice with Next. Specify whether or not the router should act as a DHCP server.
LANCOM 7111 VPN – LANCOM 8011 VPN Chapter 3: Basic configuration Section ’TCP/IP settings to workstation PCs’ on page 37 will describe the settings required for the individual workstations in the LAN. Instructions for WEBconfig To configure the router with WEBconfig you must know how to address it in the LAN.
LANCOM 7111 VPN – LANCOM 8011 VPN Chapter 3: Basic configuration address x.x.x.254 ( “x” stands for the first three blocks in the IP address of the configuration PC). Network with DHCP server EN If a DHCP server is active in the LAN to assign IP addresses, an unconfigured LANCOM device will turn off its own DHCP server. It will change into DHCP client mode and will obtain an IP address from the DHCP server of the LAN. This IP address is not known at first.
LANCOM 7111 VPN – LANCOM 8011 VPN Chapter 3: Basic configuration If you cannot access an unconfigured LANCOM router, the problem may be due to the netmask of the LAN: with less than 254 possible hosts (netmask > '255.255.255.0'), please ensure that the IP address 'x.x.x.254' is located in your own subnet. EN The WEBconfig main menu will be displayed: The setup wizards are tailored precisely to the functionality of the specific LANCOM router.
LANCOM 7111 VPN – LANCOM 8011 VPN Chapter 3: Basic configuration In the following 'Security settings' window, specify a password for configuration access. Note that the password is case-sensitive and ensure that it is sufficiently long (at least 6 characters). EN You may specify whether the device may only be configured from the local network or whether remote configuration via the WAN (i.e. a remote network) is also permissible.
LANCOM 7111 VPN – LANCOM 8011 VPN Chapter 3: Basic configuration Connect charge protection can limit the cost of DSL and ISDN connections to a predetermined amount if desired. Confirm your choice with Apply. Enter the ISDN subscriber numbers (as MSNs, i.e. without area code) on which the router will accept calls. Multiple numbers are separated by semicolons. If you do not specify any MSNs, the router will answer all incoming calls on the ISDN connection.
LANCOM 7111 VPN – LANCOM 8011 VPN Chapter 3: Basic configuration IP address assignment via a separate DHCP server The workstation PCs must be configured so that they automatically obtain their own IP address and the IP addresses of the standard gateway and DNS server (via DHCP). The IP address of the LANCOM router must be stored on the DHCP server so that the DHCP server transmits it to the PCs in the LAN as the standard gateway.
LANCOM 7111 VPN – LANCOM 8011 VPN Chapter 4: Setting up Internet access 4 Setting up Internet access EN All computers in the LAN can take advantage of the central Internet access of the LANCOM router. The connection to the Internet provider can be established via any WAN connection. Internet access via ISDN can be used as a backup connection for DSL, for example.
LANCOM 7111 VPN – LANCOM 8011 VPN Chapter 4: Setting up Internet access ISDN – dial-in number User name and password Additional connection options You may also enable or disable further options in the wizard, depending on whether or not they are supported by your Internet provider: EN Time-based billing or flat rate – select the accounting model used by your Internet provider.
LANCOM 7111 VPN – LANCOM 8011 VPN Chapter 4: Setting up Internet access 4.1 Instructions for LANconfig EN Highlight the LANCOM router in the selection window. From the menu bar, select Tools Setup Wizard. From the menu, select the Setup Internet access wizard and click Next. In the following window select your country and your Internet provider if possible, and enter your access information.
LANCOM 7111 VPN – LANCOM 8011 VPN Chapter 5: Linking two networks 5 Linking two networks With the network interconnection (also known as LAN to LAN coupling) of the LANCOM router, two local networks are linked. The LAN to LAN coupling can be realized in principle in two different ways: EN VPN: For coupling via VPN, the connection between both LANs is established over a specially secured connection through the public Internet. A router with VPN support is required in both LANs.
LANCOM 7111 VPN – LANCOM 8011 VPN Chapter 5: Linking two networks The ISDN call back function cannot be configured using the wizard. It can only be set up in the expert configuration. For details, please see the reference manual. What information is necessary? The wizard will prompt you for the necessary information on a step-by-step basis. If possible, however, you should have it available before launching the wizard.
LANCOM 7111 VPN – LANCOM 8011 VPN EN Chapter 5: Linking two networks Coupling Entry Gateway 1 Gateway 2 VPN Netmask of the remote network 255.255.255.0 255.255.255.
LANCOM 7111 VPN – LANCOM 8011 VPN The password for the ISDN connection is an alternative to the use of the ISDN caller ID. It is always used to authenticate callers that do not send an ISDN caller ID. The exact same password must be entered on both sides. It is used for calls in both directions. The Shared Secret is the central password for security within the VPN.
LANCOM 7111 VPN – LANCOM 8011 VPN Chapter 5: Linking two networks DNS access to the remote LAN Thanks to DNS, it is not only possible to access remote computers in a TCP/IP network via their IP address, but also by using freely defined names. EN For example, the computer with the name 'pc1.branch.company' (IP 10.0.2.10) will not only be able to access the server of the head office via its IP address, but also via its name, 'server.head.company'.
LANCOM 7111 VPN – LANCOM 8011 VPN Chapter 5: Linking two networks for the LAN of the head office for the LAN of the branch office for the higher-level WAN The IPX network numbers in the head and branch offices are specified to the respective remote sides. EN IPX internal net: 00020002 WAN IPX network no.: 00000009 VPN or ISDN connection (0123) 123456 LAN of the head office IPX network no.: 00000001 Binding: Ethernet_II (0789) 654321 LAN of the branch office IPX network no.
LANCOM 7111 VPN – LANCOM 8011 VPN Chapter 5: Linking two networks Remote Windows workgroups do not appear in the Windows Network Neighbourhood, but can only be contacted directly (e.g. via Find Computers). 5.2 Instructions for LANconfig EN Perform the configuration on both routers, one at a time. Launch the 'Connect two local area networks' wizard. Follow the wizard's instructions and enter the required information.
LANCOM 7111 VPN – LANCOM 8011 VPN Chapter 5: Linking two networks From the main menu, launch the 'Connect two local area networks' wizard. Follow the wizard's instructions and enter the required information. After finishing the configuration of both routers, you can test the network connection. Try to contact a computer in the remote LAN (e.g. with a ping). The LANCOM router should automatically set up a connection to the remote station and contact the required computer.
LANCOM 7111 VPN – LANCOM 8011 VPN Chapter 6: Providing dial- up access 6 Providing dial-up access Your LANCOM router supports dial-up connections to permit individual computers full access to your network. This service is also known as RAS (Remote Access Service). In principle, the RAS access can be realized in two different ways: EN VPN: For a RAS access via VPN, the connection between the LAN and the dial-in PC is established over a specially secured connection through the public Internet.
LANCOM 7111 VPN – LANCOM 8011 VPN Chapter 6: Providing dial- up access 6.1.
LANCOM 7111 VPN – LANCOM 8011 VPN Chapter 6: Providing dial- up access 6.1.2 Settings for TCP/IP Each active RAS user must be assigned an IP address when using the TCP/IP protocol. LAN of the head office. IP: 10.0.1.0 EN Remote workstation IP: 10.0.1.101 VPN or ISDN connection 10.0.1.100 (0123) 123456 ISDN adapter User: 'SAMPLE' (0123) 777888 This IP address can be permanently assigned when setting up a user.
LANCOM 7111 VPN – LANCOM 8011 VPN Chapter 6: Providing dial- up access IPX internal net: 00020002 VPN or ISDN connection (0123) 123456 LAN of the head office IPX network no.: 00000001, Binding: Ethernet_II Remote workstation EN WAN IPX network no.: 00000009 ISDN adapter User: 'SAMPLE' (0123) 777888 The required network numbers are designated as “External Network Numbers”. Like IP network addresses, they apply to an entire LAN segment.
LANCOM 7111 VPN – LANCOM 8011 VPN Chapter 6: Providing dial- up access 6.2 6.2.1 Settings for the dial-in computer Dial-up via VPN For dialing into a network via VPN a workstation requires: an Internet access a VPN client EN LANCOM Systems offers the LANCOM VPN Client on the LANCOM CD. It can be run under Windows 2000 and Windows XP. A detailed description of the LANCOM VPN Client and a description of its installation can also be found on the CD.
LANCOM 7111 VPN – LANCOM 8011 VPN Chapter 6: Providing dial- up access Select desired network protocols (TCP/IP, IPX) Additional TCP/IP settings: Assignment of IP address and name server address enabled 'IP header compression' disabled 6.3 EN These settings will permit a PC to dial into a remote LAN via ISDN and access its resources in the usual manner. Instructions for LANconfig Launch the 'Provide Dial-In access (RAS)' wizard.
LANCOM 7111 VPN – LANCOM 8011 VPN Chapter 6: Providing dial- up access From the main menu, launch the 'Connect two local networks' wizard. Follow the wizard's instructions and enter the required information. EN Configure Dial-Up Networking access on the dial-in PC as described. Next, test the connection (see box ’Ping – quick testing for TCP/IP connections’ →page 49).
LANCOM 7111 VPN – LANCOM 8011 VPN Chapter 7: Sending faxes with LANCAPI 7 Sending faxes with LANCAPI The main advantages of using LANCAPI are economic. LANCAPI provides all Windows workstations integrated in the LAN (local-area network) with unlimited access to office communications functions such as fax machines, answering machines, online banking and eurofile transfer.
LANCOM 7111 VPN – LANCOM 8011 VPN Chapter 7: Sending faxes with LANCAPI 7.1 Installation of the LANCOM CAPI fax modem Select the entry Install LANCOM software in the setup program of your LANCOM CD. EN Highlight the option CAPI fax modem, click Next and follow the instructions of the installation routine.
LANCOM 7111 VPN – LANCOM 8011 VPN Chapter 7: Sending faxes with LANCAPI EN When the installation was successful, the LANCOM CAPI fax modem is entered into the Phone and Modem Options of the control panel. 7.2 Installation of the MS Windows fax service Select the option Printers and Faxes from the control panel. Select the option Set up faxing from the window ’Printers and Fax’. Follow, if necessary, the instructions of the installation tool.
LANCOM 7111 VPN – LANCOM 8011 VPN Chapter 7: Sending faxes with LANCAPI For checking the installation, click with the right mouse button on the fax-icon and select Properties. The LANCOM CAPI fax modem should now be entered into register 'devices'. 7.3 Sending a fax EN After installing all required components, you have several possibilities to send a fax from your workstation PC. If you have already an existing data file, you can send it directly from your respective application.
LANCOM 7111 VPN – LANCOM 8011 VPN Chapter 7: Sending faxes with LANCAPI EN The fax client console will open. Select the menu item Send a Fax. A wizard will assist you through the remaining sending process.
LANCOM 7111 VPN – LANCOM 8011 VPN Chapter 8: Security settings 8 Security settings Your LANCOM router has numerous security functions. You find in this chapter all information you need for an optimal protection. 8.1 The security settings wizard EN Access to the configuration of a device permits not only to read out critical information such as WEP key or Internet password. Rather, also the entire settings of the security functions (e.g. firewall) can be altered then.
LANCOM 7111 VPN – LANCOM 8011 VPN Chapter 8: Security settings In a next step parameters of the configuration lock like number of failed log-in attempts and the duration of the lock can be adjusted. Now activate Stateful Inspection, ping-blocking and Stealth mode in the the firewall configuration. 8.1.2 EN The wizard will inform you when entries are complete. Complete the configuration with Finish.
LANCOM 7111 VPN – LANCOM 8011 VPN Chapter 8: Security settings EN Mark your LANCOM router in the selection window. Select from the command bar Extras Setup Wizard. Select in the selection menu the setup wizard Configuring Firewall and confirm your choice with Next. In the following windows, select the services/protocols the rule should be related to. Then you define the source and destination stations for this rule and what actions will be executed when the rule will apply to a data packet.
LANCOM 7111 VPN – LANCOM 8011 VPN Chapter 8: Security settings Have you permitted remote configuration? If you do not require remote configuration, then deactivate it. If you require remote configuration, then be sure to assign a password protection for the configuration (see previous section). The field for deactivating the remote configuration is also contained in LANconfig in the 'Management' configuration area on the 'Security' tab.
LANCOM 7111 VPN – LANCOM 8011 VPN Chapter 8: Security settings individually for each route in the routing table. The routing table can be found in the LANconfig in the 'IP router' configuration section on the 'Routing' tab. EN Have you excluded certain stations from access to the router? Access to the internal functions of the devices can be restricted using a special filter list. Internal functions in this case are configuration sessions via LANconfig, WEBconfig, Telnet or TFTP.
LANCOM 7111 VPN – LANCOM 8011 VPN Chapter 9: Troubleshooting 9 Troubleshooting In this chapter, you will find suggestions and assistance for a few common difficulties. No WAN connection is established After start-up the router automatically attempts to connect to the access provider. During this process, the Online LED will blink green. If successful, the LED will switch over to steady green. If, however, the connection can't be established, the Online LED will light up red.
LANCOM 7111 VPN – LANCOM 8011 VPN Chapter 9: Troubleshooting Numerous other factors involving the Internet itself can also influence the transfer rate. Increasing the TCP/IP window size under Windows If the actual transfer rate of a DSL connection is significantly below the fastest rate listed by the provider, there are only a few possible causes (apart from the above-mentioned external factors) which may involve one's own equipment.
LANCOM 7111 VPN – LANCOM 8011 VPN Chapter 9: Troubleshooting EN tested (e.g. “DSL1” or “LAN-1”). Pay attention to the correct spelling of the interfaces. Start the test for the specified interface by clicking on Execute. Change then to menu item Expert configuration Status LAN statistics Cable test results. The results of the cable test for the individual interfaces are show up in a list. The following results can occur: OK: Cable plugged in correctly, line ok.
LANCOM 7111 VPN – LANCOM 8011 VPN Chapter 10: Appendix 10 Appendix 10.1 Performance data and specifications LANCOM 7111 VPN LANCOM 8011 VPN Stateful inspection, IP packet filter with port ranges; masquerading (NAT/PAT) of TCP, UDP, ICMP, FTP, PPTP, H.323, NetMeeting IRC and IPSec; DNS forwarding; inverse masquerading for IP services from the Intranet such as web server; support of 2 local networks; e.g. DMZ with own IP address range without NAT, port mapping.
LANCOM 7111 VPN – LANCOM 8011 VPN Chapter 10: Appendix LANCOM 8011 VPN WAN: 10/100 Mbps Fast Ethernet LAN/DMZ/Switch: 4 ports, 10/100 Mbps Fast Ethernet ISDN (RJ-45): ISDN S0 Bus Serial config (8 pol. Mini DIN) COM port: 9600-11500 baud Management Outband Inband Tools command line interface, serial V.24/V.28 port (8 pol. mini-DIN) LANconfig (Windows configuration program), incl.
LANCOM 7111 VPN – LANCOM 8011 VPN Chapter 10: Appendix 10.2 10.2.1 Contact assignment DSL interface 6-pin RJ45 socket EN Connector 10.2.
LANCOM 7111 VPN – LANCOM 8011 VPN Chapter 10: Appendix 10.2.3 Ethernet interfaces 10/100Base-T Connector 10.2.4 Pin Line 1 T+ 2 T- 3 R+ 4 – 5 – 6 R- 7 – 8 – Pin Line EN 8-pin RJ45 socket, corresponding to ISO 8877, EN 60603-7 Configuration interface (Outband) 8-pin mini-DIN socket Connector 10.
LANCOM 7111 VPN – LANCOM 8011 VPN Index EN Index Numerics 10/100Base-TX 3-DES 24 42, 50 A Accounting AES Autosensing 30 42, 50 25 B Bandwidth limiting bandwidth management Basic configuration Blowfish 17 17 28 42, 50 C Callback Callback function Calling Line Identity (CLI) CAPI interface CAST charge lock Common ISDN Application Programming Interface (CAPI) Configuration access Configuration file Configuration interface Configuration password Configuration port Configuration protection Connect char
LANCOM 7111 VPN – LANCOM 8011 VPN Index ISDN 24 I ICMP 66 Installation 18 ADSL 25 configuration port 25 ISDN 25 LAN 25 LANtools 25, 26 power adapter 25 Interconnection 42 Security aspects 42 Internet access 14, 15, 39 Authentication data 39 Default gateway 39 DNS server 39 Flat rate 40 IP address 39 Netmask 39 Internet provider 39 Intrusion Detection 12 IP Filter 66 Lock ports 66 IP address 29, 47 IP address of the LANCOM 25 IP masquerading 12, 14, 16, 65 IP router 16 IPoE 39 IPSec 42, 50 IPX 54 Binding
LANCOM 7111 VPN – LANCOM 8011 VPN Index EN MSN N NAT – see IP masquerading NetBIOS NetBIOS proxy Netmask Network segment Number of VPN channels 51 47 16 29 25, 47 23 P Package contents packet size adaption Password 30, 32, 42, PAT – see IP masquerading Ping Plain Ethernet Plain IP PMTU PPP PPP client PPPoE PPTP Preshared Key Shared Secret priority queuing 18 17 50 49 39 39 17 50 54 39 39 45 17 Q Quality of Service Quality-of-Service 17 13 R Remote Access Service (RAS) Configuring the dial-in comp
LANCOM 7111 VPN – LANCOM 8011 VPN Index U UDP V Virtual Private Network (VPN) Voltage switch VPN client 66 14, 15 24 54 W WAN Connector cable 18 WAN connection 24 problems establishing the connection 67 WEBconfig 33 password 36 Starting the wizards 34 System preconditions 19 Wide Area Network (WAN) 13 77 EN TCP/IP 19, 54 check connection 49 Settings 28, 32, 35 Settings to PCs in the LAN 37 Windows size 68 TCP/IP configuration Automatic 35 fully automatic 28, 29 manual 28, 29 TCP/IP filter 12, 16, 66