
User Manual


7
2.2.2 Master/Slave Selection
Master device setup:
1. Press reset button (S1), see Figure 3-1 location 5, and user button
(S3), see Figure 3-1 location 6, on Interface Board simultaneously.
2. Release reset button (S1) on Interface Module.
3. Wait until yellow LED (LED2) is lit, then release reset button (S1).
Slave device setup:
1. Press reset button (S1) and user button (S3) on Interface Board
simultaneously.
2. Release reset button (S1) on Interface Module.
3. Quickly release the user button (S3) (Release within 1.5 seconds of
performing step 2 above).
2.2.3 Association Mode
In association mode, the red LED (LED3) will flash rapidly on each board
until it has linked with the other device. At this point, the red LED (LED3) will
go out and the yellow LED (LED2) will begin to flash rapidly for
approximately two seconds. Association mode lasts up to thirty seconds
after power up, so the master and slave pair should be powered up at
relatively the same time. If the transceivers link, they will enter the ping pong
mode after association mode times out. However, if they do not link, they will
not communicate and the sequence must be repeated from the point of
master/slave selection at power up.
2.2.4 Ping Pong Mode
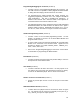
In ping pong mode, the master and slave boards will flash one or two LEDs
with each packet (slave) or acknowledge (master) received, based on
message signal strength. Refer to Table 2-1 below for a description of the
LEDs versus signal strength. In case there is a lot of traffic on the default
channel, it is possible to change the channel.
Red LED Yellow LED Signal Strength
Off Off None
Off On Marginal
On Off Good
On On Excellent
Table 2-1. LED Signal Strength Definitions