INSTR UCTION MANU AL INSTRUCTION MANUA FOR OCENTRIFUGE MICR MICROCENTRIFUGE Z 233 M-2 National Labnet Company PO Box 841 Woodbridge, NJ 07095 Phone: (732) 417-0700 Fax: (732) 417-1750 1
INDEX 1. 2. 3. 4. General Information 1.1 Precaution and hazards................................................................................. 3 1.2 Description ..................................................................................................... 4 1.3 Do not operate the centrifuge under the following conditions ....................... 4 1.4 Safety standards ........................................................................................... 4 1.5 Technical data ..
1. General Information 1.1 Precautions and hazards Before putting the centrifuge into operation, please read this instruction manual carefully. The centrifuge must not be operated by unqualified persons not familar with the correct use and intended purpose of the machine. Please use only the original spare parts.
2 1.2 Description Model Z 233 M-2 is a microcentrifuge. Four rotors for microcentrifuge tubes are available (24 x 1.5ml, 44 x 1.5ml, 48 combo 24x1.5, 24 x 0.5ml, and 64 x .05ml). The Z 233 M-2 is microprocessor controlled and has a maintenance-free induction drive motor. 1.3 Do not operate the centrifuge if: - The unit is not installed correctly. - The unit is partly dismantled. - The unit was serviced by non-authorized or non-qualified personnel.
1.
1.6 Accessories supplied with each centrifuge unit 2 Fine-wire fuses 6.3 AT, 1 Instruction manual, 1 Tool for removing the rotor 1.7 Warranty This centrifuge has been subjected to thorough testing and quality control during the production process. In the unlikely event of any manufacturing faults occuring, the centrifuge and rotors are covered by warranty for a period of one year from date of delivery.
2.3 ! 3. Installation Check that: - the power supply corresponds to that on the manufacturer's rating label which is mounted on the rear panel, then connect the power cord to the centrifuge and the socket. - The line voltage circuit breaker has a maximum of 16 Amp. type K slow release for commonly used instruments. - An emergency switch is installed outside the room to disconnect the power supply in case of a troubled run. - The digital indications on the display are lighting up. - Press the "lid" key.
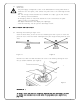
-Load the rotor symmetrically by inserting tubes into spaces opposite from each other. The rotor must always be balanced in this fashion prior to operation. ATTENTION: Before operation, secure the rotor lid to the rotor by pressing the snap connector lightly on the rotor nut (see figure 3). Figure 3 3.2 Set or change rotor-code . With a new unit, the centrifuge is programmed with the rotor-code for the rotor that has been ordered with the machine.
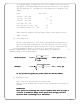
On the digital display for "speed rpm / rcf g x 10" the number code for the set rotor type appears. On the digital display "time min-sec" the letters "ro" ( rotor ) appears. Turn the speed knob (1), (see figure 4) till the required rotor code appears on the display. Rotor Rotor code C0230-2A, 24 x 1.5ml 59 C0200-95, 18 x 1.5ml C0230-9A, 44 x 1.5ml 88 C0230-43A, 64 x .05ml 92 95 C0230-55A, 24 x 1.5, 24 x 0.5ml 88 C0230-TSA Strip tube 4 x 8 - 0.
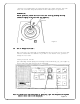
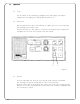
4. Operation 4.1 Power You can switch on the centrifuge by plugging in the power supply. The digital indications on the display will light up when the power is on. 4.2 Lid release When the green control lamp of the "lid" key (1) lights, the rotor is not moving and the centrifuge lid is ready to open. Press the "lid" key (1) (see figure 5) to open the lid. The green control lamp(2) will extinguish as soon as the lid is opened or the unit started. Z233M-2 2 1 Figure 5 4.
4.4 Preselection of speed / RCF When the centrifuge lid is open, you can preset the required speed or rcf with the speed knob (1). With the "speed/rcf" key (2) you can change the display from speed to g-value. The green control lamps (3) show which mode is activated. If the centrifuge lid is closed and during the run, the speed can be changed as follows: Press the "preset" key (4), hold it and at the same time change speed or g-value with the speed knob. The max. speed for all rotors is 14 000 rpm.
4.5 Preselection of operating time You can adjust the desired operating time between 1 and 60 minutes or hold. With the centrifuge lid open you can preset the operating time with the knob (3). During a run and with the centrifuge lid closed you have to press the "preset" key (1), hold it and change operating time by turning the knob (3). The preselected running time will be indicated on the time display (2). At the end of a run the preset operating time will be kept for further runs.
4.6 Preselection of brake intensity and acceleration With the "fast/slow" key (1) you have the choice between two steps of brake and acceleration intensity. 1 Figure 8 If the green "fast" control lamp is lit, the unit accelerates and decelerates fast. If the green "slow"control lamp is lit, the unit accelerates and decelerates very softly below 2 000 rpm. slow fast preset speed 2000 rpm Acceleration times fast / slow in seconds: Rotor C0200-95 Rotor C0230-43A 18 x 1.5ml 64 x .
4.7 Keyboard - Starting the centrifuge - "quick"-key 1 "Lid" key: To open the centrifuge lid. If the green LED of the "lid" key is lit, the lid is closed correctly. 2 "Quick" key: For short time runs. 3 "Start" key: To start the centrifuge. 4 "Stop" key: To stop the centrifuge befor the preset operating time has expired or to stop the centrifuge during a continuous run. Figure 9 Starting the centrifuge The rotor has to be fixed correctly and completely loaded. Close the centrifuge lid.
5. Temperature Features 5.1 Temperature During centrifugation, heat is generated by air friction between the rapidly spinning rotor and the air inside the rotor chamber. The temperature rise depends on the rotor ( swing-out or angle rotor ),bucket type, ambient temperature, running time and the speed of the rotor. The continous air flow through the centrifuge housing is restricting the temperature rise of the samples to the standard value of 40°C with each rotor even at maximum speed. 6.
7.1 Service and inspection of centrifuge Centrifuge service and inspection should be done regularly and only by authorized and qualified personnel. Use only original spare parts! 7.2 Maintenance and cleaning Maintenance The maintenance of the centrifuge involves essentially keeping the rotor chamber, the rotor and the accessories clean. Please pay special attention to anodized aluminium parts. Breakage of rotors can be caused even by slight damages.
7.3 Cleaning of centrifuge after breakage of glass tubes/glass bottles With high g-values, there is a possibility that tube breakage will occur. Should this happen, the centrifuge, rotor, buckets, adapters and the rotor chamber must be thoroughly cleaned and all broken particles removed immediately. If this is not done, they could scratch the protective coating of the rotor.
8.2 Check list / Trouble shooting The error message will be indicated by an error number on the digital speed display (see figure 11). There is a distinction between two different kinds of errors. The digits on the indication "speed" have the following meaning: Error no. 1 - 49 (Forced stop) If one of those errors occurs, the rotor will be braked from the preset speed to 0. As soon as the rotor has stopped, the error message can be reset by opening and closing the centrifuge lid. Error no.
Error no.: 25 Power failure Reason: Action: Power failure while rotor is in motion Open and reclose the lid, restart the centrifuge Error no.: 36 Relay for the frequency converter cannot be released Reason: Action: Defect on the power board Call service Reason: Action: Centrifuge lid is jamming Open the centrifuge lid manually. Grease the lid lock lightly. If this failure occurs again, call service. Error no.
Error no.: 82 Cutoff power board - frequency converter Reason: Action: Overcurrent or undervoltage due to power supply fluctuations Restart the unit, take care that the power supply is stable Error no.: 83 Preset speed cannot be reached Reason: Action: Preset speed cannot be reached Call service Error no.: 90 Emergency lid release Reason: Action: Lid has been opened during centrifuge run. Close the lid.