
Instruction Manual
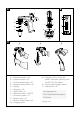
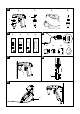

Table Of Contents
Instruction Manual | 5
7. Replacing the Filter
CAUTION: The work safety instructions given in Section 2 shall be observed when
disassembling the pipet controller.
If drawing efciency deterioration is observed, the lter replacement is necessary.
The direct reason may be a dirty lter after a long period of use. In order to replace
the lter:
Remove the pipet.
Unscrew the nosepiece (Figure 4.1).
Remove the membrane lter (Figure 4.1) and the pipet holder (Figure 4.2).
Rinse the holder using a wash bottle (Figure 4.3).
Blow liquid out of the holder and set it aside until it is completely dry.
Install a new membrane lter (Figure 4.4), and assemble the device in reverse order.
8. Charging the Batteries
CAUTION: The pipet controller may be charged only with the original charger. The
mains voltage shall conform with the specication on the charger (Input: 100-240V,
50/60Hz, 0.2A; output: DC 9V).
Using chargers other than the original one may damage the battery.
The pipet controller requires 3 NiMH type AAA batteries (included).
The batteries can be replaced easily if necessary after the battery cover is taken off
(Figure 1K). The manner in which the batteries are arranged is shown in Figure 8.
Charging
Charging temperature: 10°C to 55°C.
Charging the battery is carried out through a charger (power supply) by direct
connection to the main power. Batteries charging is indicated by successive lighting
of the “bars”.
Full charging time: 7 to 8 hours.
The batteries are charged when all 3 “bars” are displayed simultaneously (Figure 5.1).
When the batteries are charged, the charging circuit disconnects automatically.
The service life of the batteries: approx. 1,000 charging cycles, if used correctly. It is
not possible to overcharge the batteries if all instructions of the manufacturer are
followed.
Charging on charging stand (Figure 9.3)
Put the pipet controller on the stand.
Plug the charger into the stand outlet.
Connect the charger to the adapter and to the main power.