IN STRUC TION MANUA L Laboratory Equipment Pty Ltd email: sales@labec.com.au Ph: 02 9560 2811 • Fax: 02 9560 6131 www.labec.com.
Contents Use of Operation Manual ‥‥‥‥‥‥‥‥‥‥‥‥‥‥‥‥‥… … … .‥‥‥‥ 3 To S UPERV IS OR in charge of this equipment ‥‥‥‥‥‥‥‥‥‥‥‥ 4 S AFETY S YMBOLS ‥‥‥‥‥‥‥‥‥‥‥‥‥‥‥… … … … ‥‥‥‥‥‥‥‥ 5 S afety Precautions ‥‥‥‥‥‥‥‥‥‥‥‥‥‥‥‥‥… … … … .‥‥‥‥‥‥‥ 5 1. Intended use of the Apparatus ‥‥‥‥‥‥‥‥‥‥‥‥‥‥‥‥‥‥‥ 7 2. Features of product ‥‥‥‥‥‥‥‥‥‥‥‥‥‥‥‥‥‥‥‥‥‥‥ 8 3. Appearance ‥‥‥‥‥‥‥‥‥‥‥‥‥‥‥‥‥‥‥‥‥‥‥‥‥‥ 8 4. Installation ‥‥‥‥‥‥‥‥‥‥‥‥‥‥‥‥‥‥‥‥‥‥‥‥‥‥‥ 9 5.
Use of Operation Manual ● ● ● Please read through and understand this Operation Manual before using the product. After reading, always keep the manual nearby so that you may refer to it as needed. When moving the product to another location, be sure to take the manual as well. If you find any incorrectly arranged or missing pages in this manual, they will be replaced. If the manual gets lost or soiled, a new Operation Manual can be purchased.
To the Supervisor If the operator does not read the language used in this manual, translate the manual into appropriate language. Help the operator to understanding this manual before operating. Keep this manual near the unit for easy access by the operator.
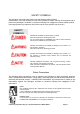
S AFETY S YMBOLS This operation manual and this product use the following safety symbols. Please keep in mind the meaning of each of the symbols to ensure safe use of the product and to prevent any damages, accidents or problems resulting from negligence of these safety symbols. (As using symbols may depend on the product not all of the symbols may be used.) SAFETY SYMBOLS Indicates the possibility of personal injury or death.
Input Power Use the product with the specified input power voltage. For applying power, use the AC power cable provided. The shape of the plug differs according to the power voltage and areas. Use the cable, which is suitable for the line voltage used. Fuse With products with a fuse holder on the exterior surface, the fuse can be replaced with a new one.
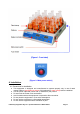
installed for holding flasks. Other forms of platform with universal rack, slide rack or test tube rack are also available as optional accessories. This model can be used as a reciprocating shaker (option) as well as an orbital shaker and shaking speed can be easily changed by the digital controller.
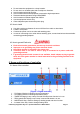
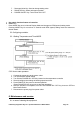
[Figure 2: Main power switch] 4. Installation. 4.1 Precautions for Installation ● ● ● ● ● ● ● This equipment is designed and manufactured to operate properly only in use of rated voltage. Refer to specifications section of this manual for rated voltage before installation. Use AC power cable that comes with (or installed to) the product. Do not touch the Power Cord wet handed. Avoid locations where the equipment is exposed to direct sunshine.
● ● ● ● ● ● ● ● Do not locate the equipment in a dusty location. Do not use in an unstable place that is subject to vibrations. Avoid locations with high humidity. Avoid locations where the equipment is exposed to high temperature. Recommended temperature range: 5ºC to 35ºC. Avoid locations of altitude higher than 2000m. Use the equipment indoors only. Clear adequate space around the power plug. 4.
7. : Decrease V alue K ey: Used to change setting value. 8. : RUN/S TOP K ey: S tarts and stops operation. 9. : POWER ON/OFF K ey: Turns Power ON / OFF. ● ■ Key switch function feature of controller. MODE K ey: Press MODE K ey once in Normal Display Mode and changes to RPM (speed) setting mode. Pressing MODE K ey for more than 2 seconds ends RPM (speed) setting mode and returns to Normal status. 5.2 Configuring controller. 5.2.
7. : Decrease V alue K ey: Used to change setting value. 8. : RUN/S TOP K ey: S tarts and stops operation. 9. : POWER ON/OFF K ey: Turns Power ON / OFF. ● ■ Key switch function feature of controller. MODE K ey: Press MODE K ey once in Normal Display Mode and changes to RPM (speed) setting mode. Pressing MODE K ey for more than 2 seconds ends RPM (speed) setting mode and returns to Normal status. 5.2 Configuring controller. 5.2.
7. : Decrease V alue K ey: Used to change setting value. 8. : RUN/S TOP K ey: S tarts and stops operation. 9. : POWER ON/OFF K ey: Turns Power ON / OFF. ● ■ Key switch function feature of controller. MODE K ey: Press MODE K ey once in Normal Display Mode and changes to RPM (speed) setting mode. Pressing MODE K ey for more than 2 seconds ends RPM (speed) setting mode and returns to Normal status. 5.2 Configuring controller. 5.2.
7. : Decrease V alue K ey: Used to change setting value. 8. : RUN/S TOP K ey: S tarts and stops operation. 9. : POWER ON/OFF K ey: Turns Power ON / OFF. ● ■ Key switch function feature of controller. MODE K ey: Press MODE K ey once in Normal Display Mode and changes to RPM (speed) setting mode. Pressing MODE K ey for more than 2 seconds ends RPM (speed) setting mode and returns to Normal status. 5.2 Configuring controller. 5.2.
● ● ● ● ● Disconnect the power plug from power outlet. Clean the exterior of the equipment with sponge or soft clothes getting wet by neutral cleaner. Clean with dry clothes. Do not use organic solvent. Do not use flammable or volatile chemicals such as benzene, alcohol to clean. ● ● Do not use flammable or volatile chemicals such as benzene, alcohol to clean the equipment.
8.2 Onerous repair In the following cases the cost to repair will not be covered in spite of guarantee period. ● Fault by user mistake, unsuitable repair or modification. ● Fault by negligence by carrying and handling during use. ● Fault due to natural disasters such as fire, flood disaster and abnormal voltage. ● Fault by using against directions for use. 9. Specifications. 9.
coated finish Alumin um plate platform 100ml flasks x 16ea or 250ml flasks × 9ea or 500ml flasks x 6ea Max load (Net K g 12.3 weight) Power source & AC 230V consumption 50/60H z 1phase Capacity 9.2 Components list No Description Specification Model No. Qty Manufacturer 1 Main board DCCONTMV 1.2 1 2 Display board DCCONTDV 1.