IN STRUC TION MANUA L Laboratory Equipment Pty Ltd email: sales@labec.com.au Ph: 02 9560 2811 • Fax: 02 9560 6131 www.labec.com.
GW2045 GW1060 GLASSWARE WASHER OPERATING INSTRUCTIONS MANUAL
CAREFULLY READ THIS INSTRUCTION MANUAL Failure to read or fully understand the instruction manual, or incorrect interpretation of the instructions herein may cause damage to the appliance as well as being a source of danger for the operator and lowering the performances provided by the machine to a considerable extent. The manufacturer declines all liability for uses differing from those listed below. The machine must only be installed, serviced and repaired by authorized personnel.
Information or Assistance for products from the SMEG Instruments Division Our Sales Office staff will give you all the info you require about prices and offers. Our Technical Assistance Office staff can tell you how to operate your appliance in the correct way or put you in contact with your nearest Authorized Assistance Centre if necessary. instruments@smeg.it Fax +39 0522 821 593 Tel +39 0522 8211 You can examine our entire product range in our Internet web site: www.smeg-instruments.
TABLE OF CONTENTS 1. INTRODUCTION .................................................................................................................................... 6 2. KEY TO THE SYMBOLS USED IN THE MANUAL AND ON THE MACHINE ..................................... 7 3. GENERAL RECOMMENDATIONS........................................................................................................ 8 4. GENERAL SPECIFICATIONS ............................................................................
9.1. RECOMMENDATIONS AND GENERAL ADVICE ................................................................................ 39 9.2. IF THE GLASSWARE WASHER IS NOT USED FOR A LONG PERIOD OF TIME .............................. 41 9.3. REUSING THE GLASSWARE WASHER AFTER A LONG STANDSTILL PERIOD ............................. 41 9.4. TROUBLESHOOTING .......................................................................................................................... 41 10. INSTALLATION DIAGRAM GW2045 – GW1060.
1. INTRODUCTION This manual is an integral part of the machine It must be kept in a good condition and ready to hand for the entire life cycle of the machine. You are advised to carefully read this manual and all the instructions it contains before using the appliance. This appliance has been built for the following function: 1 ! Washing with Thermal Disinfection or Thermodisinfection of laboratory glassware; ! the appliance cannot be used to sterilize instruments or any other device.
2. KEY TO THE SYMBOLS USED IN THE MANUAL AND ON THE MACHINE Carefully read the paragraph. Warning, danger: consult the manual Attention, hot surface. ~ Alternating current. CE labelling. At the end of life the product should be sent to disposal facilities for the recovery and recycling. Rev. 00 GW2045 – GW1060 Manual Pag.
3. GENERAL RECOMMENDATIONS Never use solvents such as alcohol or turpentine in the appliance as they could cause an explosion. Do not place materials dirtied with ash, wax or paint in the appliance. • Do not rest or sit on the open door of the glassware washer as this could cause the appliance to tip over and endanger persons. The door’s primary functions is not to bear weights or loads. The maximum weight loaded onto the open door, including the weight of the instrument trolley, must never exceed 25kg.
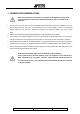
4. GENERAL SPECIFICATIONS 4.1. TECHNICAL FEATURES ELECTRICAL POWER SUPPLY GW2045 TYPE OF VOLTAGE 230V ~ [tolerated variation ±10%] FREQUENCY [HZ] 50 POWER RATING [KW] 3.3 ELECTRICAL POWER SUPPLY GW1060 MODELS GW1060 VERSION TYPE OF VOLTAGE [variaz.
GLASSWARE WASHER MEASUREMENTS HEIGHT [MM] 850 DEPTH [MM] GW2045: 620mm – GW1060: 670mm WIDTH [MM] GW2045: 450mm – GW1060: 600mm NET WEIGHT [kg] GW2045: 50kg – GW1060: 65kg Material used Washing tub AISI 316L Outer coating AISI 304 ENVIRONMENTAL CONDITIONS USE Indoors ALTITUDE Up to 1000 metres TEMPERATURE From 5°C to 40°C RELATIVE HUMIDITY 80% for temperatures up to 31°C with linear reducti on Up to 50% to temperature of 40°C INSTALLATION CATEGORY II POLLUTION DEGREE 2 (ref.
4.2. LIFTING AND HANDLING Before it leaves the factory, the base of the machine is fixed to a pallet which is then used to lift and transport the machine itself. The machine must be handled with a fork-lift truck or transpallet. Do not use appliances damaged by transport! Consult your dealer if in doubt. The appliance must only be installed and connected by personnel authorized by the manufacturer. 4.3.
4.4. EMERGENCY UNLOCKING OF DOOR 4.4.1. UNLOCKING GW2045 If any malfunction occurs, or in the event of a blackout, it is possible to open the appliance manually. The appliance has a manual door opening device: a rubber ring with a cable that works directly on the locking device hidden in the centre of the lower part of the door. To open the door manually: pull the rubber ring downwards gently until the door clicks open. Rev. 00 GW2045 – GW1060 Manual Pag.
4.4.2. UNLOCKING GW1060 If the event of malfunctions or of a blackout, it is possible to open the door manually, carefully using a slim screwdriver on the opening mechanism, avoiding damage to the device. Warning Before opening the appliance manually, disconnect from the mains. fig. 2 – Front of the GW1060. To unlock the door manually, it is necessary to: 1 – push the opening handle to access the opening mechanism, 2 – Force the opening mechanism, pushing upwards.
5. INSTALLATION IMPORTANT: The machine must be positioned against the wall (minimum distance 10 mm) and must be installed by a technician authorized by Smeg. The technician who installs the machine is responsible for the appliance operating correctly after it has been installed. He is also obliged to provide the user with all the information required to use the machine in the correct way. During installation, the scratch protection film must be removed from the outer steel surfaces.
WARNING – MAKE SURE THAT: • The water supply pressure is within the working limits: See the machine’s technical features table. • The water supply taps are in an easily accessible position Keep the water supply taps turned off when the machine is not being used WARNING – Washing stainless steel instruments Chemical characteristics of mains water which are not compatible with good washing of materials: If the supply water contains Fe2+/Fe3+ ions in a quantity greater than 0.
GW1060 fig. 5 - rear of product GW1060, detail of rear cross-section with indication of water inlets and outlets The appliance is standard equipped with 1 peristaltic pump for detergent dosage: P2. P1 and P3 are optional accessories. 5.4. NON PRESSURIZED DEMINERALIZED WATER CONNECTION The connection to a non-pressurized demineralized water supply (e.g. gravity tank) is possible only by installing the special demineralized water pump, called "SMEG-PAD".
5.5. WATER OUTLET CONNECTION The machine is equipped with drainage pipe. The internal diameter of the pipe is ½ inch therefore it can be attached to any standard ½” rubber holder General rules for installing outlet A siphon drain is recommended. When installing it is necessary to follow the following advice: • As the outlet water is at 95°C, the end of the out let pipe must be fixed to the rubber holder, using the clips provided. • The outlet pipe must not have any sharp bends and consequent narrowing.
5.6. ELECTRICAL CONNECTION Refer to the technical features diagram for electrical absorption in the section "GENERAL SPECIFICATIONS ".
6. DESCRIPTION OF CONTROLS 6.1. MAIN PANEL All the controls and indicators of the glassware washer are positioned on the front panel.
6.2. SETUP MODE DESCRIPTION The SETUP function can be accessed on the programme selection switch (see par. DATE AND TIME SETUP). Note: Below, in brackets, are the numbers used in the picture to identify the controls. Procedure for accessing appliance’s SETUP menu: • Press the ON/OFF button (3) to switch on the machine (If any alarm appears on the display at this stage, ignore it).
SETUP MENU SETUP menu, available functions: 1. Position 1: For dose of detergent in pump P1. Set the ml/litre required as dose of detergent with maximum threshold allowed at 20ml/litre. In 1ml steps (increase/decrease by using buttons (5) and (4)). P1 Default dosage is 5 ml/litre. 2. Position 2: Similar to Position 1 for P2, neutraliser. P2 Default dosage is 3 ml/litre. 3. Position 3: Similar to Position 1 for P3. P3 Default dosage is 0 ml/litre. 4.
6.3. WASHING PROGRAMME SETTINGS Consult the following table to select the required programme. It gives the washing cycle most able to suit the nature of the instruments you need to wash and the degree of dirt involved. Once you have found the most suitable washing programme, turn the PROGRAMME SELECTOR (1) knob and select the desired programme by setting it to the relative reference number. PR-1: Pre-wash, Quick washing programme using cold water (soaking glassware while awaiting wash).
6.5. PREPARATION OF LOAD FOR THE WASHING AND DISINFECTING PHASE A efficient wash begins with the preparation of the glassware to be treated. Before placing the glassware and the instruments in the specific baskets, it is necessary to remove any large residue deriving from previous use, by soaking, treatment or simply rinsing.
6.6. PROGRAMMES DESCRIPTION Rev. 00 GW2045 – GW1060 Manual Pag.
KEY TO PROGRAMMES AND DEFAULT DOSE TABLE SYMBOL DESCRIPTION P1, P2, P3 Peristaltic pumps DD: Detergent measuring device N.C. Heating not controlled COMPONENT STANDARD DOSE P1/DD 5ml/litre P2. 4ml/litre P3 9ml/litre WATER INLET GW2045 GW1060 STANDARD PHASE 5 litres 9 litres WASH AND NEUTRALISATION PHASE 4 litres 6 litres DEMINERALISED WATER RINSE 5 litres 9 litres NOTE If the demineralised water attachment has not been selected, the phase is replaced by one using cold water.
BLANK TABLE FOR RECORDING ANY PERSONALISED PROGRAMMES Rev. 00 GW2045 – GW1060 Manual Pag.
6.7. CARRYING OUT THE PROGRAMME Note: The numbers below in brackets are used to refer to the ones in the picture. The machine has an automatic door opening/closing system: To open the machine connect it to the electrical power and press the ON/OFF button (3), then press the button with the KEY icon (6). Follow the described procedure to carry out a programme: 1. 2. 3. 4. 5. Load the baskets with the material to be washed. Close the door manually. Turn on the appliance, pressing the ON/OFF button (3).
Before removing the treated instruments, wait about ten minutes for the material inside the washing chamber to cool and dry. 6.10. IN PROGRESS PROGRAMME INTERRUPTION While a programme is running, you may stop it pressing the START/STOP button (4). The following message appears on the display: “S1,…, S8”, where the number indicates the programme in progress (e.g. S7 stands for "forced stopping of programme 7).
6.13. COMMUNICATION WITH PRINTER A serial port (RS232) is available as a standard feature on the appliance, to which the SMEG printer, named “WD-PRINTE” with code 901783, may be connected. Once of the accessories supplied is a flat extension to connect RS232 in a more accessible position. The printer is capable of printing out the following data: • Serial Number of the WD1050 "Serial Number" • Number of cycles carried out "Cycle N.
GW1060 – POSITION OF PORT RS232 fig. 9 - Rear of GW1060, detail of RS232 connection, where it is possible to connect the external printer. Rev. 00 GW2045 – GW1060 Manual Pag.
7. OPERATING INSTRUCTIONS After the glassware washer has been correctly installed, it must be prepared for operation in the following way: • Pour in regenerating salt (only if necessary, i.e. with water harder than 10°F); • Add detergent and neutralizing agent. 7.1. USE OF THE WATER SOFTENER The lime content in the water (index of water hardness) is responsible for the whitish marks on dry instruments, which tend to become opaque as time goes by.
7.2. USE OF THE DETERGENT AND NEUTRALIZING AGENT The machine is equipped with a power detergent distributor “DD” and a peristaltic pump “P2” as standard. 1. DD: Detergent dosage, the distributor is located on the inside door of the appliance. 2.
7.4. LOADING NEUTRALISER The acid agent used for the neutralising phase is introduced and distributed automatically using the peristaltic pump P2 provided, to be connected to the corresponding neutralising agent bottle. The amount of neutralising agent introduced is set according to an average value adapted to most cases. The amounts distributed by the peristaltic pumps can be regulated via the SETUP mode, see paragraph "SETUP MODE DESCRIPTION".
7.5. OPTIONAL ACCESSORIES IMPORTANT The installation of optional accessories must be carried out by authorised SMEG technical staff. 7.5.1. PERISTALTIC PUMPS P1 AND P3 (ACCESSORY “SMEG ADU”) During first start-up or whenever the detergent can runs empty, it is necessary to activate peristaltic pumps loading using programme 8. The detergent recommended for use with P1 is smeg Deterliquid D2. The pump dosage can be adjusted by following the procedure described in paragraph "SETUP MODE DESCRIPTION".
fig. 14 - Rear of 1060, position of pumps from top to bottom respectively. P1, P2, P3 7.5.2. DETERGENT CAN LEVEL SENSORS The machine can also be fitted with built-in level sensors in the detergent suction pipes, smeg product "KIT WD-LS3060". IMPORTANT The level sensors must be electrically connected, using: 1. GW2045: The terminal board on the plate fixed to the rear bar. 2.
fig. 16 – Rear of GW 2045, peristaltic pumps and detail of the plate that holds terminal board on inner side for electrical connection of level sensors, optional accessory. 7.6. PRECAUTION WHEN USING DETERGENTS. HANDLE DETERGENT CANS AND BOTTLES WITH CARE We recommend the use of protective gloves for any transactions racking, topping and insertion of suction lances.
8. ALARMS Below is a list of the alarms that the glassware washer is provided with: They are divided into FATAL and NON-FATAL alarms. In the first case, the message that appears is "AF”, followed by the alarm number. In the second case, the message that appears is "A-”, followed by the alarm number. Generally, the RESET procedure described in paragraph 6.11 can be used to exit alarms. The actions described below are a brief summary that may be useful. These actions must not be taken by unauthorised staff.
ALARM ID DESCRIPTION ACTION 22 The cold water flowmeter does not measure correctly. 23 Insufficient water. 24 Lack of water. 25 Insufficient pressure in the circulating motor pump. 29 No draining. 30 Water safety level. 31 Safety level fault. 32 Standing water in the washing chamber. 33 OFF 34 OFF 35 OFF 36 OFF Check the outlet connection. Repeat the cycle. Call the Technical Assistance Service if the fault persists. Repeat the cycle.
9. CLEANING AND MAINTENANCE Electric Power supply Disconnect the power supply before any intervention, using the panel knife switch or disconnect the power cable, and shut off the water tap. If any damaged electrical cables 5 need replacing, it is necessary to use HT 105°C cab les (high temperature) or H05V2-K . FREE SPACE It is necessary to have about 1m2 of free space in front of the machine to be able to work correctly.
How to clean the filter unit – GW2045 It is necessary to inspect the central filter “D” regularly, and if necessary, clean it. To extract it, it is necessary to grip the handle, turn it anticlockwise and lift it up as shown in the picture. Push the central filter “D” from underneath to extract it from the micro-filter and separate the two parts that make up the plastic filter, pressing the filter body in the area indicated by the arrows. Remove the central filter by lifting it.
9.2. IF THE GLASSWARE WASHER IS NOT USED FOR A LONG PERIOD OF TIME • Carry out the soaking programme twice consecutively. • Detach the plug from the socket/cut off electricity supply from the appliance. • Leave the door slightly open to prevent unpleasant odours from forming inside the washing chamber. • Shut off the water cock. 9.3. REUSING THE GLASSWARE WASHER AFTER A LONG STANDSTILL PERIOD • Check that there is no sludge or rust in the pipes. In this case run water from tap for a few minutes.
IMPORTANT Repairs to the appliance by unauthorized personnel are not covered by the warranty and are at the user’s charge. 10. INSTALLATION DIAGRAM GW2045 – GW1060 For detailed specifications and electricity connection, see paragraph "INSTALLATION". Note: Water connections can also be prepared on the left side of the machine, bearing in mind the maximum distance indicated on the product, “H”. The internal diameter of the outlet pipe must be at least 40 mm.
Smeg S.p.A. Instruments Division Via Leonardo da Vinci, 4 Tel +39 0522 8211 – Fax +39 0522 821 592 E-mail: instruments@smeg.it – www.smeg-instruments.