User’s Manual Purifier® Non-Ventilated PCR & Tissue Culture Enclosures Models 3951400 3951420 3952400 3952420 To receive important product updates, complete your product registration card online at register.labconco.com Labconco Corporation 8811 Prospect Avenue Kansas City, MO 64132-2696 800-821-5525, 816-333-8811 FAX 816-363-0130 E-MAIL labconco@labconco.com HOME PAGE www.labconco.com Please read the User’s Manual before operating the equipment.
Copyright © 2004, 2007, 2013, 2014 Labconco Corporation. All rights reserved. The information contained in this manual and the accompanying products are copyrighted and all rights reserved by Labconco Corporation. Labconco Corporation reserves the right to make periodic design changes without obligation to notify any person or entity of such change. Warranty Labconco provides a warranty on all parts and factory workmanship.
ORIGINAL INSTRUCTIONS TABLE OF CONTENTS CHAPTER 1: INTRODUCTION Polymerase Chain Reaction (PCR) Definition About This Manual Typographical Conventions 1 1 2 3 CHAPTER 2: PREREQUISITES Support Requirements Location and Air Current Requirements Electrical Requirements Space Requirements 4 4 4 5 5 CHAPTER 3: GETTING STARTED Unpacking Your Enclosure Installing the Enclosure on a Supporting Structure & Work Surface Connecting the Electrical Supply Sealing the Enclosure to the Work Surface 6 7 7 9 9 CHAPTE
CHAPTER 8: TROUBLESHOOTING 18 APPENDIX A: REPLACEMENT PARTS 19 APPENDIX B: DIMENSIONS 22 APPENDIX C: SPECIFICATIONS 23
CHAPTER 1 INTRODUCTION Congratulations on your purchase of a Labconco Purifier® Passive PCR Enclosure or Purifier Tissue Culture Enclosure. Your non-ventilated enclosure is designed to reduce cross-contamination in laboratory applications. The Purifier Passive PCR Enclosure and Purifier Tissue Culture Enclosure offer a UV light for disinfecting the interior and an interior switched electrical outlet.
Chapter 1: Introduction range of applications from DNA fingerprinting to medical tests to identify diseases from the infectious agent’s DNA. See also nucleic acid. The Concise Columbia Encyclopedia is licensed from Columbia University Press. Copyright © 1995 by Columbia University Press. All rights reserved. About This Manual This manual is designed to help you learn how to install, use, and maintain your non-ventilated enclosure.
Chapter 1: Introduction Appendix B: Dimensions show all of the dimensions for the enclosures. Appendix C: Specifications contains the electrical requirements. Wiring diagrams are also included in this section. Typographical Conventions Recognizing the following typographical conventions will help you understand and use this manual: • • • ! • • Book, chapter, and section titles are shown in italic type (e.g., Chapter 3: Getting Started).
CHAPTER 2 PREREQUISITES Before you install the enclosure, carefully examine the location. You must be certain that the area is level and of solid construction. In addition, a dedicated source of electrical power should be located near the installation site to power the enclosure. Carefully read this chapter to learn the requirements for your installation site: • • • • The support requirements. The location and air current requirements. The electrical power requirements. The space requirements.
Chapter 2: Prerequisites ! Do not position the unit so that it is difficult to operate the main disconnect device. Ne placez pas l'appareil de sorte qu'il est difficile de faire fonctionner le dispositif principal de déconnexion. Electrical Requirements Standard duplex electrical receptacles should be nearby for connecting the nonventilated Purifier Passive PCR Enclosure or Purifier Tissue Culture Enclosure. For your convenience the enclosures have a switched auxiliary outlet receptacle.
CHAPTER 3 GETTING STARTED Now that the site for your non-ventilated Purifier PCR or Purifier Tissue Culture Enclosures is properly prepared, you are ready to unpack, inspect and install your non-ventilated enclosure. Read this chapter to learn how to: • Unpack and move the enclosure. • Set up the enclosure with the proper supporting structure and work surface. • Connect the electrical supply. • Seal the enclosure to the work surface.
Chapter 3: Getting Started Unpacking the Enclosure Carefully remove the shrink-wrap or carton on the enclosure and inspect it for damage that may have occurred in transit. If damaged, notify the delivery carrier immediately and retain the entire shipment intact for inspection by the carrier. ) DO NOT RETURN GOODS WITHOUT THE PRIOR AUTHORIZATION OF LABCONCO. UNAUTHORIZED RETURNS WILL NOT BE ACCEPTED. ) IF ENCLOSURE WAS DAMAGED IN TRANSIT, YOU MUST FILE A CLAIM DIRECTLY WITH THE FREIGHT CARRIER.
Chapter 3: Getting Started Work Surface and Non-Ventilated Enclosure Installation 1. Level the base cabinets and the work surface. Work surface should be placed flush with the front of the base cabinet as shown in Figure 3-1. 2. Position the work surface in its intended location and with the front of the work surface, (wide flange), towards you. 3. Secure the work surface to the base cabinet with a structural adhesive or silicone sealant. 4. Insert the supplied mounting screws in the four holes.
Chapter 3: Getting Started Connecting the Electrical Supply A grounded receptacle should be nearby for connecting the Purifier PCR or Purifier Tissue Culture Enclosures. Please review Chapter 2 for electrical prerequisites. All wiring for the building electrical outlets SHOULD be performed by a licensed electrician and conform to all local codes. ! Do not use any detachable power cord that is not adequately rated for the unit.
CHAPTER 4 FEATURES AND SAFETY PRECAUTIONS Features Labconco engineered the Purifier Passive PCR Enclosure and Purifier Tissue Culture Enclosure to provide a non-ventilated, circulation-free work area to reduce cross-contamination in laboratory applications. A spacious interior and convenience outlet give ample room for media preparation and equipment used for procedures. A UV light with digital timer, included on the Purifier PCR Enclosure, provides decontamination control after PCR protocols are conducted.
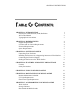
Chapter 4: Features and Safety Precautions 5 7 9, Internal 3 6 8 4 10, Not Shown 2 Figure 4-1 Features 1 1. Ergonomic Slope and Front of 20° provides maximum visibility, and comfort, reduces glare, thereby minimizing operator fatigue. 2. Internal Depth of 23" and interior height of 22" provides necessary depth and height to support procedures and other auxiliary equipment without extending outside the non-ventilated enclosure. 3.
Chapter 4: Features and Safety Precautions 120, 240 minutes and infinitely ON. It is easily changed by selecting the time necessary on the control panel. 8. UV Sash Closure Panel provides added safety to prevent access and air currents inside the non-ventilated enclosure when the UV light is activated. The panel must be in place for the UV light to operate. 9. Switched Outlet is located inside the non-ventilated enclosure for powering electrical equipment. 10.
CHAPTER 5 USING YOUR ENCLOSURE Planning • Thoroughly understand procedures and equipment required before beginning work. • Arrange for minimal disruptions, such as room traffic or entry into the room while the enclosure is in use. Start-up • Clean and surface disinfect the inside of the enclosure. Use UV light as required for protocol. • Turn on the fluorescent light. • Only raise the sash for loading. • Wear a long sleeved lab coat and rubber gloves. Use protective eyewear.
CHAPTER 6 MAINTAINING YOUR ENCLOSURE Now that you have an understanding of how to work in the non-ventilated enclosure, we will review the suggested maintenance schedule and common service operations. Routine Maintenance Schedule Weekly • Clean the enclosure interior appropriate for the application. Monthly (or more often as required) • Using a cloth and glass cleaner, clean the exterior surfaces of the nonventilated enclosure, particularly the front to remove any accumulated dust. • All weekly activities.
Chapter 6: Maintaining Your Enclosure Fluorescent Light Replacement 1. Disconnect power. 2. Locate the two Phillips machine screws on top of the light and remove. 3. Gently lift up the light assembly and rotate it upside down to rest on top of the enclosure. Use caution when lifting and removing light assembly to prevent damage to UV closure panel sensor wire, sensor wire is attached between light assembly and enclosure. 4. Rotate and remove the old fluorescent lamp. 5.
CHAPTER 7 ACCESSORIZING YOUR ENCLOSURE There are several ways to accessorize the enclosure for your individual requirements. These include the addition of accessory work surfaces, storage cabinets, base stands and mobile stands. 1. Work Surfaces An optional dished work surface is available. Dished work surfaces are contoured to fit the enclosure to contain spills. Epoxy is chemical resistant. Catalog # 3908402 3908405 16 Description Black, 4-foot wide Gray, 4-foot wide Dimensions (W x D x H) 48" x 26.
Chapter 7: Accessorizing Your Enclosure 2.
CHAPTER 8 TROUBLESHOOTING Refer to the following table if your enclosure fails to operate properly. If the suggested corrective actions do not solve your problem, contact Labconco for additional assistance. PROBLEM CAUSE CORRECTIVE ACTION Reset or replace circuit breaker. Lights do not work. Circuit breaker(s) tripped. Lamp not installed properly. Lamp Wiring disconnected. Defective lamp. Light switch is defective. UV closure panel not installed . Magnetic switch for UV closure panel defective.
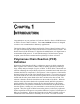
APPENDIX A REPLACEMENT PARTS The following illustrations indicate the replacement parts.
Appendix A: Replacement Parts Item 1 2 3 4 5A 5B 5C 5D 6 7A 7B 7C 7D 7E 8 9A 9B 10A 10B 10C 11A 11B 12 13A 13B 14 15 16 17A 17B 18A 18B 18C 19A 19B 20A 20B 21A 21B 22 22A 22B 22C 23 24 Qty. 1 1 1 2.3 Ft.
Appendix A: Replacement Parts 12 13 14 11 15, Interior 24 13, Light (3 Pos.
APPENDIX B DIMENSIONS See the following dimensions.
APPENDIX C SPECIFICATIONS This Appendix contains technical information about all the Purifier Passive PCR Enclosures and Purifier Tissue Culture Enclosures including electrical specifications and environmental conditions. Electrical Specifications • 10 Amps, 115V, 60 Hz • 5 Amps, 230V, 50/60 Hz • The auxiliary outlet load is 8 Amps on 115V and 4 Amps on 230V Environmental Conditions • Indoor use only. • Maximum altitude: 6562 feet (2000 meters). • Ambient temperature range: 41° to 104°F (5° to 40°C).