
User Manual
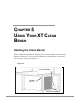

Chapter 5: Using Your XT Clean Bench
Product Service 1-800-522-7658
26
Use of the Clean Bench
Planning
• Thoroughly understand procedures and equipment before beginning work.
• Arrange for minimal disruptions, such as room traffic or entry into the
room, while the clean bench is in use.
Start-Up
• Turn on clean bench blower.
• Check the prefilter for obstructions.
• Wipe down the interior surfaces of the clean bench with stainless steel
cleaner or 70% ethanol. DO NOT use abrasive cleaners, bleach or
solvents, as they may damage the work surface of the clean bench.
• Allow the clean bench to operate undisturbed for 5 to 15 minutes before
loading materials.
• Wear long sleeved lab coat with knit cuffs and over-the-cuff rubber
gloves. Use protective eyewear.
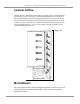
Loading Materials and Equipment
• Only load the materials required for the procedure. Do not overload the
clean bench.
• Do not obstruct the air diffuser.
• Large objects should not be placed close together.
• After loading the clean bench, wait 2 to 3 minutes to purge airborne
contaminants from the work area.
Work Techniques
• Keep all materials at least 4 inches inside of the clean bench and perform
all contaminated operations as far to the front of the work area as possible.
• Perform sterile operations as far to the rear of the work area as possible.
• Segregate all clean and contaminated materials in the work area.
• Arrange materials to minimize the movement of contaminated materials
into clean areas.
• Keep all discarded contaminated material to the front of the clean bench.
• Avoid moving materials or the operator’s hands and arms in and out of the
work area during use.
• Avoid the use of an open flame.
• Use proper aseptic technique. – “Sterile Air First”
• Avoid using techniques or procedures that disrupt the airflow patterns of
the clean bench.
Final Purging
• Upon completion of work, the clean bench should be allowed to operate
for 2 to 3 minutes undisturbed, to purge airborne contaminants from the
work area.