User’s Manual Purifier® XT Clean Benches Models 32000 Series To receive important product updates, complete your product registration card online at register.labconco.com Labconco Corporation 8811 Prospect Avenue Kansas City, MO 64132-2696 800-821-5525, 816-333-8811 FAX 816-363-0130 E-MAIL labconco@labconco.com HOME PAGE www.labconco.com Please read the User’s Manual before operating the equipment.
Copyright © 2013 Labconco Corporation. All rights reserved. The information contained in this manual and the accompanying products are copyrighted and all rights reserved by Labconco Corporation. Labconco Corporation reserves the right to make periodic design changes without obligation to notify any person or entity of such change. Warranty Labconco provides a warranty on all parts and factory workmanship.
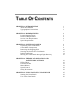
TABLE OF CONTENTS CHAPTER 1: INTRODUCTION About This Manual Typographical Conventions 1 1 3 CHAPTER 2: PREREQUISITES Location Requirements Electrical Requirements Service Line Requirements Space Requirements 4 5 6 6 7 CHAPTER 3: GETTING STARTED Unpacking Your Clean Bench Clean Bench Components Removing the Shipping Skid Securing the Purifier XT Clean Bench Initial Certification Moving XT Clean Bench through Tight Doorway 8 9 9 10 13 14 16 CHAPTER 4: THEORY OF OPERATION AND SAFETY PRECAUTIONS HEPA Filt
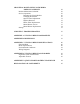
CHAPTER 6: MAINTAINING YOUR MEDIA PREP CLEAN BENCH Routine Maintenance Schedule Service Operations Resetting the Circuit Breaker Changing the Prefilter Speed Control Adjustment Diffuser Removal HEPA Filter Replacement Motor/Blower Service Motor/Blower Replacement Storage 28 29 30 30 30 31 32 32 33 34 35 CHAPTER 7: TROUBLESHOOTING 36 APPENDIX A: XT CLEAN BENCH COMPONENTS 37 APPENDIX B: DIMENSIONS 39 APPENDIX C: XT CLEAN BENCH SPECIFICATIONS Electrical Data Motor Specifications Environmental Condition
CHAPTER 1 INTRODUCTION Congratulations on your purchase of a Labconco Purifier® XT Clean Bench. Your XT Clean Bench is designed to protect your product from particulate matter contamination. The XT Clean Bench offers many features to enhance safety, performance and ergonomics. To take full advantage of them, please acquaint yourself with this manual and keep it handy for future reference.
Chapter 1: Introduction Chapter 3: Getting Started contains the information you need to properly unpack, inspect, install, and certify your XT Clean Bench. Chapter 4: Theory Of Operation And Safety Precautions explains how a clean bench operates and the appropriate precautions you should take when using the bench. Chapter 5: Using Your XT Clean Bench discusses the basic operation of your bench. Information on how to prepare, use and shut down your XT Clean Bench is included.
Chapter 1: Introduction Typographical Conventions Recognizing the following typographical conventions will help you understand and use this manual: • • • • ! • • ) • Book, chapter, and section titles are shown in italic type (e.g., Chapter 3: Getting Started). Steps required to perform a task are presented in a numbered format. Comments located in the margins provide suggestions, reminders, and references.
CHAPTER 2 PREREQUISITES Before you install your XT Clean Bench, you need to prepare your site for installation. Carefully examine the location where you intend to install your bench. You must be certain that the area is level and of solid construction, and a wall is nearby to secure the back of the XT Clean. In addition, a dedicated source of electrical power must be located near the installation site. Carefully read this chapter to learn: • • • • the location requirements for your installation site.
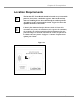
Chapter 2: Prerequisites Location Requirements ! ! The Purifier XT Clean Bench should be located away from traffic patterns, doors, fans, ventilation registers, fume hoods and any other air-handling device that could disrupt its airflow patterns. All windows in the room should be closed. Figure 2-1 shows the optimum location for the bench.
Chapter 2: Prerequisites Electrical Requirements The different Purifier XT Clean Bench models have the following electrical requirements: Table 2-1 Model # 32000 -00 32000 -01, -02, -03, -04 Requirements 115 VAC, 60 Hz, 10 Amps 230 VAC, 50/60 Hz, 6 Amps All Purifier XT Clean Benches with model numbers ending in -00 are designed for operation at 115 volts, 60 Hz, alternating current.
Chapter 2: Prerequisites The use of air or gases under high pressure should be considered carefully as they may seriously disrupt the airflow patterns in the bench. ! L’utilisation de gaz inflammables ou de solvants dans l’hotte doit être évitée. Les flammes nues interromprent le circuit du courant d’air laminaire dans l’hotte. Si vous estimez que votre procedure exige l’utilisation d’une flamme nue ou des matériaux inflammables, Prenez contact avec un officiel de sécurité competent.
CHAPTER 3 GETTING STARTED Now that the site for your XT Clean Bench is properly prepared, you are ready to unpack, inspect, install, and certify your unit. Read this chapter to learn how to: • • • • • unpack and move your bench. set up the bench. connect the electrical supply source. connect the service lines. arrange certification of your XT Clean Bench.
Chapter 3: Getting Started Unpacking Your Clean Bench Carefully unpack your Purifier XT Clean Bench and inspect it for damage that The United States Interstate may have occurred in transit. If your unit is damaged, notify the delivery carrier Commerce immediately and retain the entire shipment intact for inspection by the carrier. Commission rules require DO NOT RETURN GOODS WITHOUT THE PRIOR that claims be AUTHORIZATION OF YOUR DEALER AND LABCONCO. filed with the UNAUTHORIZED RETURNS WILL NOT BE ACCEPTED.
Chapter 3: Getting Started Part # Component Description 3208000 3952900 3894400 1337100 Purifier Clean Bench Owner’s Manual CD Strap, Lashing Bracket, Tie-Down Power Cord, 115V Or (one of the following) Power Cord, 230V United States Power Cord, 230V United Kingdom Power Cord, 230V Schuko Power Cord, 230V China/Australia 1338000 1332600 1336100 1332700 If you did not receive one or more of the components listed for your clean bench, or if any of the components are damaged, contact the Labconco Product
Chapter 3: Getting Started Figure 3-1a Cabinet screws (2) Wood screws (2) Shipping Bracket Figure 3-1b Shipping Bracket (1 ea side) Nut (2 ea side) Washer (2 ea side) Bolt (2 ea side) Product Service 1-800-522-7658 11
Chapter 3: Getting Started Figure 3-2 Bolt, Washers & Acorn Nut (ea leg) 12 Support Boards Pallet Jack Product Service 1-800-522-7658
Chapter 3: Getting Started Securing the Purifier XT Clean Bench ) BEFORE USING THE CLEAN BENCH, IT MUST BE PROPERLY SECURED TO A WALL OR STRUCTURAL BEAM TO AVOID TIPPING OVER. Obtain the following items from the box located on the Purifier XT Clean Bench worksurface: (1) Wall-Mount Bracket (2) Lashing Strap p/n 3894400 p/n 3952900 Follow the steps below to secure the clean bench to a wall or other significant vertical structural building element. To secure the clean bench: 1.
Chapter 3: Getting Started Figure 3-4 Back of clean bench Slot for Lashing Strap Initial Certification Prior to use, all Purifier XT Clean Benches should be certified by a qualified certifier. Under normal operating conditions, the Purifier XT Clean Bench should be recertified at least annually and when moved or serviced. The certifier should perform the following tests, as recommended in Institute of Environmental Sciences and Technology, IEST RP-CC0002.
Chapter 3: Getting Started ADJUSTMENT ESTABLISHES THE DESIRED FACE VELOCITY (FPM), AND AS THE HEPA FILTERS LOAD, THE MOTOR WILL SPEED UP TO MAINTAIN THE DESIRED FACE VELOCITY. HAVE THE FACE VELOCITY CHECKED AT LEAST ANNUALLY AS INDICATED IN CHAPTER 6: MAINTAINING YOUR XT CLEAN BENCH. REPLACE HEPA FILTERS WHEN FACE VELOCITY DROPS BELOW DESIRED RANGE. If you have any questions regarding certification agencies or need assistance in locating one, contact Labconco’s Product Service Department at 1-800-821-5525.
Chapter 3: Getting Started Moving XT Clean Bench through Tight Doorway ) MAKE SURE THERE IS NO ALTERNATE DOORWAY OF GREATER WIDTH. DISASSEMBLY OF UNIT INVOLVES SIGNIFICANT TIME AND LIFTING OF HEAVY COMPONENTS. To remove the Side Windows: 1. Obtain a T20 Torx Head Driver Bit and electrical screwdriver or drill. 2. Unscrew all screws around both the right and left window frames as seen in Figure 3-5a below. NOTE!!! Do NOT remove Screws next to a small cut-out as seen in Figure 3-5b.
Chapter 3: Getting Started Figure 3-5b Cut-outs Leave the screws by cut-outs ! The Top Window assembly is heavy. Lift & handle with care. L’ensemble première fenêtre est lourd. Soulever et manipuler avec precaution.
Chapter 3: Getting Started 3. Remove the Torx Head Screws on top side and top back of unit to remove Top Window as seen in Figure 3-5c. 4. Remove the two Bolts and Washers underneath Worksurface as shown in Figure 3-5c. 5. Pull up on front edge of Worksurface, and then pull Worksurface out. 6. Reinstall components in reverse to reassemble the XT Clean Bench.
CHAPTER 4 THEORY OF OPERATION AND SAFETY PRECAUTIONS All clean benches operate using the following principles: • Filtration and retention of particulates by High Efficiency Particulate Air (HEPA) filter(s) • Laminar airflow The major components in a clean bench are: • The HEPA filter • The motor/blower to force air through the unit • A speed control for the motor HEPA Filters HEPA filters are disposable, dry-type particulate filters.
Chapter 4: Theory of Operation and Safety Precautions HEPA Filters are only effective against particulate material. Gases will pass through the filter. ! Le matériel du filtre HEPA est très fragile. Ne pas toucher ou être en contact avec la surface du matériel. Si vous pensez que la surface d’un filter HEPA est endommagé, NE PAS UTILISER L’HOTTE. Faire tester l’intégrité du filter HEPA par un certificateur qualifié avant d’utiliser l’hotte.
Chapter 4: Theory of Operation and Safety Precautions Laminar Airflow Laminar airflow is defined as the movement of a body of air in a single direction, with a uniform velocity. In practice, the horizontal laminar flow of sterile air in the clean bench flushes out any aerosol generated in the work area of the bench. This sterile airflow maintains the sterility of sterile items inside the clean bench.
Chapter 4: Theory of Operation and Safety Precautions Speed Control ! The speed control should only be adjusted by a qualified certifier. ! Le contrôle de la vitesse doit être réglée uniquement par un certificateur qualifié. The speed control is an electronic circuit that allows the certifier to set the air face velocity (fpm) by adjusting its voltage. ) THE XT CLEAN BENCH USES A SELF-ADJUSTING ECM MOTOR TO MAINTAIN AIRFLOW ACROSS THE WORK AREA.
Chapter 4: Theory of Operation and Safety Precautions infectieuses, des toxins ou des radionucléides. L’opérateur et l’oficiel de sécurité competent doivent soigneusement évaluer le risque associé à tous les opérations effectuées dans un hotte à flux laminaire. The Purifier XT Clean Bench should be certified by a qualified certification technician before its initial use. The clean bench should be recertified whenever it is relocated, serviced, or at least annually thereafter.
Chapter 4: Theory of Operation and Safety Precautions d’air dams l’hotte. Gaz sous haute pression ne doit pas être utilisé dans l’hotte, car il peut interrompre le ciruit du courant d’air dans l’hotte. La surface du filtre HEPA est fragile et ne doit pas être touchée. Faites attention de ne pas percer le filtre HEPA lors de l’installtion ou le fonctionnement normal. Si vous pensez que le filtre HEPA a été endommagé.
CHAPTER 5 USING YOUR XT CLEAN BENCH Starting the Clean Bench Before starting the Clean Bench, plug the power cord in and make sure the Circuit Breaker is depressed. To turn on the Clean Bench, push the blower switch to the “ON” position, as shown in Figure 5-1.
Chapter 5: Using Your XT Clean Bench Use of the Clean Bench Planning • Thoroughly understand procedures and equipment before beginning work. • Arrange for minimal disruptions, such as room traffic or entry into the room, while the clean bench is in use. Start-Up • Turn on clean bench blower. • Check the prefilter for obstructions. • Wipe down the interior surfaces of the clean bench with stainless steel cleaner or 70% ethanol.
Chapter 5: Using Your XT Clean Bench Wipe-Down • Wipe down the interior surfaces of the clean bench with stainless steel cleaner or 70% ethanol and allow to dry. Shutdown • Turn off the clean bench blower.
CHAPTER 6 MAINTAINING YOUR XT CLEAN BENCH Now that you have an understanding of how to work in the XT Clean Bench, we will review the suggested maintenance schedule and the common service operations necessary to maintain your clean bench for peak performance. ! ! 28 Many of the service operations should be performed only by trained and experienced certification technicians. DO NOT attempt to perform these operations if you are not properly trained.
Chapter 6: Maintaining Your XT Clean Bench Routine Maintenance Schedule Under normal operation, your Purifier XT Clean Bench will require little routine maintenance. The following schedule is recommended: Weekly • Wipe down the interior surfaces of the clean bench with stainless steel cleaner or 70% ethanol and allow to dry. • Using a damp cloth, clean the exterior surfaces of the clean bench, particularly the front and top of the clean bench to remove any accumulated dust.
Chapter 6: Maintaining Your XT Clean Bench Service Operations Resetting the Circuit Breaker: 1. The circuit breaker is located next to the power cord on the lower right panel of the bench as shown in Figure 6-1. If the circuit breaker trips, it can be reset by pressing the white button in. Figure 6-1 Circuit Breaker Pre-Filter Retainer Changing the Prefilter: The prefilter should be replaced at least quarterly, or more often as conditions require.
Chapter 6: Maintaining Your XT Clean Bench Speed Control Adjustment: Adjusting the speed control will have an effect on the air velocities and the effectiveness of the clean bench. Only a qualified certification technician, as part of the recertification process, should adjust the speed control. ! Do NOT contact blower wheel while still in motion. NE PAS être en contact avec la roué du ventilateur tant qu’il est en marche. 1. Remove the right side prefilter only, as described on previous page. 2.
Chapter 6: Maintaining Your XT Clean Bench Diffuser Removal: 1. Locate and remove the diffuser screws, shown in Figure 6-3. Pull the diffuser straight out. Figure 6-3 HEPA Filter Replacement: The HEPA filters should only be serviced by a qualified certification technician. Following replacement of the HEPA filters, a qualified certification technician MUST recertify the clean bench. 1. Unplug the clean bench. 2. Remove the diffuser as described above. 3.
Chapter 6: Maintaining Your XT Clean Bench Figure 6-4 Filter Gasket (both sides and top of HEPAs) Filter Clamps (3 ea top, 3 ea bottom, & 1 ea sides) Filter Center Strap 5. Remove the filter by pulling it straight out of the clean bench. 6. Install the new filter(s) by placing the filter(s) back into the clean bench. Make sure that the HEPA filter(s) is centered side-to-side in the clean bench. 7.
Chapter 6: Maintaining Your XT Clean Bench Motor/Blower Replacement: ) ! A QUALIFIED CERTIFICATION TECHNICIAN SHOULD SERVICE THE MOTOR/BLOWER. FOLLOWING REPLACEMENT OF A MOTOR/BLOWER, A QUALIFIED CERTIFICATION TECHNICIAN MUST RECERTIFY THE CLEAN BENCH. Do NOT contact blower wheel while still in motion. NE PAS être en contact avec la roué du ventilateur tant qu’il est en marche. 1. Unplug the clean bench. 2. Remove the prefilters, as described earlier. 3.
Chapter 6: Maintaining Your XT Clean Bench Storage ) IF THE XT CLEAN BENCH IS TO BE LEFT UNUSED FOR MORE THAN ONE MONTH THE UNIT SHOULD BE PREPARED FOR STORAGE. 1. Unplug the clean bench. 2. Cover and seal the prefilters and the work area opening with plastic sheeting. ! The clean bench should not be stored in areas of excess humidity or temperature extremes. If the clean bench is moved during storage, it should be recertified before use.
CHAPTER 7 TROUBLESHOOTING Refer to the following table if your Purifier XT Clean Bench fails to operate properly. If the suggested corrective actions do not solve your problem, contact Labconco Product Service for additional assistance. PROBLEM CAUSE CORRECTIVE ACTION Blower and lights won’t turn on Unit not plugged into outlet Plug the clean bench into appropriate electrical service. Circuit breakers tripped Reset circuit breakers.
APPENDIX A XT CLEAN BENCH COMPONENTS Illustration A-1 indicates the location of the following service parts: Purifier XT Clean Bench Replacement Parts Item Quantity Part No.
Appendix A: Clean Bench Components A-1 1 4 3 2 38 Product Service 1-800-522-7658
APPENDIX B DIMENSIONS B-1 Width Depth Shipping Height Working Height Worksurface Height Interior Width Interior Depth Interior Height Product Service 1-800-522-7658 A B C D E F G Inches 38.6 41.6 85.1 91.6-94.6 29.2, 30.7, 32.2 37.5 28.6 60.
APPENDIX C XT CLEAN BENCH SPECIFICATIONS Electrical Data Bench Model 3200000 Electrical Requirements 115 VAC – 60 Hz, 1 Phase – 10 Amps Bench Model 3200001 to -04 Electrical Requirements 230 VAC – 50/60 Hz, 1 Phase – 6 Amps Motor Specifications Bench Model 3200000 to -04 40 Electrical Requirements 115 VAC / 230 VAC – 50/60 Hz, 6.0 Full Load Amps 3/4 H.P.
Appendix C: XT Clean Bench Specifications Environmental Conditions • • • • • • • Indoor use only. Maximum altitude: 6562 feet (2000 meters). Ambient temperature range: 41° to 104°F (5° to 40°C). Maximum relative humidity: 80% for temperatures up to 88°F (31°C), decreasing linearly to 50% relative humidity at 104°F (40°C). Main supply voltage fluctuations not to exceed ±10% of the nominal voltage. Transient overvoltages according to Installation Categories II (Overvoltage Categories per IEC 1010).
Appendix C: XT Clean Bench Specifications C-1 C-2 42 Product Service 1-800-522-7658
APPENDIX D XT CLEAN BENCH ACCESSORIES Ergonomic Chair with Armrests (# 3744000) Chair has 6-way articulating seat and back control for personalized adjustment. Pneumatic mechanism adjusts seat height from 18.25" to 25.75". Five-leg black reinforced composite base rests on 2" ball bearing casters. Aluminum support ring. Removable arm rests. Black vinyl upholstery. Shipping weight 35 lbs. (15.9 kg). Adjustable Footrest (# 3746000) Elevates feet and permits angle repositioning while in use. 18.5" w x 11.
APPENDIX E QUICK CHART FOR PURIFIER XT CLEAN BENCHES Width (feet) HEPA Filter Dims. (in.) Avg. Velocity Reading Grid (inches) Grid Distance from Diffuser (inches) Grid Distance from Sidewalls (inches) Average Velocity (FPM) Work Area (ft2) Exhaust Volume Range (CFM) Number of Laskin Nozzles needed Motor HP 44 3’ 60 x 18 x 3 6x6 6 6 65 ±10 15.
Product Service 1-800-522-7658 45