
Manual


Product Service 1-800-522-7658
8
C
C
h
h
a
a
p
p
t
t
e
e
r
r
3
3
:
:
G
G
e
e
t
t
t
t
i
i
n
n
g
g
S
S
t
t
a
a
r
r
t
t
e
e
d
d
Now that the site for your laboratory fume hood is properly prepared, you are
ready to unpack, inspect, install, and certify your unit. Read this chapter to learn
how to:
• Unpack and move your Protector Hood.
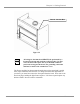
• Set up the fume hood with the supporting structure and work surface.
• Connect to an exhaust system.
• Connect the electrical supply source.
• Connect the service lines.
• Sealing the Protector Hood to the work surface.
• Arrange certification of your Protector Hood.
Depending upon which model you are installing, you may need common
plumbing and electrical installation tools in addition to 5/16", 3/8", 7/16", and
1/2" wrenches, ratchets, sockets, a nut driver set, a flat-blade screwdriver, a
Phillips screwdriver, and a carpenter level to complete the instructions in the
chapter.
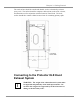
The Protector XLE Hood models weigh between 400 to 800 lbs.
(182-363 kg). The shipping skid allows for lifting with a
mechanical lift truck or floor jack. If you must lift the fume
hood manually, follow safe-lifting guidelines. Normally, the
fume hood can be slid off a hydraulic lift table and be placed
into position on top of the work surface. Do not lift by the
front air foil and trough assembly.
!